
User`s manual


1
2
drag the corner
drag the side square
to rotate
square to resize
405-00026-00iNspect Express User’s Manual
20 Rev 1600; 12 July 2010
Using the Angle Tool
The Angle tool measures the angle between two edges.
a. Click on the “Angle” button. Move the mouse over the image in the Work Area. You should
see sections of the edges in the image highlighted as you move across them. These are “edge
candidates” that you can use with Angle. Valid edges are straight lines only.
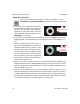
b. Find two edges that match your measurement. Click on the
first edge, then click on the second edge. iNspect draws in-
tersecting lines by using these two edges, and calculates the
angle between them. The curve drawn between the two
edges shows the angle measured.
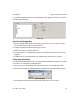
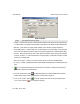
c. When the angle tool is selected, you can drag the end points
if they are not exactly where you wanted. To increase accura-
cy of the angle measurement, move the end points so they are
not close together. The small boxes that appear around the
end points define the search area for locating the edge at each
endpoint. You can drag the solid squares at the corners
, to re-
size the box and increase the search area; but searching more
area increases the processing time. The smaller pink dots
show the samples for finding the edge at run time. You can
drag the solid square on one side of the search box to rotate
the box, changing the direction for finding the edge. A small
arrow on the opposite side of the box shows the direction.
d. When you hover the cursor over the curve, it turns red, the measured angle is displayed on
the image, and a message appears telling you to “Right-click to edit.”
e. Right-click on the highlighted curve. The Angle Properties box opens. In this box you can:
rename the angle measurement, set the tolerances for recycle and reject, change the “accura-
cy” (number of sampling points to find the edges at the end points; the pink dots).