
User`s manual


1
scan direction
iNspect Express User’s Manual405-00026-00
33Rev 1600; 12 July 2010
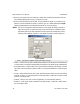
• Sensitivity – higher setting detects less sharp or less sudden transitions from dark to light.
f. Click on the padlock button
to lock the value for “Perfect” so it does not change as you
adjust or move your measurement.
g. Click the “Preprocess” button
to add image filtering, or feature enhancement. Adding
preprocessing may increase inspection time. Please refer to page 15.
h. Click on the “check” button
to accept changes and close the Point Properties box. Click
on the X button
to close without changes.
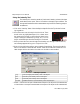
Using the Tip Tool
The Tip tool finds the extreme edge, or “tip” of an object or edge by locating the
sharpest angle in the search box area. Tip creates a point that can be used by other
measurements. The default is no measurement enabled. This tool may be useful
when edges are noisy or blurred.
a. Click on the “Tip” button. Move the mouse over the image in the Work Area. You should see
the edges in the image highlighted as you move across them.
b. Find the end or tip of an object or edge that you
wish to track, and Click on it. A point is created
and labeled (Tip1, Tip2) with a rectangle
search box around the point. The Point is
created at the sharpest angle near where you
clicked.
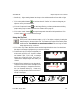
c. With the Tip tool selected, you can drag the sol-
id square in the corner of the rectangle to the
size of the rectangle, or change the scan direc-
tion (as illustrated below) by . Rotate only
slightly, to align the axis of the box with the in-
tercept of the edges.
axis
tip
search box
0
1
2
etc.
scan direction
0
1
2
0
1
2
Tip Orientation and Scan Direction