
User`s manual


resize
resize
iNspect Express User’s Manual405-00026-00
41Rev 1600; 12 July 2010
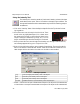
• Relative – clear the box to report actual numbers; check the box to report difference.
• Auto label position – puts the label (Avg1, Avg2) beside the Region in the display. Clear the
check box to move the label to another location (or with the Properties box closed, drag the
label).
• Locator – makes the tool follow the Locator, and follow the part. Select a locator (by number)
to follow, or select “X” to disconnect the tool from the locator, or make the tool stay in a fixed
position in the image area.
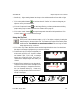
e. Click on the padlock button
to lock the value for “Perfect” so it does not change as you
adjust or move your measurement.
f. Click the “Preprocess” button
to add image filtering, or feature enhancement. Adding
preprocessing may increase inspection time. Please refer to page 15.
g. Click the “check” button
to accept changes and close the Intensity Properties box. Click
the X button
to close without changes.
Using the Count Tool
The Count tool looks for light objects on a dark background, or dark objects on a
light background. The background does not have to be uniform. This tool is sensi-
tive to changes in light conditions.
a. Click on the “Count” button. Select the Region shape. Refer to the Tip window for drawing
suggestions.
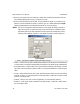
b. Move the mouse over the image in the Work Area. Click,
release, move the mouse and click again, to draw a Re-
gion shape over the area where you want to count objects.
iNspect draws (yellow) boxes around the blobs found.
The Region is labeled (N1, N2, etc.).
c. When the Count tool is selected, you can drag the solid
squares that appear at some corners, to resize the Region.
You can drag the outline of the Region to reposition it.
d. When you hover the cursor over the Count Tool, the Re-
gion outline turns red, and a message appears telling you
to “Right-click to edit.”