
User`s manual

405-00026-00iNspect Express User’s Manual
70 Rev 1600; 12 July 2010
• Auto label position – puts the label beside the tool in the display. Clear the check box to move
the label to another location (or with the Properties box closed, drag the label).
• Locator – makes the tool follow the Locator, and follow the part. Select a locator (by number)
to follow, or select “X” to disconnect the tool from the locator, or make the tool stay in a fixed
position in the image area.
• Sample gap – changes the spacing (in pixels) between the sample lines, and changes the num-
ber of samples.
• Edge type – “Dark-Light” means a transition from-dark-to-light. “Light-Dark” means a transi-
tion from-light-to-dark.
• Sensitivity – a higher setting finds more defects or ignores less.
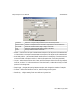
f. Click on the padlock button
to lock the value for “Perfect” so it does not change if you
move or resize the tool, or change parameters.
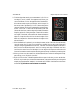
g. Click the “Preprocess” button
to add image filtering, or feature enhancement. Adding
preprocessing may increase inspection time. Please refer to page 15.
h. Click on the “check” button
to accept changes and close the Contour Properties box.
Click the X button
to close without changes.
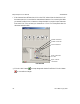
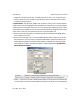
Using the Bead Tool
The Bead Tool measures the uniformity, consistency or repeatability of the distance
between the edges of a strip of material, such as an applied strip of adhesive or paste,
or an etched track. By default, two measurements are enabled.
This tool measures deviation or change in edge positions, and reports the number of “failed sec-
tions” that were greater than the maximum distance tolerance entered.
a. Click on the “Bead” button. Move the mouse over the image in the Work Area. You should
see the edges in the image highlighted as you move across them.
NOTE For this drawing example, pretend the left registration of the Data Matrix is a
bead of adhesive.