
User`s manual

21
3
iNspect Express User’s Manual405-00026-00
71Rev 1600; 12 July 2010
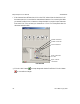
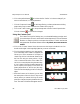
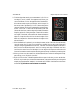
b. Find the edges that match your measurement. Left-click on
one edge (1), and a “rubber” line appears and follows your
cursor movement. Click on the opposite side of the bead (2).
Move the mouse along the second edge, and click again on
the second side of the bead (3). A line is drawn through the
center of the bead. This line is intersected by several perpen-
dicular “ruler lines”. These lines and the smaller pink dots
(where the ruler lines cross the edges of the bead) indicate the
sampling points for finding the edges. These lines locate the
two edges of the bead, and measure the distances between
edges. At inspection time the lines locate the edges of the
bead and compare the distances between the edges to the
trained distance.
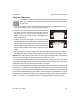
c. When the Bead tool is selected, you can drag the center points of the ruler lines (where they
cross the center line) if they are not where you wanted. Moving the center points also
changes the spacing between the ruler lines. The small solid box that appears at the end of
the first ruler line defines the search “area” for locating each edge of the bead; how far to
look from the center line to find the edge. You can drag the solid square to resize the ruler
lines and increase the search area; but searching more area may increase the processing time.
d. When you hover over the center line, the label (Bead1) turns red and a message should ap-
pear, telling you to “Right-click to edit.”
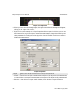
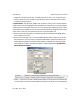
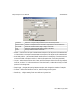
e. Right-click on the line. A Bead Properties edit box opens. In this box you can: set the toler-
ances for recycle and reject, rename the measurement, change the sensitivity and change the
sample gap (space between samples). Use the tabs and “Enable” check boxes to select mea-
surements. By default two measurements are enabled.