GigE Vision Dual Line Scan Camera 14-Jul-10 03-032-20027-02 www.dalsa.
Spyder3 GigE Vision User Manual 2 © 2010 DALSA. All information provided in this manual is believed to be accurate and reliable. No responsibility is assumed by DALSA for its use. DALSA reserves the right to make changes to this information without notice. Reproduction of this manual in whole or in part, by any means, is prohibited without prior permission having been obtained from DALSA.
Spyder3 GigE Vision User’s Manual 3 Contents Spyder3 GigE Vision Camera _______________________________________________ 5 1.1 Camera Highlights.......................................................................................................................................................5 1.2 Camera Performance Specifications ............................................................................................................................7 1.3 Image Sensor..................................
Spyder3 GigE Vision User Manual 5.7 Data Processing...........................................................................................................................................................44 Processing Chain Overview and Description...................................................................................................44 Returning Calibration Results and Errors.......................................................................................................
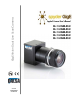
Spyder3 GigE Vision User’s Manual 5 1 Spyder3 GigE Vision Camera 1.
Spyder3 GigE Vision User Manual 6 Description and Applications The Spyder3 GEV is also DALSA’s first dual line scan camera. When operating in high sensitivity (dual line scan) mode, the Spyder3 GEV camera has 3x the responsivity of DALSA’s Spyder 2 line scan camera. The GigE Vision interface eliminates the need for a frame grabber, resulting in significant system cost savings.
Spyder3 GigE Vision User’s Manual 7 1.
Spyder3 GigE Vision User Manual 8 Feature / Specification 1k Data Rate 40 or 80 MHz, 40 or 80 MHz, model dependent model dependent Table 3: Camera Operating Specifications Specifications Unit Min Broadband responsivity 1k and 2k Dual line 1k and 2k Single line 4k Dual line 4k Single line Random noise rms 1k and 2k 4k Dynamic range 1k and 2k Dual line 1k and 2k Single line 4k Dual and Single FPN global Uncorrected Corrected PRNU ECD Uncorrected local Uncorrected global Corrected local Corrected global
Spyder3 GigE Vision User’s Manual Dual line Single line 4k Dual line 4k Single line Saturation output amplitude DC offset 9 4.6 9.2 7.0 14.0 4.5 9.3 8.1 16.1 3968±80 DN DN 96 4.6 9.2 160 336 Test conditions unless otherwise noted: • 12-bit values, Flat Field Correction (FFC) enabled.
Spyder3 GigE Vision User Manual 10 CCD Readout Shift Register Tap 1 N Pixels (14μm x 14μm) N Pixels (14μm x 14μm) CCD Readout Shift Register N=1024, 2048 Pixel 1, 1 Sensitivity Mode and Pixel Readout The camera has the option to operate in either high sensitivity or low sensitivity mode or in tall pixel mode. When in high sensitivity mode, the camera uses both line scan sensors and its responsivity increases accordingly. When in low sensitivity mode, the camera uses the bottom sensor.
Spyder3 GigE Vision User’s Manual 11 Pixel Detail 14/10μm 14/10μm CCD Readout Shift Register Sensor 2(14μm x 14μm OR 10μm x 10μm) Sensor 1 (14μm x 14μm OR 10μm x 10μm) CCD Readout Shift Register Figure 5: Tall Pixel Mode In tall pixel mode, the camera uses a 28µm x 14µm pixel (1k and 2k) or a 20µm x 10µm pixel (4k model) and captures an image two times taller than in high or low sensitivity modes, resulting in a taller image.
Spyder3 GigE Vision User Manual 12 1.4 Responsivity Figure 6: Spyder3 GigE Vision 1k and 2k Responsivity Spectral Responsivity.
Spyder3 GigE Vision User’s Manual 13 1.5 Supported Industry Standards Spyder GEV cameras are 100% compliant with the GigE Vision 1.0 specification. This specification defines the communication interface protocol used by GigE Vision devices. For more information on these requirements refer to the following site: http://www.machinevisiononline.org/public/articles/details.cfm?id=2761 Spyder GEV cameras implement a superset of the GenICamTM specification which defines device capabilities.
03-032-20027-02 Spyder3 GigE Vision User Manual DALSA
Spyder3 GigE Vision User’s Manual 15 2 Mechanicals and Optics 2.1 Mechanical Interface Figure 8: Spyder3 1k and 2k GigE Vision Camera Mechanical Dimensions 30.000 ±0.050 CCD IMAGING CENTRE M42X1 THREAD DEPTH 4.0 60 50 36.000 ±0.050 CCD IMAGING CENTRE 72.0 57.0 7.5 42.0 9.0 60.0 6.56 ±0.25 TO CCD IMAGING SURFACE UNITS: mm 30.0 11.5 M3X0.5 THREAD DEPTH 5.0 (4X) 16.3 10.8 20.0 11.9 14.0 32.0 6.0 23.
Spyder3 GigE Vision User Manual 16 Figure 9: Spyder3 4k GigE Vision Camera Mechanical Dimensions 60 58 32.500 ± 0.050 CCD IMAGING CENTRE ø 62.0 - 4.5 DEEP (50) 6.0 (2X) M3X0.5 THREAD DEPTH 5.0 (4X) 42.500 ± 0.050 CCD IMAGING CENTRE 85.0 70.0 78.0 (2X) 7.5 M3X0.5 THREAD DEPTH 7.0 (4X) 3.5 6.56 ± 0.25 TO CCD IMAGING SURFACE 58.0 (2X) 3.5 65.0 42.5 UNITS: mm 30.1 11.6 M3X0.5 THREAD DEPTH 5.0 (4X) 16.5 10.9 16.5 6.0 (2X) 32.0 12.0 20.0 23.
Spyder3 GigE Vision User’s Manual 17 2.2 Mounting DALSA DALSA recommends that you allow the heat generated by the camera to move away from the camera. One way to do this is by mounting the camera correctly, as shown: 2.3 Optical Interface Illumination The amount and wavelengths of light required to capture useful images depend on the particular application.
Spyder3 GigE Vision User Manual 18 • LED light sources are relatively inexpensive, provide a uniform field, and longer life span compared to other light sources. However, they also require a camera with excellent sensitivity, such as the Spyder3 GEV camera. • Halogen light sources generally provide very little blue relative to infrared light (IR). • Fiber-optic light distribution systems generally transmit very little blue relative to IR.
Spyder3 GigE Vision User’s Manual 19 3 Setting Up the Camera 3.1 Installation Overview 1. Install Ethernet card Following the manufactuerer's instruction, install an Ethernet card. For gigabit performance, you must install an intel PRO/1000 Ethernet card. Note: Do not install the manufactuerer's driver. You will install the appropriate QuickCam driver in a later step. 2.
Spyder3 GigE Vision User Manual 20 4. Connect GPIO cable If using an external sync, external direction control, or any other external signals, connect the GPIO cable to the back of the camera. 5. Connect Ethernet cable Connect a Cat 5 or Cat 6 cable from the camera to the computer ethernet jack. 6. Connect power cable Connect a power cable from the camera to a +12V to +15V power supply. 7. Open QuickCam On the Windows task bar, click Start > Programs > DALSA QuickCam GEV > DALSA QuickCam GEV. 8.
Spyder3 GigE Vision User’s Manual 21 3.2 Equipment Recommendations PC Requirements To achieve best performance, the following minimum requirements are recommended: • Processor: AMD Athlon XP 2000+ or Intel P4 2.0GHz • Memory: 512MB DDR-RAM PC2700 • Motherboard: Mid-end without embedded graphic card. Avoid using onboard video cards as they may compete with other components for shared memory. • VGA card: Nvidia GForce 2 or better (ATI not recommended).
Spyder3 GigE Vision User Manual 22 eBus Optimal Driver The eBus Optimal Driver is our recommended driver for applications demanding high bandwidth. The driver is a purpose-built replacement for the regular driver that comes with Intel PRO/1000 card or 825xx chip. Designed to maximize throughput and minimize CPU usage, this driver is ideal for high-bandwidth applications that need virtually all the CPU for other application tasks. (It also supports corporate network connectivity.
Spyder3 GigE Vision User’s Manual 23 Standard Driver Mode In standard mode, the Spyder3 GEV operates with any vendor’s Ethernet network adapter. The driver shipped with the adapter transfers the data to the Windows network stack, which handles IP communications tasks. Efficiency ★☆☆☆☆ Usage Low-bandwidth application or temporary Standard mode is recommended for applications where flexibility is more important than performance.
Spyder3 GigE Vision User Manual 24 3.4 Camera Connectors This camera uses the following connectors: • An RJ-45 connector for Gigabit Ethernet signals, data signals, and serial communications. Refer to section Ethernet Connector for details. • One 6-pin Hirose connector for power. Refer to section Power Connector for details. • One 15-pin general purpose input/output (GPIO) connector. Refer to section GPIO Connector for details.
Spyder3 GigE Vision User’s Manual 25 Steady yellow indicates that the camera is ready for data transmission. Flashing yellow indicates that the camera is transmitting or receiving data. EMC Compliance In order to achieve EMC compliance, the Spyder3 camera requires the use of shielded CAT5e or CAT6 Ethernet cables.
Spyder3 GigE Vision User Manual 26 GPIO Connector The GPIO connector is used to receive or control external signals. For example, the GPIO connector can be used to receive EXSYNC, PRIN (pixel reset), and direction signals.
Spyder3 GigE Vision User’s Manual 27 TTL Inputs and Outputs Figure 13: TTL Input Schematic 3.3V 3.3V 1000Ω TTL • Termination: 1000 Ω series • Input current: minimum 0 nA; maximum 2 mA • Input voltage: maximum of low 0.66 V; minimum of high 2.6 V • TTL inputs are maximum 5V and 3.3V logic tolerant Figure 14: TTL Output Schematic 100Ω 5V ESD Protection Termination: 100 Ω series Output current: sink 50 mA; source 50 mA Output voltage: maximum of low 0.55 V @ 32mA; minimum of high 3.8 V @ 32mA.
Spyder3 GigE Vision User Manual 28 GPIO Isolation All of the GPIOs are isolated from the rest of the camera and the camera case. They are not isolated with respect to each other and share a common return (ground) through pin 5 of the GPIO connector. Note: The shell connection of the GPIO connector is not isolated and it should not be used as a return (ground) for the GPIO signals. The shell connection is attached to the camera case.
Spyder3 GigE Vision User’s Manual 29 4 EMC Declaration Dalsa's SG-11 cameras meet the requirements outlined below which satisfy the EMC requirements for CE marking, the FCC Part 15 Class A requirements, and the Industry Canada requirements. Model SG-11-04K80 The CE Mark Evaluation of the Dalsa SG-11 Camera, which is manufactured by Dalsa Inc.
03-032-20027-02 Spyder3 GigE Vision User Manual DALSA
Spyder3 GigE Vision User’s Manual 31 5 Controlling the Camera To control the camera, you have a choice of using the following: • GenICam Interface. (See below). • The DALSA QuickCam graphical user interface (GUI). QuickCam provides a quick and easy way to start imaging with the camera. All camera functionality can be controlled with the QuickCam application. QuickCam is available on the Spyder3 GigE Vision Color CD. Online Help is available through the QuickCam GUI.
Spyder3 GigE Vision User Manual 32 BinningHorizontal sbh BlackLevelRaw [BlackLevelSelector] BlackLevelSelector CalculateAnalogCameraGain [CameraGainAlgorithmSelector] CalculateDigitalCameraGain sao CalculateDigitalCameraGainTarget CalculatePRNUAlgorithmTargetVa lue ccg cpa CalculatePRNUCoefficients Min 300 Hz, Max 18500 Hz set binning horizontal Min 1, Max 2 set analog offset ti 0-1:0-255 Black level tap selector Calibrates the analog gain 1 and 2k models only Calibrates the digital gain so that t
Spyder3 GigE Vision User’s Manual 33 [GPIOSelector] GPIOSelector Height LedStatus gls LoadPixelCoefficients lpc LowerThresholdLimitRaw slt PixelFormat sdm PixelSetSelector ReadoutMode srm ResetPixelCoefficients RestoreFactorySettings rpc rfs RestoreUserSettings rus SensitivityMode SensorDigitizationTaps ssm SensorShiftDirection scd SensorWidth SubtractBackgroundRaw [SubtractBackgroundSelector] ssb SubtractBackgroundSelector TestImageSelector svm UpdateGainReference ugr UpperThresh
Spyder3 GigE Vision User Manual 34 5.3 First Power Up Camera Settings When the camera is powered up for the first time, it operates using the following factory settings: • High sensitivity mode. • Forward CCD shift direction. • No binning. • Exposure mode 7 (Programmable line rate & max exposure time). • 5000 Hz line rate. • Factory calibrated analog gain and offset. • Analog gain enabled (1k and 2k use).
Spyder3 GigE Vision User’s Manual 35 Sensor Shift Direction When in high sensitivity mode, you can select either forward or reverse CCD shift direction. Selectable direction accommodates object direction change on a web and allows you to mount the camera “upside down”.
Spyder3 GigE Vision User Manual 36 5.5 Timing: Exposure and Synchronization Image exposures are initiated by an event. The trigger event is either the camera's programmable internal clock used in free running mode, an external input used for synchronizing exposures to external triggers, or a programmed function call message by the controlling computer. These triggering modes are described below.
Spyder3 GigE Vision User’s Manual 37 27.78 1000 2K 2 Tap 54.
Spyder3 GigE Vision User Manual 38 Exposure Mode, Readout Mode, Line Rate and Exposure Time Overview You have a choice of operating in one of seven modes. The camera’s line rate (synchronization) can be generated internally through the software command AcquisitionLineRateAbs or set externally with an EXSYNC signal, depending on your mode of operation. To select how you want the camera’s line rate to be generated: 1. You must first set the camera mode using the DALSAExposureMode command. 2.
Spyder3 GigE Vision User’s Manual 39 Exposure Modes in Detail Mode 2: Internally Programmable Line Rate and Exposure Time (Factory Setting) Mode 2 operates at a maximum line rate and exposure time. • When setting the line rate (using the AcquisitionLineRateAbs command), exposure time will be reduced, if necessary, to accommodate the new line rate.
Spyder3 GigE Vision User Manual 40 Mode 4: Smart EXSYNC, External Line Rate and Exposure Time In this mode, EXSYNC sets both the line period and the exposure time. The rising edge of EXSYNC marks the beginning of the exposure and the falling edge initiates readout. Example 3: Trigger Period is Repetitive and Greater than Read Out Time.
Spyder3 GigE Vision User’s Manual 41 Mode 7: Internally Programmable Line Rate, Maximum Exposure Time In this mode, the line rate is set internally with a maximum exposure time.
Spyder3 GigE Vision User Manual 42 Setting the Readout Mode Refer to the Clearing Dark Current section, page 62, for more information on this feature. Use this command to clear out dark current charge collected in the vertical transfer gates immediately before the sensor is read out. ReadoutMode Auto. Clears dark current below ~ 45% of the maximum line rate. DarkCurrent. Dark current clear. Always clears dark. Reduces the maximum line rate. ImmediateReadout. Immediate readout. Does not clear dark current.
Spyder3 GigE Vision User’s Manual 43 5.6 Configuring the GPIO Connector The following commands provide a connection between the GPIO controller and the camera’s internal functions. Setting the GPIO Output Signal Sets the signal type for the selected output. GPIOSelector Output to set. Port0 = Output 0, pin 11 (TTL) or 11 and 12 (LVDS) Port1 = Output 1, pin 13 (TTL) or 13 and 14 (LVDS) Port2 = Output 2, pin 15 (TTL) or 15 and 10 (LVDS) Port3 = Output 3, pin 9 (TTL) GPIOOutput Signal type.
Spyder3 GigE Vision User Manual 44 5.7 Data Processing Processing Chain Overview and Description The following diagram shows a simplified block diagram of the camera’s analog and digital processing chain. The analog processing chain begins with an analog gain adjustment, followed by an analog offset adjustment. These adjustments are applied to the video analog signal prior to its digitization by an A/D converter.
Spyder3 GigE Vision User’s Manual 45 at only 50% of the DN. An analog gain of 6 dB (2x) will ensure full use of the dynamic range of the A/D converter. Of course the noise is also increased. Note: To maintain valid LUT calibration, do not use the GainAbs command with the 4k model. Instead, use the DigitalGainRaw command. 2. The analog offset (BlackLevelRaw command) or black level is an “artificial” offset introduced into the video path to ensure that the A/D is functioning properly.
Spyder3 GigE Vision User Manual 46 Sets the camera’s analog gain value. Analog gain is multiplied by the analog signal to increase the signal strength before the A/D conversion. It is used to take advantage of the full dynamic range of the A/D converter. GainSelector Tap selection: All or Tap1 to Tap2 for individual tap selection. GainAbs Gain value in a range from –10 to +10dB. • Not available on the 4k model.
Spyder3 GigE Vision User’s Manual 47 Setting Analog Offset Sets the analog offset. The analog offset should be set so that it is at least 3 times the rms noise value at the current gain. DALSA configures the analog offset for the noise at the maximum specified gain and as a result you should not need to adjust the analog offset. BlackLevelSelector Tap selection: All, Tap1, or Tap2 for individual tap selection if you are using the two tap model.
Spyder3 GigE Vision User Manual 48 The white light calibration is performed next to determine the multiplication factors required to bring each pixel to the required value (target) for flat, white output. Video output is set slightly above the brightest pixel (depending on offset subtracted). Flat Field Correction Restrictions It is important to do the FPN correction first. Results of the FPN correction are used in the PRNU procedure.
Spyder3 GigE Vision User’s Manual 49 Set up the camera operating environment (i.e. line rate, exposure, offset, gain, etc.) Set the calibration sample size using the command css. It is recommended that you use the default setting. Set the region of interest to include all of the image’s pixels of importance using the command roi x1 y1 x2 y2. You can use the default if you want to calibrate all pixels. Perform FPN calculation Perform PRNU calculation 1. Stop all light from entering the camera.
Spyder3 GigE Vision User Manual 50 Digital Signal Processing To optimize camera performance, digital signal processing should be completed after any analog adjustments. FPN Correction Performing FPN Correction Performs FPN correction and eliminates FPN noise by subtracting away individual pixel dark current. CorrectionCalibrateFPN • Perform all analog and digital adjustments before performing FPN correction. • Perform FPN correction before PRNU correction.
Spyder3 GigE Vision User’s Manual 51 Performing PRNU to a user entered value Performs PRNU calibration to user entered value and eliminates the difference in responsivity between the most and least sensitive pixel creating a uniform response to light. Using this command, you must provide a calibration target. Executing these algorithms causes the SubtractBackgroundRaw command to be set to 0 (no background subtraction) and the DigitalGainRaw command to 4096 (unity digital gain).
Spyder3 GigE Vision User Manual 52 incorrect PRNU coefficients. This algorithm is more robust and repeatable than algorithm 1 because it uses an average pixel value rather than a number above target. However, this algorithm is slower. i Peak target value in a range from 1024 to 4055DN. The target value must be greater than the current peak output value. Notes: • Perform all analog adjustments before calibrating PRNU.
Spyder3 GigE Vision User’s Manual 53 correction wizard. For easy flat field correction, use the wizard located on the Calibration tab. Related Commands: CorrectionCalibrateFPN, CalculatePRNUAlgorithmTargetValue CalculatePRNUAlgorithmTargetValue • Perform all analog adjustments before calibrating PRNU. • This command performs the same function as the CorrectionCalibratePRNU command but forces you to enter a target value. • Calibrate FPN before calibrating PRNU.
Spyder3 GigE Vision User Manual 54 Setting Digital System Gain Improves signal output swing after a background subtract. When subtracting a digital value from the digital video signal, using the SubtractBackgroundRaw command, the output can no longer reach its maximum. Use this command to correct for this where: max output value max output value ‐ ssb value ssg value = GainSelector Tap selection. All, Tap1 to Tap2. DigitalGainRaw Gain setting. The gain ranges are 0 to 65535.
Spyder3 GigE Vision User’s Manual 55 Location Value Description 3 A’s 4 4 bit counter LSB justified 5 Line sum (7…0) 6 Line sum (15…8) 7 Line sum (23…16) 8 Line sum (31…24) 9 Pixels above threshold (7…0) 10 Pixels above threshold (15…8) 11 Pixels below threshold (7…0) 12 Pixels below threshold (15…8) 13 Differential line sum (7..0) 14 Differential line sum (15…8) 15 Differential line sum (23…16) 16 Differential line sum (31…24) Counter increments by 1.
Spyder3 GigE Vision User Manual 56 Look-Up Tables Note: This information only applies to the 4k model camera. The flat field corrections FPN and PRNU assume a linear response to the amount of light by the sensor, output node, analog amplifier, and analog to digital converter. To correct any non-linearity in this system of components a Look-Up Table (LUT) has been implemented in the FPGA for each tap immediately after the ADC.
Spyder3 GigE Vision User’s Manual • 57 To restore the last saved pixel coefficients, use the command LoadPixelCoefficients. Current Session Settings These are the current operating settings of your camera. To save these settings to nonvolatile memory, use the command WriteUserSetting. Saving and Restoring PRNU and FPN Coefficients Saving the Current PRNU Coefficients Saves the current PRNU coefficients.
Spyder3 GigE Vision User Manual 58 DeviceReset 5.9 Diagnostics Generating a Test Pattern Generates a test pattern to aid in system debugging. The test patterns are useful for verifying camera timing and connections. The following tables show each available test pattern. TestImageSelector {Ramp12bits, Step8bits, iPORTTestPattern} Video. 0 1 12 bit ramp test pattern. 2 tap model 1 tap model 2 8 bit step test pattern.
Spyder3 GigE Vision User’s Manual 59 Ethernet Test Pattern A third test pattern—Ethernet—is accessible using the QuickCam GUI. Purpose: Availability: Generates a test pattern to aid in system debugging. The test patterns are useful for verifying camera timing and connections. The following table shows the ethernet test pattern available through the QuickCam GUI. Under the Diagnostics tab in the Test Patter drop-down list. Ethernet.
Spyder3 GigE Vision User Manual 60 Returning the LED Status Returns the status of the camera’s LED. LEDStatus The camera returns one of the following values: Red (loss of functionality) Green (camera is operating correctly) Flashing green (camera is performing a function) Flashing red (fatal error) 5.10 Error Handling The following table lists warning and error messages and provides a description and possible cause.
Spyder3 GigE Vision User’s Manual 61 Message Description Message Description Error 02: Unrecognized command> Command is not available in the current access level or it is not a valid command. Error 03: Incorrect number of parameters> DALSA Error 04: Incorrect parameter value> This response returned for · Alpha received for numeric or vice versa · Not an element of the set of possible values. E.g.
Spyder3 GigE Vision User Manual 62 5.11 Clearing Dark Current Gate Dark Current Clear Image sensors accumulate dark current while they wait for a trigger signal. If the readout is not triggered in a reasonable amount of time, then this dark current accumulation may increase to an excessive amount. The result of this happening will be that the first row, and possibly additional rows (frames), of the image will be corrupt.
Spyder3 GigE Vision User’s Manual SG-11-02K80 63 13.6KHz 16.4KHz Immediate read out mode (default, ReadoutMode 2) In this mode the image is read out, including accumulated dark current, immediately following the trigger or the EXSYNC falling edge. There are no line rate limitations other than the amount of gate dark current that can be tolerated at low line rates. There are no timing or exposure anomalies other than situations where EXSYNC is removed from camera.
Spyder3 GigE Vision User Manual 64 Auto Mode (Auto) In this mode the line rate from the camera will automatically cause a switch between the gate dark current clear mode and non gate dark current clear mode. The frequency of when this mode switchover occurs depends on the camera model.
Spyder3 GigE Vision User’s Manual 65 Dark Current Clear Dark Current Clear to Immediate Readout Transition Frequency Mode Immediate Readout 0Hz Immediate Readout to Dark Current Clear Transition Frequency Watchdog Frequency Max. Line Rate in Dark Current Clear Mode Increasing Line Rate Frequency Max. Line Rate in Immediate Readout Mode ReadoutMode 0, Auto Mode.
Spyder3 GigE Vision User Manual 66 ReadoutMode 2, Immediate Readout Mode. Operating Region Time Period Refer to Figure 23.
Spyder3 GigE Vision User’s Manual 67 Dark Current Dump to Immediate Readout (TINT > #) F DUMP F IMMEDIATE EXSYNC T DUMP T INT T VERT_TRANS LVAL Valid Dark Current Dump to Immediate Readout: Multi-Line Artifacts ReadoutMode 0, Auto Mode. Operating Region Time Period Refer to Figure 23. T0 Dark Current Dump state T1 Immediate Readout state ReadoutMode 0, Auto Mode. Operating Region Time Period Refer to Figure 23.
Spyder3 GigE Vision User Manual 68 Dark Current Dump to Immediate Readout (TINT < #) F DUMP F > DUMP (MAX) EXSYNC T DUMP T INT T VERT_TRANS LVAL Dark Current Dump to Immediate Readout (TINT > #) F DUMP F > DUMP (MAX) EXSYNC T DUMP T INT T VERT_TRANS LVAL 03-032-20027-02 DALSA
Spyder3 GigE Vision User’s Manual 69 Immediate Readout to Dark Current Dump: Hysteresis Artifacts ReadoutMode 0, Auto Mode. Operating Region Time Period Refer to Figure 23. Operating Mode T0 Immediate Readout state T1 Dark Current Dump state ReadoutMode 0, Auto Mode. Operating Region Time Period Refer to Figure 23.
Spyder3 GigE Vision User Manual 70 Setting the Readout Mode Use this command to clear out dark current charge in the vertical transfer gates immediately before the sensor is read out. ReadoutMode Auto (0x0) DarkCurrentClear (0x1) ImmediateReadout (0x2) Auto. Clears dark current below ~ 45% of the maximum line rate. DarkCurrentClear. Always clears dark. Reduces the maximum line rate. ImmediateReadout. Does not clear dark current. (Default mode.
Spyder3 GigE Vision User’s Manual 71 Appendix B ASCII Commands All the functionality available through the QuickCam GUI is also available through the serial interface using the camera-specific three letter commands. There are three ways to enter ASCII commands: (1) through the QuickCam Command tab, (2) through the Configuration window, or (3) through the virtual serial port. Entering commands through the QuickCam Command window is the simplest method. Command Window Method: 1. Open QuickCam.
Spyder3 GigE Vision User Manual 72 Figure 24: Command Tab after Sending the sem (Set Exposure Mode) Command Configuration Window Method: 1. Open QuickCam. In the Camera Configuration Window: 2. Open the Exposure/GPIO tab. 3. Click Advanced… 4. Open the Port Communication tab. The Port Communication tab provides an ASCII interface. In order to comply with DALSA camera command protocol, you must send and receive as ASCII and ensure that the CR checkbox is checked (default).
Spyder3 GigE Vision User’s Manual 73 Virtual Serial Port Method 1. Open QuickCam. 2. Select Configure → Serial Port Link to enable or disable the virtual serial port. Some camera control tools can connect only to a Windows system serial port. To avoid asking for changes from camera manufacturers, two serial COM ports in the PC can be linked together to share the serial channel to the IP engine. Using this link, data written to one port can be read by the other port, and vice-versa.
Spyder3 GigE Vision User Manual 74 gcp Camera ASCII Command Help For quick help, the camera can return all available commands and parameters through the serial interface. There are two different help screens available. One lists all of the commands available to configure camera operation. The other help screen lists all of the commands available for retrieving camera parameters (these are called “get” commands).
Spyder3 GigE Vision User’s Manual 75 Mnemonic Syntax Parameters Description calculate camera gain ccg i t i Calculates the camera gain according to the selected algorithm. i = Calibration algorithm to use. 1 = This algorithm adjusts analog gain so that 8% to 13% of tap ROI pixels are above the specified target value. 2 = This algorithm adjusts analog gain so that the average pixel value in tap’s ROI is equal to the specified target value.
Spyder3 GigE Vision User Manual 76 Mnemonic Syntax Parameters Description calculate PRNU algorithm cpa i i Performs PRNU calibration according to the selected algorithm. The first parameter is the algorithm where i is: 1 = This algorithm first adjusts each tap’s analog gain so that 8-13% of pixels within a tap are above the value specified in the target value parameter. PRNU calibration then occurs using the peak pixel in the region of interest. (Identical to ccp).
Spyder3 GigE Vision User’s Manual DALSA 77 Mnemonic Syntax Parameters Description enable input LUT eil i Enable input LUT, where: 0: Off 1: On (4k model only.) end of line sequence els i Sets the end-of-line sequence: 0: Off 1: On enable pixel coefficients epc i i Sets whether pixel coefficients are enabled or disabled.
Spyder3 GigE Vision User Manual 78 03-032-20027-02 Mnemonic Syntax Parameters Description get signal frequency gsf i Reads the requested Camera Link control frequency. 1 = EXSYNC frequency 2 = Spare 3 = Direction 4 = Spare get status led gsl Returns the current state of the camera’s LED where: 1 = Red 2 = Green 5 = Blinking green 6 = Blinking red help h Display the online help.
Spyder3 GigE Vision User’s Manual DALSA 79 Mnemonic Syntax Parameters Description set analog offset sao t i Sets the analog offset. t = tap selection, either 1 or 2 depending on camera model, or 0 for all taps. i= Offset value in a range from 0 to 255 (12-bit LSB). Offset increases with higher values. set binning horizontal sbh m Sets the horizontal binning value. Available values are 1 and 2. set baud rate sbr i Set the speed of camera serial communication port.
Spyder3 GigE Vision User Manual 80 03-032-20027-02 Mnemonic Syntax Parameters Description set exposure time set f Sets the exposure time. Refer to the camera help screen (h command) for allowable range. set fpn coeff sfc x i Set the FPN coefficient. x =pixel number within the range 1 to sensor pixel count. i= FPN value within the range 0 to 2047 (12-bit LSB). set GPIO input sgi i1 i2 Sets the GPIO input signal.
Spyder3 GigE Vision User’s Manual DALSA 81 Mnemonic Syntax Parameters Description set sync frequency ssf i Set the frame rate to a value from 300Hz to 36000Hz (2k model) or 300Hz to 68000Hz (1k model). Value rounded up/down as required. set system gain ssg t i Set the digital gain. t = tap selection, either 1 to 2, or 0 for all taps i = Digital gain in a range from 0 to 65535. (4k limit is 12953.) The digital video values are multiplied by this number.
03-032-20027-02 Spyder3 GigE Vision User Manual DALSA
Spyder3 GigE Vision User’s Manual 83 Appendix D Troubleshooting The information in this chapter can help you solve problems that may occur during the setup of your camera. Remember that the camera is part of the entire acquisition system.
Spyder3 GigE Vision User Manual 84 If you change to an exposure mode that requires an external sync, then ensure that you properly providing an external sync Camera Operation and Test Patterns To validate camera and Ethernet connections, have the camera send out a test pattern and verify that it is being properly received. To send a test pattern: Under Test Pattern on the Diagnostics tab in QuickCam: 1. Select a test pattern from the Camera dropdown box to confirm camera functionality.
Spyder3 GigE Vision User’s Manual 4. 85 Click Save. To view the error report: 1. Select View → Error Report. In the Open dialog box: 2. In the Look in list, click the drive or folder that contains the error report you want to open. 3. In the folder list, locate and open the folder that contains the error report. 4. Click the error report, and then click Open.
Spyder3 GigE Vision User Manual end. The goal is to prevent solvent from evaporating from the window surface, as this will end up leaving residue and streaking behind. 8. Repeat steps 2-4 using a clean tissue until the entire window has been cleaned. 9. Blow off any adhering fibers or particles using dry, filtered compressed air.
Spyder3 GigE Vision User’s Manual 87 Product Support If there is a problem with your camera, collect the following data about your application and situation and call your DALSA representative. Note: You may also want to photocopy this page to fax to DALSA. Customer name Organization name Customer phone number fax number email Complete Product Model Number (e.g. SG-11-01k40-00-R) Complete Serial Number Your DALSA Agent or Dealer Acquisition System hardware (frame grabber, host computer, light sources, etc.
03-032-20027-02 Spyder3 GigE Vision User Manual DALSA
Spyder3 GigE Vision User’s Manual 89 Appendix E Revision History DALSA Revision Number Change Description 00 Preliminary release. 01 4k version of camera, content, added. 02 Preliminary stamp removed.
03-032-20027-02 Spyder3 GigE Vision User Manual DALSA
Spyder3 GigE Vision User’s Manual 91 Index A analog gain, 45, 46, 47 processing, 44 ASCII commands, 71 complete list, 74 B background subtract, 53 bright lines, 85 C calibrating the camera, 47, 50, 52, 53 camera dimensions, 15 messages, 60 coefficients diabling, 54 enabling, 54 loading, 54 resetting, 54 commands ASCII, 71 format, 73 GenICam, 31 list, 74 parameters, 73 connectors, 24 ethernet, 24 GPIO, 26 Hirose, 25 power, 25 D dark calibration.
Spyder3 GigE Vision User Manual 92 commands, 31 description of, 13 interface, 31 website, 13 GigE Vision description of, 13 website, 13 GPIO connector, 26 programming, 28 GPIO isolation, 28 H halogen light sources, 18 heat moving away from camera, 17 help, 74 High Performance Driver, 22 Hirose connector, 25 hot mirror, 18 I illumination, 17 incorrect line rate, 85 input/output, 24 interface electrical, 7 mechanical, 7 optical, 7, 17 L LED, 28 LED status, 28 returning, 60 light calibration.
Spyder3 GigE Vision User’s Manual DALSA 93 sensor, 9 serial interface defaults, 73 settings factory, 34 restoring, 56 saving, 56 shielded cables compliance, 18 shift direction, 35 standard mode, 23 standards supported, 13 status LED, 28 subtracting background, 53 test patterns, 58 threshold lower, 55 setting, 55 upper, 55 timing mode 7, 41 Timing, 36 TTL outputs, 27, 43 T W Technical Sales Support, 87 temperature measurement, 59 warning messages, 60 V voltage measurement, 59 03-032-20027-02