
Installation Sheet

the top (see incorrect/correct image for reference). Make sure the tapping
block lip sits on the edge of the tile and not the click profile to prevent
damage to the profile. Repeat this method for the remaining tiles in the
second row.
TIP: To assist short-side alignment, bridge the two pieces with a full piece
on the long-side of the following row. Remove the full piece when locked.
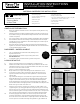
17. Continue to finish the room. For installing the last row of tile close to the
wall, use the angle pullbar tool by anchoring in on the outer edge of tile
and tapping on the inside with the rubber mallet.
18. (OPTIONAL) Another option is to start a row and work in the next several
rows (3-4) simultaneously before finishing that row. The advantage is
that it reduces the back and forth movement across the floor.
RAPIDGROUT
™
19. Walk over the tile and make sure all pieces are clicked well together.
Check for gaps and uniformity of gap joints. Thoroughly mix grout with
margin trowel and follow packaging instruction before use. Do not
add water.
20. Use the recommended flexible, pre-mixed grout or epoxy grout only; do
not use regular cementitious grout.
21. Lightly dampen the tile surface to be grouted. Scoop sucient amount
of grout with a margin trowel and place on tile. Holding the grout float
at 45 degree angle, spread the grout and press into the joints firmly to fill
them completely. Work in a small area at a time, no more than 3 foot x 3
foot section.
22. Sweep the float diagonally across to remove excess grout.
23. Wipe across with a wet sponge. Make sure the grout is
hardening taking care not to dig out grout from the joints.
Change water as required.
24. Clean any grout haze across the tile by wiping with a wet
cloth, followed by a dry cloth.
25. For areas prone to water exposure, caulk along perimeter,
baseboards and/or walls as needed. Let the grout cure for
the recommended amount
of time.
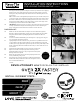
GROUT
CLICK
PREP
PLACE UNDERLAYMENT
NO MORTAR REQUIRED
GROUT IMMEDIATELY,
NO WAIT TIME
CLICK TILES TOGETHER
INSTALL IN 3 EASY STEPS...
REVOLUTIONARY NEW PORCELAIN TILE INSTALLS
*When compared to installing 300 sq ft., 6 x 24 porcelain tile with a three-man crew using typical trade installation practices and tools, and a 3-hour rapid dry mortar cure.
INSTALLATION INSTRUCTIONS
FOR LOCKING PORCELAIN TILE continued
Use of
RAPIDGROUT
™
is required for
full warranty
protection.