OWNER’S USE AND CARE GUIDE GUIDE D’UTILISATION ET D'ENTRETIEN AIR CONDITONER CLIMATISEUR MODEL • MODÈLE DAC050BACWDB / DAC050BAUWDB DANBY PRODUCTS LIMITED, ONTARIO, CANADA N1H 6Z9 DANBY PRODUCTS INC., FINDLAY, OHIO, USA 45840 2016.11.
CONTENTS TABLE DES MATIÈRES ÍNDICE AIR CONDITIONER Owner’s Use and Care Guide ................................ 1-10 • Welcome • Important Safety Information • Features • Installation Instructions • Operation Instructions • Care and Maintenance • Troubleshooting • Warranty CLIMATISEUR Guide d’utilisation et d’entretien du propriétaire....
WELCOME Welcome to the Danby family. We are proud of our quality products, and we believe in dependable service, like you will find in this Owner’s Use and Care Guide, and like you will receive from our friendly customer service department. Best of all, you will experience these values each and every time you use your Danby appliance. That is important, because your new appliance will be a part of your family for a long time.
IMPORTANT SAFETY INFORMATION READ AND FOLLOW ALL SAFETY INSTRUCTIONS FOR YOUR SAFETY: Read these instructions carefully before operating the unit. ELECTRICAL REQUIREMENTS 1. All wiring must comply with local and national electrical codes and must be installed by a qualified electrician. If you have any questions regarding the following instructions, contact a qualified electrician. 2. Check available power supply and resolve any wiring problems BEFORE installing and operating this unit. 3.
IMPORTANT SAFETY INFORMATION READ AND FOLLOW ALL SAFETY INSTRUCTIONS FOR YOUR SAFETY: Read these instructions carefully before operating the unit. ENERGY SAVING TIPS Your appliance is designed to be highly efficient in energy savings. Follow these recommendations for greater efficiency. 1. Select a thermostat setting that suits your comfort needs and leave at that chosen setting. 2. The air filter is very efficient in removing airborne particles. Keep the air filter clean at all times.
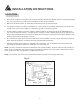
INSTALLATION INSTRUCTIONS ELECTRIC SHOCK HAZARD To avoid the possibility of personal injury, disconnect power to the unit before installing or servicing. NOTE: Your Room Air Conditioner is designed for easy installation in a single or double-hung window. This unit is NOT designed for vertical (slider type) windows and/or through-the-wall applications. TOOLS NEEDED FOR INSTALLATION: • Screwdrivers: Phillips and flat head. • Power Drill: 1/8” (3.
INSTALLATION INSTRUCTIONS LOCATION 1. This room air conditioner is designed to fit easily into a single or double hung window. However, since window designs vary, it may be necessary to make some modifications for safe, proper installation. 2. Make sure window and frame are structurally sound and free from dry and rotted wood. 3. For maximum efficiency, install the air conditioner on a side of the house or building which favours more shade than sunlight.
INSTALLATION INSTRUCTIONS ASSEMBLY AND INSTALLATION 1. Assembly of the upper channel to the cabinet (factory installed on some units). • “L” Shaped Top Channel: install the “L” shaped channel to the top of the cabinet as shown in Fig. 3, using four (4) 3/8” screws. 2. Assembly of the side curtains to the cabinet. • Extend the shutter from the shutter frame and slide it into the shutter tabs on the side channel of the air conditioner, as shown in Fig. 4.
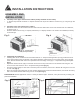
OPERATING INSTRUCTIONS ASSEMBLY AND INSTALLATION Fig. 7 Check that the air conditioner is tilted downwards to the outside, about 3° to 4°, as shown in Fig. 7. After proper installation, condensed water should not drain from the overflow drain hole during normal use. If you notice water leaking out, check the angle of tilt, and make any necessary adjustments. However, on a very humid day, water leakage can occur – this is normal. Measure the tilt angle from the cabinet’s edge.
CARE AND MAINTENANCE NOTE: In order to avoid electric shock, please turn off the A/C and unplug the plug before maintenance or repair. CLEANING When cleaning the air conditioner be sure to turn the SELECTOR knob to the “OFF” position and disconnect the power cord from the electrical outlet. 1. DO NOT use gasoline, benzene, thinner, or any other chemicals to clean this unit, as these substances may cause damage to the finish and deformation of plastic parts. 2.
TROUBLESHOOTING Occasionally, a minor problem may arise, and a service call may not be necessary- use this troubleshooting guide for a possible solution. If the unit continues to operate improperly, call an authorized service depot or Danby’s Toll Free Number for assistance.
LIMITEDIN-HOME APPLIANCE WARRANTY LIMITED APPLIANCE WARRANTY This quality quality product is warranted to be free from manufacturer’s in material anddefects workmanship, provided that theworkmanship, unit is used under the normal This product is warranted to be free fromdefects manufacturer’s in material and provided thatoperating the unit is conditions intended by the manufacturer. used under the normal operating conditions intended by the manufacturer.
BIENVENUE Bienvenue dans la famille Danby. Nous sommes fiers de la qualité de nos produits et nous croyons fermement au service par une assistance fiable. Vous découvrirez au travers de ce quide, facile d’utilisation et vous en aurez la confirmation par notre service d’assistance à la clientèle. Mais ce qui est encore mieux, vous pourrez bénéficier de ces valeurs à chaque utilisation de votre appareil. Ceci est important parce que votre nouvel appareil fera partie de votre famille pour longtemps.
CONSIGNES DE SÉCURITÉ IMPORTANTES LISEZ TOUTE L’INFORMATION DE SÉCURITÉ AVANT UTILISATION POUR VOTRE SÉCURITÉ : Lire attentivement ces instructions avant d’utiliser l’appareil. SPECIFICATIONS ELECTRIQUES 1. Tous les câblages doivent être conformes aux codes électriques locaux et nationaux et doivent être installés par un électricien qualifié. Si vous avez la moindre question au suject des instructions ci-dessous, contactez un électricien qualifié. 2.
CONSIGNES DE SÉCURITÉ IMPORTANTES LISEZ TOUTE L’INFORMATION DE SÉCURITÉ AVANT UTILISATION POUR VOTRE SÉCURITÉ : Lire attentivement ces instructions avant d’utiliser l’appareil. L’ÉCONOMIE DE L’ÉNERGIE Votre appareil ménager est conçu pour l’efficacité en économie de l’énergie. Pour le rendement maximal, observer les recommandations qui suivent. 1. Choisir un réglage du thermostat qui répond à vos besoins de confort et le laisser au réglage choisi. 2.
CONSIGNES D’INSTALLATION RISQUE DE CHOC ÉLECTRIQUE REMARQUE : Votre climatiseur de chambre a été conçu pour une installation facile dans une fenêtre à châssis à guillotine simple ou double. Cet appareil n’a pas été conçu pour des fenêtres verticales (de type coulissant) ou pour être installé à travers une paroi. Pour éviter la possibilité de blessures corporelles, débrancher l’alimentation de courant à l’unité avant d’entreprendre l’installation ou le service.
CONSIGNES D’INSTALLATION ENDROIT 1. Ce climatiseur pour chambre a été conçu pour être installé facilement dans une fenêtre à châssis à guillotine simple ou double. Cependant, comme le design de la fenêtre peut varier, it peut être nécessaire d’y faire quelques modifications pour une installation sécuritaire et appropriée. 2. Assurez-vous que la fenêtre et son châssis sont structurellement solides et exempts de bois sec et pourri. 3.
CONSIGNES D’INSTALLATION ASSEMBLAGE ET INSTALLATION 1. Montage de canaux supérieur sur le caisson (préinstallé sur certain modèles). • Canal supérieur en forme de “L”: Installez le canal en forme de “L” au-dessus du caisson tel que montré à la Fig. 3, un utilisant quatre (4) vis de 3/8 po. 2. Montage des rideaux latéraux au caisson. • Étendez les volets et glissez-le dans les support de volets sur le canal latéral du climatiseur comme montré dans Fig. 4.
CONSIGNES D’UTILISATION ASSEMBLAGE ET INSTALLATION Vérifiez que le climatiseur est incliné vers le bas à l’extérieur, environ 3° à 4°, selon Fig. 7. Après une installation adéquate, l’eau condensée ne devrait pas s’écouler du trou de drainage pendant une utilisation normale. Si vous remarquez d’égouttement d’eau, vérifiez l’angle d’inclination et exécutez tout ajustement. Pourtant, lorsqu’il fait très humide, l’égouttement d’eau peut arriver – cela est normale.
SOINS ET ENTRETIEN REMARQUE : Afin d’éviter tout choc électrique, éteindre et débrancher le climatiseur avant entretien ou réparation. NETTOYAGE Avant de procéder à l’entretien du climatiseur, assurez-vous de tourner le bouton de SÉLECTION en position “ARRÊT” et débranchez le cordon d’alimentation de la prise électrique. 1.
DÉPANNAGE De temps en temps, un problème est mineur et un appel de service peut ne pas être nécessaire. Utilisez ce guide de dépannage pour trouver une solution possible. Si l’unité continue de fonctionner incorrectement, appelez un dépôt de service autorisé ou le numéro sans frais de Danby pour obtenir de l’assistance.
GARANTIE SURWARRANTY LIMITED IN-HOMELIMITÉE APPLIANCE APPAREIL ÉLECTROMÉNAGER This quality product is warranted to be free from manufacturer’s defects in material and workmanship, provided that the unit is used under the normal operating conditions intended by the manufacturer.
NOTES / REMARQUES : __________________________________________________________________________________________ __________________________________________________________________________________________ __________________________________________________________________________________________ __________________________________________________________________________________________ __________________________________________________________________________________________ _____________________________________
AIR CONDITIONER CLIMATISEUR All repair parts are available for purchase or special order when you visit your nearest service depot. To request service and/or the location of the service depot nearest you, call the TOLL FREE number. Toutes les pièces de rechange ou commandes spéciales sont disponibles à votre centre de service régional autorisé. Pour obtenir le service et/ou la localité de votre centre de service régional, signalez le NUMÉRO D’APPEL SANS FRAIS.