Owner’s Use and Care Guide Guide d’utilisation et soins de Propriètaire Model • Modèle DAC6010E CAUTION: Read and follow all safety rules and operating instructions before first use of this product. MISE EN GARDE : Veuillez lire attentivement les consignes de sécurité et les directives d'utilisation avant l'utilisation initiale de ce produit.
WELCOME Thank you for choosing a Danby Room Air Conditioner to cool your home. This Owner’s Use and Care Guide will provide you with valuable information necessary for the proper care and maintenance of your new appliance. If properly maintained, your Danby appliance will give you many years of trouble free operation. Please take a few moments to read the instructions thoroughly and familiarize yourself with all of the operational aspects of this appliance.
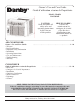
PART IDENTIFICATION Fresh Air Ventilation Switch (open for Fan only operation) Cabinet Interior air outlet Exterior air inlet Interior air inlet Control Panel Filter IMPORTANT SAFETY INFORMATION READ ALL SAFETY INFORMATION BEFORE USING ELECTRICAL SPECIFICATIONS TABLE 1 1) All wiring must comply with local and national electrical codes and must be installed by a qualified electrician. If you have any questions regarding the following instructions, contact a qualified electrician.
IMPORTANT SAFETY INFORMATION ENERGYSAVING TIPS Your Danby appliance is designed to be highly efficient in energy savings. Follow these recommendations for greater efficiency. 1) Select a thermostat setting that suits your comfort needs and leave at that chosen setting. 4) Start your air conditioner before the outdoor air becomes hot and uncomfortable, to avoid an initial period of discomfort while the unit is cooling off the room. 2) The filter is very efficient in removing airborne particles.
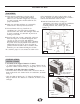
INSTALLATION LOCATION A) This room air conditioner is designed to fit easily into a single or double hung window. However, since window designs vary, it may be necessary to make some modifications for safe, proper installation. of the installation. Use only a single outlet circuit rated at 15 amps. All wiring should be in accordance with local and national electrical codes. F) DO NOT install unit where leakage of combustible gas is suspected.
INSTALLATION (cont’d) Window sash INSTALLATION INSTRUCTIONS (cont’d) 3) Completing the Installation • Cut the foam (non adhesive) sealing strip to fit the area of the window sill that the air conditioner will rest on. • Carefully place the air conditioner into the window with the “L” shaped mounting bracket (on top) positioned in front of the upper window sash. The bottom of the cabinet should be positioned on the “recessed” portion of the window frame.
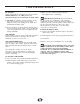
OPERATING INSTRUCTIONS KEY PAD FEATURES LED DISPLAY LED DISPLAY: Displays the following information independently;Set Temperature, Ambient RoomTemperature and Auto Timer On/Off settings. Temp/Timer Control Auto Timer POWER: Turns unit On/Off. MODE: Allows you to scroll through and select the desired operating mode; Cool , Dry , Fan Only and *Auto .The selected mode will be denoted by the adjacent indicator light.
OPERATING INSTRUCTIONS REMOTE CONTROL FEATURES Electronic Display: Displays the following information: A: Remote Control power On/Off and Mode Icons B: Clock and Auto-Timer settings C: Current set temperature D: Fan speed setting Control Buttons 1) Power switch. 2) Mode. 3) Fan Speed. 4) Energy Saver. 5) Auto-Timer. 6) Used to increase or decrease temperature settings in 1° increments on the Celsius or Fahrenheit scale.
CARE AND MAINTENANCE 3) Rinse the filter with clean water and dry thoroughly before re-installing. CLEANING: When cleaning the air conditioner, be sure to turn the SELECTOR knob to the OFF position and disconnect the power cord from the electrical outlet. IMPORTANT: DO NOT forget to install the air filter. If the air conditioner is left to operate without the air filter, dust is not removed from the room air and may result in machine failure.
TROUBLESHOOTING Occasionally, a problem may occur that is minor, and a service call may not be necessary. Use this troubleshooting guide for a possible solution. If the unit continues to operate improperly, call an authorized service depot or Danby’s Toll Free Number for assistance: 1-800-26(1-800-263-2629) PROBLEM POSSIBLE CAUSE 1) Air conditioner will not operate. • No power to the unit. SOLUTION • Check connection of power cord to power source. • Check fuse or circuit breaker.
BIENVENUE Nous vous remercions d’avoir choisi un climatiseur de chambre Danby pour refroidir votre logement. Ce manuel d’utilisation et d’entretien fournit les renseignements nécessaires pour prendre soin et entretenir votre nouveau climatiseur de chambre. S’il est adéquatement entretenu, votre climatiseur vous donnera de nombreuses années d’utilisation sans problème.
IDENTIFICATION DE PARTIE Commutateur pour ventilation d'air frais Caisson Sortie d'air Intérieure Entrée d'air Extérieure Entrée d'air Intérieure Panneau du commande Filtre à air CONSIGNES DE SÉCURITÉ IMPORTANT LISEZ TOUTE L'INFORMATION DE SÉCURITÉ AVANT UTILISATION SPECIFICATIONS ELECTRIQUE TABLEAU 1 1) Tous les câblages doivent être conformes aux codes électriques locaux et nationaux et doivent être installés par un électricien qualifié.
CONSIGNES DE SÉCURITÉ IMPORTANT SUGGESTIONS POUR L’ÉCONOMIE Votre appareil ménager Danby est conçu pour l’efficacité en économie de DE L’ÉNERGIE l’énergie. Pour le rendement maximal, observer les recommandations qui suivent. 1) Choisir un réglage du thermostat qui répond à vos besoins de confort et le laisser au réglage choisi. 2) Le filtre à air est très efficace pour éliminer les particules qui flottent dans l’air. Conserver le filtre à air propre en tout temps.
INSTALLATION ENDROIT A) Ce climatiseur pour chambre a été conçu pour être installé facilement dans une fenêtre à châssis à guillotine simple ou double. Cependant, comme le design de la fenêtre peut varier, it peut être nécessaire d’y faire quelques modifications pour une installation sécuritaire et appropriée. B) Assurez-vous que la fenêtre et son châssis sont structurellement solides et exempts de bois sec et pourri.
INSTALLATION (suite) INSTRUCTIONS D’INSTALLATION (suite) Cadre de la fenêtre 3) Pour compléter l’installation • Coupez la lisière à calfeutrer en mousse (non adhésif) pour qu’elle se fixe adéquatement au dessous du bas du cadre de la fenêtre. • Placez le climatiseur dans la fenêtre avec le canal de montage en forme de “L” (en haut) positionné à l’avant du cadre supérieur de la fenêtre. Le bas du caisson doit être positionné dans le bas du cadre de la fenêtre.
CONSIGNES D’UTILISATION FONCTIONNEMENT Affichage DEL AFFICHAGE DEL: Affiche l’information suivantein dépendamment; Réglage de la température, température ambiente et le programme de minutrie. Réglage du Temp. et Minuterie Minuterie Commutateur de courant: En Marche/Arrêt. MODE: Vous permet de choisissez le mode d'opération désiré; Frais , Sec, Ventilateur Seulement et Auto. Le mode choisi sera dénoté par l’afficheur au-dessus du bouton.
CONSIGNES D’UTILISATION (suite) CARACTÉRISTIQUES À TÉLÉCOMMANDE Affichage Électronique: Affiche l’information suivante; A) Icônes du Télécommande ‘En Marche’ et Mode. B) Horloge et Minutrie C) Réglage de la température D) Réglage de Vitesse du ventilateur Affichage Électronique Boutons De Commande: 1) Commutateur de courant. 2) Mode. 3) Vitesse du ventilateur. 4) Économiseur d'Énergie. 5) Minutrie. 6) Utilisé pour augmenter ou réduire le température par 1° incrément de la degré en Fahrenheit ou Celsius.
SOINS ET ENTRETIEN ENTRETIEN: Avant de procéder à l’entretien du climatiseur, assurez-vous de tourner le bouton de SÉLECTION en position “ARRÊT” et débranchez le cordon d’alimentation de la prise électrique. 1) N’utilisez PAS de l’essence, un produit chimique, diluant ou autre sur un climatiseur, car ces substances peuvent endommager la finition de la peinture et déformer des pièces en plastique.
DÉPANNAGE De temps en temps, un problème peut se poser qui est mineur, et une intervention peut ne pas être nécessaire. Employez ce guide de dépannage pour une solution possible. Si l'unité continue à fonctionner incorrectement, demandez un dépôt autorisé de service ou le numéro de appel sans frais Danby pour l'aide à: 1-800-26(1-800-263-2629) PROBLEME CAUSE PROBABLE 1) Le climatiseur ne veut pas fonctionner. • Aucun courant branché à l’appareil. 2) Inefficace ou aucun refroidissement.
Model • Modèle DAC6010E For service, contact your nearest service depot or call: 1-800-26(1-800-263-2629) to recommend a depot in your area. AIR CONDITIONER The model number can be found on the serial plate located on the back panel of the unit. All repair parts are available for purchase or special order when you visit your nearest service depot. To request service and/or the location of the service depot nearest you, call the TOLL FREE NUMBER.