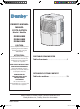
OWNER’S MANUAL MANUEL D’UTILISATION Model • Modèle DDR3008EE DDR4588EE DDR6588EE CAUTION: Read complete installation and operating instructions before installing and/or using the dehumidifier. ATTENTION : Lire attentivement les consignes de sécurité et les instructions d’utilisation avant l’utilisation initiale de ce produit. PORTABLE DEHUMIDIFIER Table of contents . . . . . . . . . . . . . . . . . . . . . .1 KEEP THESE INSTRUCTIONS FOR FUTURE REFERENCE.
Table Of Contents Page Introduction ................................................................................................................................................... 2 Warnings, and Important Notices ........................................................................................................ 3 Specifications ................................................................................................................................................ 4 Installation ...........
Introduction Thank you for choosing this Danby® appliance to provide you and your family with all of the “Home Comfort” requirements for your home, cottage or office. This Owner’s Manual will provide you with valuable information necessary for the proper usage, care and maintenance of your new appliance. If properly maintained, your Danby® appliance will give you many years of trouble free operation.
WARNING - IMPORTANT NOTICES NOTE: The WARNING instructions issued in this manual are not meant to cover all possible conditions and situations that may occur. It must be understood that common sense, caution and carefulness are factors that cannot be built into all appliances. These factors must be supplied by the person(s) installing, maintaining, or operating the appliance.
Electrical Specifications 1. All wiring must comply with local and national electrical codes and be installed by a qualified electrician. If you have any questions regarding the following instructions, contact a qualified electrician. 2. Check available power supply and resolve any wiring problems BEFORE installation and operation of this unit. 3. For your safety and protection, this unit is grounded through the power cord plug when plugged into a matching wall outlet.
INSTALLATION Location: Select a suitable location, making sure you have easy access to an electrical outlet. (avoid the use of extension cords) If it is absolutely necessary to use an extension cord, use an approved “air conditioner” heavy duty extension cord only. (available at most local hardware stores) Select a suitable location making sure there are no obstructions restricting airflow through the front air intake grill.
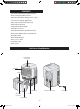
FEATURES • Soft Touch (Electronic) Control Key Pads • Auto-Sensing Humidity Control • Adjustable Humidity Settings (35% ~ 80%) • 2 Fan Speed Settings (High/Low) • Delay Start Protection (compressor) • Auto-Defrost (De-Icier) • Full Bucket Indicator Light • Easy Roll Casters (4) • Front Mounted Water Tank (Removable) • Direct Drain Option (Hose not Included) • Quiet Operation • Removable Air Filter • Timer ( 3 / 6 / 12hr) • Continuous Run • Auto restart Unit Parts Identification Control Part for consistency
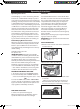
KEY PAD FUNCTIONS. 1 7 4 6 3 5 9 2 8 1. LED (SETTING HUMIDITY): The LED window displays the following information independently; A. Set Operating Relative Humidity Value. B. Fuction indicator will light up; (Fan Speed, Time, Self Dry) 5.SELF DRY:Self Dry mode can be used to clean the unit and removes excess humidity. You can operate Self Dry mode when the dehumidifier is powered on or off. The inside moisture of the unit is removed in 30 minutes. After 30 minutes, the product will power off. 2.
Operating Instructions Indicator Light Function: Water Tank Operation: LED Display: When the unit is first connected to an electrical outlet, the LED will not light until the “on/off” button is pressed. When the “on/off” button is pressed, the dehumidifier will automatically default to the factory default setting. (See Factory Default Setting for details) Proper installation of the water tank is crucial in maintaining reliable dehumidifier operation.
Operating Instructions Operating Instructions: AIR FILTER: Dehumidifying is a means of removing moisture from the air. A dehumidifier will help to protect your home and valued possessions from damage (swelling) caused by moisture in the air. Essentially a dehumidifier removes moisture from the air, as moist air passes over a dehumidifying (evaporator) coil. Moisture is condensed on the evaporator coil, drained and collected inside an internal (removable) water tank located at the front of the unit.
Setting up the Drain Hose Connector The Drain hose connector can be used to drain the water externally, instead of using the water bucket. 1. Hold the holes on both sides of the water bucket and slide it out. 4. Connect the Drain Hose to the Drain Hose Connector. : The Drain hose sold separately at participating retail stores. (An optional drain hose is available for purchase through Retail stores.) Drain Hose Drain Hose Connector 2. Remove the Drain Connector Hole cover located in the back of the unit.
Care and Maintenance Cleaning Storage CAUTION: Before attempting to clean and/ or service this unit, always disconnect the power supply cord from the electrical power supply/outlet. When the dehumidifier is not being used for long time periods, please follow these instructions. 1. Disconnect the power cord from the power supply. 1. DO NOT use gasoline, benzene, paint thinner, or any other chemicals to clean this unit, as these substances will damage/ deform both plastic components and luster finish. 2.
LIMITED DEHUMIDIFIER WARRANTY This quality product is warranted to be free from manufacturer’s defects in material and workmanship, provided that the unit is used under the normal operating conditions intended by the manufacturer. This warranty is available only to the person to whom the unit was originally sold by Danby or by an authorized distributor of Danby, and is non-transferable. TERMS OF WARRANTY Plastic parts, are warranted for thirty (30) days only from purchase date, with no extensions provided.
Table des Matières Page Introduction ................................................................................................................................................... 14 Avertissement - Avis importants .......................................................................................................... 15 Spécifications ................................................................................................................................................ 16 Installation .....
Introduction Nous vous remercions d’avoir choisi cet appareil Danby® pour assurer le confort de tous les membres de votre famille, chez vous, au chalet ou au bureau. Ce Manuel d’Utilisateur vous présente de l’information utile et nécessaire pour l’utilisation et l’entretien approprié de votre nouvel appareil. S’il fait l’objet d’un entretien adéquat, votre appareil Danby® vous fournira de nombreuses années de service sans problème.
AVERTISSEMENT – AVIS IMPORTANTS NOTE: Les instructions d’AVERTISSEMENT présentées dans ce manuel ne peuvent couvrir toutes les situations qui pourraient survenir. Chacun doit comprendre que le sens commun,l’ attention et la prudence sont les facteurs qui ne peuvent être incorporés dans tous les appareils. Ces facteurs devoivent etre fournis par le comportement de la personne qui installe l’appareil ou l’utilise, ou qui exécute les opérations d’entretien.
Spécifications Électriques 1. Tout câblage doit être réalisé par un electrician qualifié, en conformité avec les prescriptions des codes nationaux et locaux. Pour toute question au sujet des instructions qui suivent, contacter un electrician qualifié. 2. AVANT l’installation et AVANT l’utilisation de cet appareil, contrôler les caractéristiques de la source d’électricité, et résoudre tout problème affectant le câblage. 3.
INSTALLATION Emplacement: Choisir un emplacement approprié, avec accès facile à une prise de courant (éviter l’emploi d’une rallonge) S’ilest absolument nécessaire d’utiliser une rallonge pour l’alimentation de l’appareil, utiliser uniquement une rallonge agréée pour ‘’climatiseur’’ (disponible dans la plupart des magasins de quincaillerie) Choisir un emplacement où rien n’entravera la circulation de l’air à travers la grille d’admission avant.
CARACTÉRISTIQUES • Garnitures Souples de Commande Tactile (Électronique) • Auto-détection de l’humidité ambiante • Réglage Ajustable de l’Humidité (35% ~ 80%) • Ventilateur à 2 vitesses (Haut/Bas) • Protection de Mise en Marche Retardée (compresseur) • Auto-Dégivrage(Déglaçage) • Témoin Réservoir Plein • Roulettes pour Déplacement Facile (4) • Réservoir d’eau situé sur l’avant (Amovible) • Option de Drainage Direct (Tuyau non inclus) • Fonctionnement Silencieux • Filtre à Air Amovible • Temporisateur ( 3 /
FONCTIONS DE GARNITURE DE BOUTONS 1 7 4 6 3 5 9 2 8 1. LED (CONFIG. DE L’HUMIDITÉ): La fenêtre LED affiche indépendamment l’information suivante; A. Configurer la Valeur de l’humidité relative de fonctionnement. B. L’indicateur de function s’allumera; (Vitesse de Ventilateur,Temps, Séchage Auto) 5.SÉCHAGE AUTO:La mode Séchage Auto peut être employé pour nettoyer l’unité et enlever l’ humidité excessive.
Instructions d’Utilisation Fonction des témoins lumineux: Opération de Réservoir d’Eau: Affichage LED: Quand l’unité s’est relié premièrement à une sortie électrique, la LED ne s’allumera pas avant le bouton “on/off” est appuyé sur. Quand le bouton “on/off” est appuyé sur, le déhumidificateur se transférera automatiquement sur la config par défaut d’usine.
Instructions d’Utilisation Instructions d’Utilisation: La dehumidification est un moyen d’enlever l’humidité de l’air. Un déhumidificateur protégera votre maison et possessions évaluées contre des dommages (gonflement) provoqués par l’humidité dans le ciel. Essentiellement un déhumidificateur enlève l’humidité de l’air, car l’air moite passé au-dessus d’un enroulement (de vaporisateur) de déhumidification.
Installation du Connecteur du Tuyau Flexible du Drainage Le connecteur du tuyau flexible du drainage peut être utilisé pour vidanger l’eau extérieurement, au lieu d’utiliser le seau d’eau. 1. Tenez les trous sur deux côtés du seau d’eau et les glissez dehors. 4. Reliez le Tuyau Flexible du Drainage au Connecteur de Tuyau Flexible du Drainage. : Le tuyau flexible du drainage est vendue séparément dans les magasins de détail de participant.
Entretien Nettoyage Remisage ATTENTION: Avant d’essayer de nettoyer et/ou entretenir cette unité,déconnectez toujours la corde d’alimentation d’énergie de l’approvisionnement/de sortie de courant électrique. Si le déshumidificateur doit rester inutilisé durant une période prolongée, procéder comme suit. 1. Débrancher le cordon d’alimentation de la prise de courant. 1.
GARANTIE LIMITÉE DE DÉSHUMIDIFICATEUR Cet appareil de qualité est garantie exempt de tout vice de matière première et de fabrication, s’il est utilisé dans les conditions normales recommandées par le fabricant. Cette garantie n’est offerte qu’à l’acheteur initial de l’appareil vendu par Danby ou par l’un des ses distributeurs agréés et elle ne peut être transférée.