* OWNER’S MANUAL MANUEL DU PROPRIÉTAIRE MANUAL DEL PROPIETARIO REFRIGERATOR Owner’s Manual...............................1 - 8 RÉFRIGÉRATEUR Manuel du propriétaire...................9 - 16 MODEL * MODÈLE * MODELO DAR110A1WDD DAR110A1BSLDD REFRIGERADOR Manual del propietario.................17 - 24 www.Danby.com DANBY PRODUCTS LIMITED, ONTARIO, CANADA N1H 6Z9 DANBY PRODUCTS INC., FINDLAY, OHIO, USA 45840 2021.08.
Welcome to the Danby family. We are proud of our quality products and we believe in dependable service. We suggest that you read this owner’s manual before plugging in your new appliance as it contains important operation information, safety information, troubleshooting, and maintenance tips to ensure the reliability and longevity of your appliance. You are entitled to the warranty coverage as described in the owner’s manual provided with your new appliance. 1.
Important Safety Information READ AND FOLLOW ALL SAFETY INSTRUCTIONS SAFETY REQUIREMENTS SAFETY REQUIREMENTS DANGER: Risk of fire or explosion. Flammable refrigerant used. Do not puncture refrigerant tubing. This appliance is not intended for use by persons (including children) whose physical, sensory or mental capabilities may be different or reduced, or who lack experience or knowledge, unless such persons receive supervision or training to operate the appliance by a person responsible for their safety.
OPERATING INSTRUCTIONS LOCATION • Two people should be used when moving the appliance. • Remove interior and exterior packaging prior to installation. Wipe the outside of the appliance with a soft, dry cloth and the inside with a lukewarm wet cloth. • Place the appliance on a floor that is strong enough to support it when it is fully loaded. • Do not place the appliance in direct sunlight or near sources of heat, such as a stove or heater, as this can increase electrical consumption.
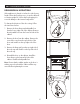
OPERATING INSTRUCTIONS FEATURES TEMPERATURE SELECTION 1. Thermostat Dial The temperature of the appliance can be adjusted by turning the thermostat dial on inner right side of the cabinet. 2. Glass Shelves 3. Crisper The number 1 is the warmest setting. Higher numbers indicate colder settings. 4. Magnetic Gasket: Tight fitting door seal keeps all the cooling power locked inside. The MAX position is the coldest setting. 5. Bottle Rack: For tall, small and medium cans or jars.
OPERATING INSTRUCTIONS DOOR REVERSAL INSTRUCTIONS 1 If the appliance is placed on its back or side for any length of time during this process, it must be allowed to remain upright for 6 hours before plugging it in to avoid damage to the internal components. To change the direction of the door swing, follow the instructions below. 1. Remove the lower hinge and adjustable foot from the lower right side of the cabinet. Remove the adjustable foot from the lower left side of the cabinet. 2.
CARE & MAINTENANCE CLEANING VACATION Ensure the appliance is unplugged before cleaning. • Short vacations: Leave the appliance operating during vacations of less than three weeks. • To clean the inside of the appliance, use a soft cloth and a solution of a tablespoon of baking soda to one quart of water or a mild soap solution or some mild detergent. • Wash removable shelves in a mild detergent solution, then dry and wipe with a soft cloth.
TROUBLESHOOTING PROBLEM POSSIBLE CAUSE • A fuse may be blown or the circuit breaker tripped No power • Plug not fully inserted into the wall outlet Internal temperature not cold enough • Temperature setting is too warm • Door is not shut properly or opened excessively • Recently added a large quantity of warm food to the cabinet • Close proximity to heat source or direct sunlight • Ambient temperature or humidity is very high Appliance runs continuously • Temperature setting is too cold • Door not shu
LIMITED “IN HOME” WARRANTY LIMITED IN-HOME APPLIANCE WARRANTY Thisquality quality product is warranted to be free manufacturer’s defects in material and workmanship, that the unit is provided used under thethe normal This product is warranted to from be free from manufacturer’s defects in materialprovided and workmanship, that unitoperating is used conditions intended by the manufacturer. under the normal operating conditions intended by the manufacturer.
Bienvenue dans la famille Danby. Nous sommes fiers de nos produits de qualité et nous croyons en un service fiable. Nous vous suggérons de lire ce manuel du propriétaire avant de brancher votre nouvel appareil car il contient des informations de fonctionnement importantes, des informations de sécurité, des conseils de dépannage et d’entretien pour assurer la fiabilité et la longévité de votre appareil.
Consignes de sécurité importantes LIRE ET SUIVRE TOUTES LES INSTRUCTIONS DE SÉCURITÉ EXIGENCES DE SÉCURITÉ EXIGENCES DE SÉCURITÉ DANGER : Risque d’incendie ou d’explosion. Liquide frigorigène inflammable utilisé. Ne pas percer les tubes de réfrigérant. • N’utilisez pas de dispositifs mécaniques pour dégivrer le réfrigérateur. • Assurez-vous que l’entretien est effectué par le personnel de service autorisé en usine, afin de minimiser les dommages sur les produits ou les questions de sécurité.
CONSIGNES D’UTILISATION EMPLACEMENT • Deux personnes doivent être utilisées pour déplacer l’appareil. • Retirer l‘emballage intérieur et extérieur avant l’installation. Essuyez l’extérieur de l’appareil avec un chiffon doux et sec et à l’intérieur avec un chiffon humide tiède. • Placez votre appareil sur un plancher qui est assez fort pour le soutenir quand il est complètement chargé.
CONSIGNES D’UTILISATION CARACTÉRISTIQUES SÉLECTION DE LA TEMPÉRATURE 1. Cadran du thermostat La température de l’appareil peut être réglée en tournant le cadran du thermostat sur le côté droit intérieur de l’armoire. 2. Étagères en verre 3. Bac à légumes Le numéro 1 est le réglage le plus chaud. Des nombres plus élevés indiquent des paramètres plus froids. 4. Joint étanche magnetique: Le joint étanche empêche l’air frais de s’échapper. 5.
CONSIGNES D’UTILISATION INSTRUCTIONS D’INVERSION DE PORTE 1 Si l’appareil est placé sur le dos ou sur le côté pendant un certain temps au cours de ce processus, il doit rester debout pendant 6 heures avant de le brancher pour éviter d’endommager les composants internes. Pour changer la direction de l’ouverture de la porte, suivez les instructions ci-dessous. 1. Retirez la charnière inférieure et le pied réglable du côté inférieur droit de l’armoire.
SOINS ET ENTRETIEN NETTOYAGE VACANCES Assurez-vous que l’appareil est débranché avant de nettoyer une partie de l’appareil. • Courtes vacances: Laissez l’appreil fonctionner pendant les vacances durant moins de trois semaines. • Pour nettoyer l’intérieur de l’appareil, utilisez un chiffon doux et une solution d’une cuillère à soupe de bicarbonate de soude à un quart d’eau ou une solution de savon doux ou un détergent doux.
DÉPANNAGE PROBLÈME L’appareil n’est pas alimenté CAUSE POSSIBLE • Un fusible de votre panneau de distribution peut être grillé ou le disjoncteur déclenché • La fiche n’est pas complètement insérée dans prise murale La température interne n’est pas assez froide • Le réglage de la température est trop chaud • Le porte n’est pas fermées correctement ou ouverte trop souvent • Ajout récemment d’une grande quantité de nourriture chaude au cabinet • Proximité de la source de chaleur ou de la lumière directe du s
GARANTIE LIMITÉEAPPLIANCE « À DOMICILE » LIMITED IN-HOME WARRANTY Cet de qualité est to garanti exempt de tout vice première et deprovided fabrication, s’il est Thisappareil quality product is warranted be free from manufacturer’s defectsdein matière material and workmanship, that the unit is utilisé useddans underles theconditions normal operating normales par le fabricant. conditionsrecommandées intended by the manufacturer.
Bienvenido a la familia Danby. Estamos orgullosos de nuestros productos de calidad y creemos en un servicio confiable. Le sugerimos que lea este manual del propietario antes de enchufar su nuevo electrodoméstico, ya que contiene información importante de funcionamiento, información de seguridad, solución de problemas y consejos de mantenimiento para garantizar la confiabilidad y longevidad de su electrodoméstico.
Importantes Instrucciones de Seguridad LEA Y SIGA TODAS LAS INSTRUCCIONES DE SEGURIDAD REQUERIMIENTOS DE SEGURIDAD PELIGRO: Riesgo de incendio o explosión. Refrigerante inflamable usado. No perforar la tubería del refrigerante. • No utilice dispositivos mecánicos para descongelar el refrigerador. • Asegúrese de que el personal de mantenimiento autorizado por la fábrica haga el mantenimiento para minimizar los daños o problemas de seguridad del producto.
INSTRUCCIONES DE OPERACIÓN UBICACIÓN • Se deben utilizar dos personas al mover el aparato. • Retire el embalaje interior y exterior antes de la instalación. Limpie el exterior del aparato con un paño suave y seco y el interior con un paño húmedo tibio. • Coloque el aparato en un piso que sea lo suficientemente fuerte como para soportarlo cuando esté completamente cargado. • Ubique el aparato lejos de la luz directa del sol y fuentes de calor (estufa, calentador, radiador, etc.).
INSTRUCCIONES DE OPERACIÓN CARACTERISTICAS SELECCION DE TEMPERATURA 1. Dial del termostato La temperatura del aparato se puede ajustar girando el dial del termostato en el lado interior derecho del armario. 2. Estantes de vidrio 3. Cajón para verduras El número 1 es el ajuste más caliente. Los números más altos indican ajustes más fríos. 4. Junta magnética: El cierre hermético de la puerta mantiene toda la potencia de enfriamiento bloqueada en su interior. La posición MAX es la más fría. 5.
INSTRUCCIONES DE OPERACIÓN INSTRUCCIONES DE INVERSIÓN DE PUERTA 1 Si el aparato se coloca boca arriba o de costado durante un período de tiempo durante este proceso, debe dejarlo en posición vertical durante 6 horas antes de enchufarlo para evitar daños a los componentes internos. Para cambiar la dirección del giro de la puerta, siga las instrucciones a continuación. 1. Retire la bisagra inferior y el pie ajustable del lado inferior derecho del gabinete.
CUIDADO Y MANTENIMIENTO LIMPIEZA VACACIONES Asegúrese de que la unidad esté desenchufada antes de limpiar cualquier parte del aparato. • Vacaciones cortas: Deje el aparato en funcionamiento durante las vacaciones de menos de tres semanas. • Para limpiar el interior del aparato, utilice un paño suave y una solución de una cucharada de bicarbonato de sodio a un litro de agua o una solución de jabón suave o algún detergente suave.
SOLUCIÓN SUGERIDA PROBLEMA No funciona POSSIBLE CAUSA • Un fusible en su casa puede soplarse o el interruptor de circuito disparado • El enchufe no está completamente insertado en la toma de corriente La temperatura interna no es lo suficientemente fría • La temperatura está demasiado alta • La puerta no se cierra correctamente o se abre demasiado • Recientemente se agregó una gran cantidad de alimentos calientes al armario • Muy cerca de la fuente de calor o de la luz solar directa • La temperatura ambie
GARANTÍA LIMITADA “A DOMICILIO” LIMITED IN-HOME APPLIANCE WARRANTY Este de iscalidad contra defectos de fabricación, incluyendo mano obra, siempre y operating Thisproducto quality product warrantedestá to begarantizado free from manufacturer’s defects in material and workmanship, providedpartes that the yunit is deused under the normal cuando la intended unidadbysetheutilice bajo las condiciones normales de funcionamiento para las que fue diseñado. conditions manufacturer.
NOTES / REMARQUES / NOTAS : __________________________________________________________________________________________ __________________________________________________________________________________________ __________________________________________________________________________________________ __________________________________________________________________________________________ __________________________________________________________________________________________ _____________________________
NOTES / REMARQUES / NOTAS : __________________________________________________________________________________________ __________________________________________________________________________________________ __________________________________________________________________________________________ __________________________________________________________________________________________ __________________________________________________________________________________________ _____________________________
DANBY PRODUCTS LIMITED, ONTARIO, CANADA N1H 6Z9 DANBY PRODUCTS INC.