• FREE STANDING BEVERAGE CENTER • CENTRE DE BREUVAGES AUTONOME • CENTRO DE BEBIDAS AUTÓNOMO Owner’s Use and Care Guide Guide d’utilisation et soins de Propriètaire Manual de Instructions pare el Uso y Cuidado de su Unidad MODEL • MODÈLE • MODELO DBC434A1BSSDD V2.05.13.
Contents FREE STANDING BEVERAGE CENTER Owner’s Use and Care Guide ............................. 1-10 • Safety Instructions • Installation Instructions • Operating Instructions • Care and Maintenance • Troubleshooting • Warranty CENTRE DE BREUVAGES AUTONOME Guide d’utiliser et soin de propriètaire .............
Welcome Welcome to the Danby family. We’re proud of our quality products, and we believe in dependable service; like you will find in this owner’s use and care guide, and like you will receive from our friendly customer service department. Best of all, you will experience these values each and every time you use your Danby Appliance. That’s important, because your new appliance will be a part of your family for a long time.
Important Safety Information This appliance must be grounded. In the event of an electrical short circuit, grounding reduces the risk of electrical shock by providing an escape wire for the electrical current. This appliance is equipped with a cord having a grounding wire with a grounding plug. The plug must be plugged into an outlet that is properly installed and grounded. ELECTRICAL REQUIREMENTS IMPORTANT WARNING An empty beverage center is a very dangerous attraction to children.
Important Safety Information GROUNDING INSTRUCTIONS WA R N I N G ! Improper use of the grounding plug can result in a risk of electrical shock. This appliance must be grounded. In the event of an electrical short circuit, grounding reduces the risk of electric shock by providing an escape wire for the electric current. For best operation, plug this appliance into its own electrical outlet to prevent flickering of lights, blowing of fuse or tripping of circuit breaker.
Installation Instructions FEATURES OF YOUR BEVERAGE CENTRE 1 4 2 6 3 5 1. Electronic Display and Controls: For viewing and regulating the temperature of the Beverage Center. 5. Leveling Legs 6. Magnetic Door Gaskets: Tight fitting seals retain all the cooling power and humidity levels. 2. Handle 3. Tempered Glass Door: Tinted for UV protection while still allowing for easy interior viewing. 4. Stainless Steel Color Trim Shelves Specifications Width 19.41 in.
Installation Instructions BEVERAGE STORAGE I M P O R TA N T ! The maximum* capacity of the DBC434A1BSSDD is 124 (350ml) cans or 88 cans and 9 (750ml) wine bottles. *When stocked as per instructions. Store beverages in sealed bottles only. Top Shelf: Holds 18 cans laying on their sides. 2nd and 3rd Middle Shelves: Each holds 35 cans (70 total) standing vertically. Base: Holds up to 9 wine bottles. Alternate base: Holds 36 cans, when the cans are stacked laying on their sides.
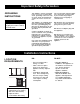
Installation Instructions DOOR REVERSAL INSTRUCTIONS TOOLS REQUIRED Phillips #2 screwdriver and an adjustable wrench. WARNING Excessive Weight hazard use two or more people when moving the wine cooler. 1 Rubber cover 2 Screws 3 Decorative cover 4 Screws 5 Top Hinge 6 Decorative nail 7 Screws 8 Lower hinge 9 Cabinet leg 10 Extrusion-board of lamp switch 11 Screws 1. Close the door and take out rubber cover (1), unscrew two screws (2) and remove decorative cover (3).(Fig.1). 2.
Operating Instructions CONTROLS OF YOUR BEVERAGE CENTER 2 4 3 5 6 1 5. ‘ ’ Button: Used to raise the temperature (warmer) in 1° degree increments. 1. Indicator light illuminates to signify the cooling mode is currently in operation. ‘ 2. Set Temperature Display: Display screen shows the temperature setting (see ‘Setting the temperature’ below) ’ Button: Used to decrease the temperature (cooler) in 1° degree increments. 6. ‘||’ Switch: Continuous illumination.
Care and Maintenance WA R N I N G ! Be certain the power is off before cleaning any part of this appliance. HELPFUL HINTS Allow the door to remain open for a few minutes after manual cleaning to air out and dry the inside of the cabinet. HOW TO CLEAN THE INSIDE Walls, Floor, Inside Window, and Shelves Water deposits and dust can be removed with a damp cloth. I M P O R TA N T ! Never use any commercial or abrasive cleaners or sharp objects on any part of the beverage center.
Troubleshooting Occasionally, a problem may arise that is minor in nature, and a service call may not be necessary. Use this troubleshooting guide for a possible solution. If the unit continues to operate improperly, call an authorized service depot or Danby’s Toll Free Number 1-800-263-2629 for assistance. Problem Possible Cause What to do No Power. A fuse in your home may be blown or the circuit breaker tripped. Replace fuse or reset circuit breaker. Power surge.
LIMITED IN-HOME APPLIANCE WARRANTY This quality product is warranted to be free from manufacturer’s defects in material and workmanship, provided that the unit is used under the normal operating conditions intended by the manufacturer. This warranty is available only to the person to whom the unit was originally sold by Danby Products Limited (Canada) or Danby Products Inc. (U.S.A.) (hereafter “Danby”) or by an authorized distributor of Danby, and is non-transferable.
Beinvenue Bienvenue dans la famille Danby .Nous sommes fiers de nos produits de qualité et croyons au bien fondé de fournir une assistance fiable à nos clients. Vous le découvrirez parce guide facile d’utilisation et vous pourrez l’entendre en provenance des voix amicales de notre service d’assistance à la clientèle. Mais, ce qui est encore mieux, vous pourrez bénéficier de ces valeurs à chaque utilisation de votre appareil.
Consignes De Sécurité Important Cet appareil doit être mis à la terre. En cas de courtcircuit, la mise à la terre réduit les risques de décharge électrique en fournissant un échappatoire au courant électrique. L’appareil est muni d’un cordon électrique comprenant un fil de mise à la terre et une fiche de terre. CONSIGNES DE MISE À LA TERRE Branchez la fiche dans une prise de courant correctement installée et mise à la terre.
Consignes De Sécurité Important Cet appareil doit être mis à la terre. Dans l’éventualité d’un court-circuit, la mise à la terre procure un chemin direct de contournement du courant pour prévenir l’électrocution des manipulateurs de l’appareil. INSTRUCTIONS DE MISE À LA TERRE AVERTISSEMENT! Une utilisation fautive de la fiche mise à la terre peut constituer un danger d’électrocution. Cet appareil est muni d’un cordon comprenant une fiche et fil de mise à la terre.
Instructions d'installation CARACTÉRISTIQUES DE VOTRE CENTRE DE BREUVAGES 1 4 2 6 3 5 1. Affichage et Controls Électroniques : Affichage et rélage de la température du centre au breuvages. 2. Poignée 3. Portes en Verre Trempé : Teinté pour protéger contre les rayons UV tout en permettant de voir facilement le contenu du cabinet. 5. Pieds Adjustables 6. Joint Étanche Magnétique : Le joint étanche permet de conserver le niveau de température et d’humidité à l’intérieur du cabinet. 4.
Instructions d'installation ENTREPOSAGE DES BOISSONS Étagère supérieure : Contient 18 cannettes remisées à l’horizontale. IMPORTANT ! La capacité optimale* du modèle DBC434A1BSSDD est de 124 cannettes (de 350 ml) ou 88 cannettes et 9 bouteilles de vin (de 750 ml). *Lorsque remisées selon les instructions. 2ième et 3ième étagères du milieu :Chacune contient 35 cannettes (70 au total) remisées à la verticale. Entreposez les boissons dans des bouteilles scellées seullement.
Instructions d'installation INVERSION DE PORTE Outils requis Tournevis Phillips #2 et une clé ajustable 16
Consignes d’utilisation COMMANDES DE VOTRE CENTRE DE BREUVAGES 2 4 3 5 6 1 5. ‘ ’ bouton de commande : Augmenter la température (plus chaud) par intervalle de un degré 1. Le voyant s’allume pour indiquer que le cycle de refroidissement est presentment en marche. ‘ ’ bouton de commande : Diminuer la température (plus froid) par intervalle de un degré. 2. Réglage de la température L’écran affiche la température demandée par réglage (référez-vous au “Réglage du température” ci-dessous). 6.
Soins et entretien MISE EN GARDE! A s s u r e z v o u s q u e l ’ a l i m e n ta t i o n e s t c o u p é e a v a n t d e n e t t o y e r n ’ i m p o r t e q u e l l e pa r t i e d e c e t a p pa r e i l . CONSEILS UTILES Après avoir fait de la glace, effectué un autonettoyage ou un nettoyage manuel, laissez la porte de la machine ouverte durant quelques minutes pour aérer et assécher l’intérieur de l’armoire.
Dépannage En temp de temp, le probleme est mineur et n’exige pas un appel de service. Utilisez ce guide pour trouver des solutions. Si l’appareil ne fonctionne toujours pas, appelez un depot de service autorise ou le numero de telephone sans frais Danby 1-800-263-2629 pour de plus amples renseignements. Problème Cause possible L’appareil n’est pas alimenté Un fusible de votre panneau Remplacez le fusible ou de distribution peut être grillé réarmez le disjoncteur.
GARANTIE LIMITÉE SUR APPAREIL ÉLECTROMÉNAGER À DOMICILE Cet appareil de qualité est garantie exempt de tout vice de matière première et de fabrication, s’il est utilisé dans les conditions normales recommandées par le fabricant. Cette garantie n’est offerte qu’à l’acheteur initial de l’appareil vendu par Danby Products Limited (Canada) ou Danby Products Inc. (E.- U. d’A) (ci-après “Danby”) ou par l’un des ses distributeurs agréés et elle ne peut être transférée.
Bienvenido Bienvenido a la familia Danby. Estamos orgullosos de nuestros productos de alta calidad y creemos en el servicio confiable. Usted lo podrá apreciar en este manual fácil de usar, y lo escuchará enlas voces amistosas de nuestro departamento de servicio al consumidor. Sobre todo, usted apreciará estas ventajas cadavez que use su aparato. Eso es importante, ya que su nuevo artefacto formará parte de su familia por mucho tiempo.
Instrucciones De Seguridad Importantes Este aparato electrodoméstico, debe estar conectado a tierra. En caso de un cortocircuito eléctrico, la conexión a tierra reduce el riesgo dechoque eléctrico proporcionando un cable de escape para la correinte eléctrica. REQUISITOS ELÉCTRICOS Este aparato viene equipado con un cordon que posee un cablea tierra con un enchufe de conexión a tierra. Este enchufe debe estar enchufado en un tomacorriente instalado correctamente y conectado a tierra.
Instrucciones de seguridad importantes INSTRUCCIONES DE LA CONEXIÓN A TIERRA AT E N C I Ó N La conexión inadecuada del cable de tierra puede causar riesgo de descarga eléctrica. Este artefacto debe ser conectado a tierra. En caso de un corto circuito eléctrico, la conexión a tierra reduce el riesgo de una descarga eléctrica proporcionando un cable de retorno para la corriente eléctrica. Este artefacto viene con un cable de alimentación que tiene un conductor y pata del enchufe de tierra.
Instrucciones de instalación CARACTERÍSTICAS DE SU CENTRO DE BEBIDAS 1 4 2 6 3 5 1. Indicador y controles electrónicos : Para ver la temperatura actual del Conservador de Bebidas y para graduarla. 2. El picaporte 5. Patas Niveladoras 6. Juntas Magnéticas de la Puerta: Las juntas ajustadas mantienen todo el poder de enfriamiento y los niveles de humedad. 3. Puerta de vidrio templado: Polarización para proteger contra radiación UV pero permite ver fácilmente el interior. 4.
Instrucciones de instalación Almacenamiento de Bebidas ¡ I M P O R TA N T E ! La capacidad máxima* del DBC434A1BSSDD es 124 latas (de 350ml) u 88 latas y 9 botellas de vino (de 750 ml). *Cuando se guardan siguiendo las instrucciones. Repisa superior: Guarda 18 latas echadas 2da y 3era repisa intermedia: Cada una guarda 35 latas paradas (70 en total) Base : Hasta 9 botellas Guarde el bebidas en botellas cerradas únicamente.
Instrucciones de instalación INVERSIÓN DE LA PUERTA HERRAMIENTAS NECESARIAS Destornillador Phillips N° 2 y una llave ajustable. ¡ADVERTENCIA! Peligro por exceso de peso El enfriador de vinos debe ser movido por dos o más personas. 1 Cubierta de caucho 2 Tornillos 3 Cubierta decorativa 4 Tornillos 5 Bisagra superior 6 Clavo decorativo 7 Tornillos 8 Bisagra inferior 9 Pata del gabinete 10 Placa de extrusión del interruptor de la lámpara 11 Tornillos 1.
Operación CONTROLES DE SU CENTRO DE BEBIDAS 2 4 3 5 6 1 5. Botón ‘ ’ : Se usa para aumentar la temperatura 1° a la vez. 1. (Marcha) : Este indicador se enciende para indicar que el modo de refrigeración está funcionando. Botón‘ ’ : Se usa para bajar la temperatura 1° a la vez. 2. Indicador de Termostato: Indica la temperatura programada: Refiérase a la sección “Programación de temperatura” a continuación. 6. Interruptor en ‘||’ : Iluminación constante.
Limpieza y Mantenimiento AT E N C I Ó N ! Verifique que la unidad esté apagada antes de limpiar cualquiera de sus partes. CONSEJOS ÚTILES Deje la puerta abierta por unos minutos luego de limpiarla para que se ventile y para secar el interior del gabinete. CÓMO LIMPIAR EL INTERIOR Paredes, Piso, Interior de las Puertas y Estantes Las manchas de agua y tierra se pueden limpiar con un trapo húmedo.
Solucion Sugerida Con frecuencia, los probelmas no son muy importantes, y es posible que no se requiera unallamada de servicio, use la guia para la resolucion de problemas para tratar de encontrar una posible solución. Si la unidad continua funcionando en forma incorrecta, llame a una estación de servicio autorzada o 1-800-26-DANBY Problema No Enciende.
GARANTÍA LIMITADA PARA ELECTRODOMÉSTICO Este producto de calidad está garantizado contra defectos de fabricación, incluyendo partes y mano de obra, siempre y cuando la unidad se utilice bajo las condiciones normales de funcionamiento para las que fue diseñado. Esta garantía está solamente disponible para la persona que haya comprado originalmente esta unidad directamente de Danby Products Limited (Canada) o Danby Products Inc. (U.S.A.
• FREE STANDING BEVERAGE CENTER • CENTRE DE BREUVAGES AUTONOME • CENTRO DE BEBIDAS AUTÓNOMO Model • Modèle • Modelo DBC434A1BSSDD BEVERAGE CENTER The model number of your unit is found on the serial plate located on the back, top left-hand corner. All repair parts are available for purchase or special order when you visit your nearest service depot. To request service and/or location of the service depot nearest you, call the toll free number listed to the left in Canada and the U.S.