
Owner's Manual

Operating Instructions
7
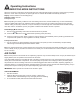
DEHUMIDIFYING MODE INSTRUCTIONS
When the unit is fi rst connected to the electrical outlet, the power light will not light up until the “on/off” button is pressed.
When the “on/off” button is pressed, the power light turns on and the dehumidifi er automatically defaults to:
Display: Current ambient room humidity (RH%)
Humidity Setting: 40% RH
Fan Speed: High.
Note: Depending on humidity conditions of the surrounding environment, the dehumidifi er may not start automatically
under the default setting (this is an indication that the humidity level of the surrounding environment is lower than the
“default” setting of 40% RH). Therefore, it may be necessary to scroll through each of the different dehumidifi er settings
35%-55% until the “humidistat” (sensor) recognizes conditions that will allow the unit to operate.
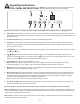
Dehumidifying Mode Selection:
1. The unit enters dehumidify mode when the ON/OFF button is pressed.
2a. Press the / buttons to select a desired RH operating value (35%-85%).
OR
2b. Press the continuous button. When continuous mode is selected, the humidistat (sensor) will be by-passed and the
compressor will operate non-stop regardless of humidity conditions.
Fan Speed Selection:
3. You can choose a fan speed (low/high) using the keypad. The speed you select is identifi ed by the (illuminated)
indicator light located directly above the selection made.
Note: For optimal performance, ensure that the unit is set at least 10% lower than the relative humidity level. It is normal
for the humidity to vary by 5% above or below the set humidity. It is recommended that in normal conditions, the humidity
be set at 40-45%.
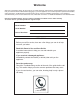
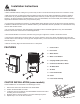
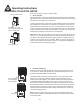
Your dehumidifi er features a removable Air Filter. This fi lter is located at the front of the unit (behind the air intake grill)
directly above the water tank compartment. The air fi lter plays an important role in helping to reduce (minimize) dust/
dirt particles from the surrounding environment. A blocked/clogged air fi lter reduces air intake, impacting negatively on
operating effi ciency. To maintain maximum operating effi ciency, the fi lter must be checked and cleaned regularly (every 2
weeks). More frequent cleaning may be required depending upon indoor air quality.
IMPORTANT: Never operate the unit without the air fi lter in place.
AIR FILTER REMOVAL:
1. Pull fi lter outwards.
2. Clean the fi lter thoroughly using a vacuum cleaner or wash using
lukewarm water and mild detergent. Dry thoroughly before re-installing.
3. To re-install the air fi lter, slide the fi lter back inside the tracks.
AIR FILTER
Note: All the pictures in the manual are for explanatory purposes only. The actual shape of the unit you purchased may be
slightly different, but the operation and functions are the same.