Dishwashers Built-In Dishwasher Installation Instructions 461.14352 DDW1806BSL Write the model and serial numbers here: Model # __________________ Serial # __________________ You can find them on the tub wall just inside the door or . the lower part of back.
BEFORE INSTALLATION Read these instructions completely and carefully. WARNING Electric Shock Hazard Disconnect electrical power at the fuse box or circuit breaker box before beginning installation. Failure to follow this warning could result in serious injury or death. Note to Installer Be sure to leave Installation Instructions and User Instructions with owner. CONTENTS CONTENTS Material You Will Need . . . . . . . . . . . . . . . . . . . . . . . . . . . . . 1 Materials You Will Need . . . . . . . . . .
Installation Preparation MATERIALS YOU WILL NEED (INCLUDED) • 2 #8 x 5/8” flat head wood screws to secure dishwasher to underside of countertop. • Strain Relief for electrical connections. Waste Tee Wood Screws MATERIALS YOU WILL NEED (NOT INCLUDED) Air Gap Hand Shut-off Valve • 3/8” Male (N.P.T.) 90º Elbow.
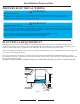
Installation Preparation UNIT DIMENSIONS 18" TYPE OF DRAIN CONNECTION: The dishwasher comes with a factory installed drain hose. Drill 2” diameter hole to allow the drain hose to pass through the cabinet and connect to drain. (under sink) Review the different ways of connecting the dishwasher to the drain system, (See Figs 4, 5, 6, 7) and choose a method that best suits your (application) needs.
Installation Preparation PREPARE ELECTRICAL WIRING WARNING! FOR PERSONAL SAFETY: Disconnect electrical power at the fuse box or circuit breaker before beginning installation. Do not use extension cords or (plug) adapters with this appliance. Such can result in fire, electrical shock or other personal injury. Failure to follow these instructions could result in serious injury or death. WARNING! GROUNDING INSTRUCTIONS: The dishwasher must be connected to a grounded metal, permanent wiring system.
Installation Instructions Kick-Plate Screws REMOVE KICK-PLATE Figure 11 Before you can make the water/electrical connections to the dishwasher, the "kick-plate" must first be removed. To remove the kick-plate, lay the dishwasher on it's back. Remove 4 screws (2 on each side) from the underside of the kick-plate. (See Fig.11) It is not necessary to reinstall these screws once removed, as the kick-plate simply snaps into position when reinstalled.
Installation Instructions PREPARE DRAIN CONNECTION: The dishwasher comes with a factory installed drain hose. Drill 2” diameter hole to allow the drain hose to pass through the cabinet and connect to drain. (under sink) Review the different ways of connecting the dishwasher to the drain system, (See Fig’s 4, 5, 6, 7) and choose a method that best suits your (application) needs.
Installation Instructions LEVEL DISHWASHER IMPORTANT-- Dishwasher must be level for proper dish rack operation and wash performance. * Place level on door and rack track inside the tub as shown to check that the dishwasher is level. * Level the dishwasher by adjusting the four leveling legs. Check Level Front to Back Check Level Side To Side Turn Legs to Adjust Figure 15 Figure 16 CONNECT WATER SUPPLY IMPORTANT: Check and make sure the dishwasher does not rub against the incoming water supply line.
Installation Instructions CONNECT DRAIN LINE FOLLOW ALL LOCAL CODES AND ORDINANCES. If a longer drain hose is required, add up to 42° of length for a total of 10 ft. length to the factory installed hose. Use 5/8" or 7/8" inside diameter hose and a coupler to connect the two hose ends. Secure the connection with hose clamps. Hose Clamp Coupler Hose Clamp Figure 20 * Secure the drain hose to the air gap, waste tee or disposer with clamps.
Installation Instructions PRE-TEST CHECK LIST ELECTRICAL CONNECTIONS: WARNING: Make sure electrical power has been disconnected at fuse box or circuit breaker box before making electrical connections. Review this list after installing your dishwasher to avoid charges for a service call that is not covered by your warranty The electrical connection (dishwasher junction box) is located on the right front side of the dishwasher behind the kick-plate. (See Fig.
Installation Instructions SLIDE DISHWASHER INTO CABINET: To avoid damage, do not push against the front door panel with your knee when sliding the dishwasher into the cabinet. Slide the dishwasher into the cabinet by (slowly) pushing the unit from side to side (See Fig. 15) As the dishwasher is pushed back, carefully pull the drain hose through the cabinet opening to prevent the hose from becoming kinked. Also make sure there is no other interference with the water/electrical lines or any other components.