• Owner’s Use and Care Guide • Guide d’utilisation et soin de propriètaire • Guía de utilización y cuidado para el propietario FROST FREE REFRIGERATOR RÉFRIGÉRATEUR SANS GIVRE REFRIGERADOR SIN ESCARCHA Model • Modèle • Modelo DFF092C1BSLDB / DFF092C1WDB Danby Products Limited, Guelph, Ontario, Canada N1H 6Z9 Danby Products Inc., Findlay, Ohio, USA 45840 08.07.
CONTENTS TABLE DES MATIÈRES ---- ÍNDICE FROST FREE REFIGERATOR Owner’s Use and Care Guide...........................1-9 • Important Safety Information • Installation Instructions • Features • Operating Instructions • Care and Maintenance • Troubleshooting • Warranty RÉFRIGÉRATEUR SANS GIVRE Guide d’utilisation et soin de propriètaire.....................................................
IMPORTANT SAFETY INFORMATION ELECTRICAL REQUIREMENTS READ AND FOLLOW ALL SAFETY INSTRUCTIONS This appliance must be grounded. In the event of an electrical short circuit, grounding reduces the risk of electrical shock by providing an escape wire for the electrical current. This appliance is equipped with a cord having a grounding wire with a grounding plug. The plug must be plugged into an outlet that is properly installed and grounded.
INSTALLATION INSTRUCTIONS Remove exterior and interior packings, wipe the outside thoroughly with a soft dry cloth and the inside with a wet, lukewarm cloth. Avoid placing the unit in a narrow recess or near any heat source, direct sunlight, or moisture. Let air circulate freely around the unit. Keep the rear of the refrigerator 2 inches away from the wall. • Location 1) Select a place with a strong, level floor.
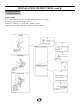
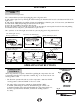
INSTALLATION INSTRUCTIONS DOOR REVERSAL INSTRUCTIONS Your refrigerator is built with a reversible door. You have the choice of either opening it from the left or the right side. In order to reverse the opening direction of your door, please follow these simple instructions: IMPORTANT Before you begin, unplug refrigerator or disconnect power. Remove food and any adjustable door or utility bins from doors. DOOR AND HINGE REMOVAL 1. Unplug refrigerator or disconnect power. 2.
INSTALLATION INSTRUCTIONS (cont’d) DOOR REVERSAL INSTRUCTIONS FINAL STEPS 1. Check all holes to make sure that hole plugs and screws are in place. 2. Plug in refrigerator or reconnect power. 3. Reset the controls (see “temperature control” section). 4. Return all removable door parts to doors and food to product. Top Hinge 1. Cover of upper hinge hole 1. Top hinge cover 2. Top hinge spindle 3. Top hinge 1. Hole plugs Center Hinge 1. Left door stop 2. Door stop screw Accessory bag 1.
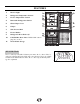
FEATURES 1) Interior Light 1 2) Refrigerator Temperature Control 2 3) Freezer Temperature Control 3 4 4) Removable Refrigerator Shelves 5) Glass Crisper Cover 6) Crisper 7) Wire Freezer Shelf 8) Freezer Basket 9) Refrigerator Door Shelves (2) 10) CANSTORTM Door Liner: Holds 355ml cans of pop, juice, or beer. 11) 2 Liter Bottle Storage 5 6 7 8 ICE CUBE TRAY The ice cube tray is flexible. Twist tray to remove the ice cubes.
FEATURES CHANGING LED LIGHT Please follow the steps below We recommend that you start by unplugging your refrigerator unit. 1. Take off the light cover by flicking the bottom tab up (the bottom tab is located at the bottom middle of the light cover). 2. Take out the LED display by pulling it down and unhooking it from the port, it is best to use your thumb on the front of the LED and you fingers at the back near the port. 3. Put in the new LED by inserting it into the port. 4.
CARE AND MAINTENANCE Cooling System This refrigerator is inclusive of a “Frost Free” type cooling system, which means you never have to defrost the freezer compartment. Defrosting is done automatically by means of a defrost heating element and a defrost timer factory-programmed to operate (cycle) after approximately 3 hours of continuous compressor cycling. The defrost water is routed into a defrost pan located directly above the compressor, where it then evaporates.
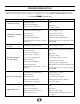
TROUBLESHOOTING Occasionally, a minor problem may arrise, and a service call may not be necessary- use this troubleshooting guide for a possible solution. If the unit continues to operate improperly, call an authorized service depot or Danby’s Toll Free Number for assistance. (1-800-263-2629). Tel: 1-800-26- PROBLEM 1) Unit does not work. POSSIBLE CAUSE SOLUTION • No power to unit. • Check connection of power cord at power source. • Power cord is unplugged. • Plug in unit.
LIMITED IN-HOME APPLIANCE WARRANTY LIMITED IN-HOME APPLIANCE WARRANTY This quality product is warranted to be free from manufacturer’s defects in material and workmanship, provided that the unit is used under the normal operating This quality product warranted to be free from manufacturer’s defects in material and workmanship, provided that the unit is conditions intended by theismanufacturer. used under the normal operating conditions intended by the manufacturer.
CONSIGNES DE SÉCURITÉ IMPORTANTES CONDITIONS ÉLECTRIQUES PRENDRE CONNAISSANCE DE TOUTES LES INFORMATIONS RELATIVES À LA SÉCURITÉ AVANT D'UTILISER LE PRODUIT Cet appareil doit être mis à la terre. En cas de court-circuit, la mise à la terre réduit les risques de décharge électrique en fournissant un échappatoire au courant électrique. L’appareil est muni d’un cordon électrique comprenant un fil de mise à la terre et une fiche de terre.
INSTRUCTIONS D’INSTALLATION Enlevez les emballages extérieurs et intérieurs. Essuyez completement l’extérieur avec un linge doux sec et l’intérieur avec un linge humide tiède. Il ne faut jamais situer l’appareil dans un recoin étroit, proche d’une source d’air chaude. L’air doit circuler à l’entour de l’appareil. Éloigner le réfrigérateur au moins 2 pouces du mur. REMARQUES : • Cet appareil est pour L'INSTALLATION AUTONOME SEULEMENT, et n'est pas pour l'installation intégrée.
INSTRUCTIONS D’INSTALLATION (suite) DIRECTIVES RELATIVES À L’INVERSION DE LA PORTE Votre réfrigérateur est muni d'une porte réversible. Vous pouvez donc l'ouvrir par la gauche ou par la droite. Pour inverser l'ouverture de la porte, il vous suffit de suivre les consignes suivantes : IMPORTANT Avant de commencer, débranchez votre réfrigérateur ou coupez l'alimentation électrique. Enlevez la nourriture ainsi que toute porte ajustable ou tout compartiment des portes.
INSTRUCTIONS D’INSTALLATION (suite) DIRECTIVES RELATIVES À L’INVERSION DE LA PORTE REMARQUE : assurez un soutien supplémentaire des portes pendant la désinstallation des charnières. Ne vous fiez pas aux aimants des portes pour tenir celles-ci en place pendant que vous travaillez. 2. Assemblez les pièces de la charnière centrale comme le montre l'illustration et resserrez toutes les vis (voir l'illustration de la charnière centrale). Remettez la porte du congélateur en place. 3.
CARACTÉRISTIQUES 1) Lampe intérieure. 2) Bouton de réglage de la température du réfrigérateur. 3) Bouton du réglage de la température du congélateur. 4) Tablettes amovibles du réfrigérateur. 5) Couvercle du bac á légumes et fruits en verre. 6) Bac á légumes et fruits 7) Tablette du congélateur du fil. 8) Panier du congélateur. 7 9) Balconnets (2). 8 10) Contre-porte CANSTORTM : peut contenir des cannettes de boissons gazeuses, de jus ou de bière de 355ml.
CARACTÉRISTIQUES CHANGER LA LUMIÈRE S’il vous plaît suivre les étapes ci-dessous Débranchez votre appareil réfrigérateur avant de commencer. 1. Enlevez le protège-lampe en soulevant la languette inférieure vers le haut en la faisant basculer à la touche (la languette inférieure est située au centre du fond du protège-lampe). 2.
CONSIGNES D’OPERATION BOUTON DE RÉGLAGE DU RÉFRIGÉRATEUR BOUTONS DE RÉGLAGE DE LA TEMPÉRATURE Votre réfrigérateur dispose d’un bouton de réglage distinct pour la régulation indépendante de la température de chaque compartiment. Les boutons de réglage de température sont situés à l’arrière du compartiment du réfrigérateur (voir la figure A). Fig. A • Lors de la première mise en marche de l’appareil, régler la température sur « MAX » pour le compartiment du réfrigérateur et pour celui du congélateur.
SOINS ET ENTRETIEN Système de refroidissement Ce réfrigérateur comprend un système de réfrigération « sans givre », ce qui signifie que vous n’aurez jamais besoin de dégivrer le congélateur. Le dégivrage est automatiquement effectué au moyen d’un élément chauffant et d’une minuterie prévus pour la décongélation et réglés en usine pour fonctionner (selon un cycle) après environ 3 heures de fonctionnement continu du compresseur au cours de son cycle.
DÉPANNAGE De temps en temps, un problème est mineur et un appel de service peut ne pas être nécessaire. Utilisez ce guide de dépannage pour trouver une solution possible. Si l’unité continue de fonctionner incorrectement, appelez un dépôt de service autorisé ou le numéro sans frais de Danby pour obtenir de l’assistance. Tel: 1-800-26- PROBLÈME (1-800-263-2629). CAUSE PROBABLE • L’appareil n’est pas alimenté. 1) Ne fonctionne pas. • Le cordon d’alimentation n’est pas branché.
GARANTIE SURWARRANTY LIMITED IN-HOMELIMITÉE APPLIANCE ÉLECTROMÉNAGER This quality product is warranted toAPPAREIL be free from manufacturer’s defects in material and workmanship, providedÀthatDOMICILE the unit is used under the normal operating conditions intended by the manufacturer.
INSTRUCCIONES DE SEGURIDAD IMPORTANTES REQUISITOS ELÉCTRICOS LEA TODA LA INFORMACIÓN SOBRE SEGURIDAD ANTES DE UTILIZAR EL EQUIPO Este artefacto debe ser conectado a tierra. En caso de un corto circuito eléctrico, la conexión a tierra reduce el riesgo de una descarga eléctrica proporcionando un cable de retorno para la corriente eléctrica. Este artefacto viene con un cable de alimentación que tiene un conductor y pata del enchufe de tierra.
INSTRUCCIONES DE INSTALACIÓN Saque los embalajes exteriores e interiores, limpie el exterior bien con un pano suave seco y el interior con un pano húmedo y tibio. Evite colocar la unidad en un hueco estrecho o cerca de una fuente de calor, luz de sol directa, o lugar húmedo. Deje que el aire circule libremente alrededor de la unidad. Mantenga la parte posterior del refrigerador a 2 pulgadas de la pared. Ubicación 1) Seleccione un lugar con un piso firme y nivelado.
INSTRUCCIONES DE INSTALACIÓN INSTRUCCIONES PARA LA INVERSIÓN DE LA PUERTA Su refrigerador tiene una puerta reversible. Tiene la posibilidad de abrirla desde la derecha o desde la izquierda. Para revertir la dirección de apertura de la puerta, siga estas sencillas instrucciones: IMPORTANTE Antes de comenzar, desenchufe el refrigerador o corte el suministro eléctrico. Retire los alimentos y las puertas ajustables o los recipientes contenedores de las puertas. EXTRACCIÓN DE LA PUERTA Y LA BISAGRA 1.
INSTRUCCIONES DE INSTALACIÓN INSTRUCCIONES PARA LA INVERSIÓN DE LA PUERTA REEMPLAZO DE LA PUERTA Y LA BISAGRA 1. Vuelva a colocar las piezas de la bisagra inferior, como se ilustra (vea la ilustración de la bisagra inferior). Apriete los tornillos. Vuelva a colocar la puerta del refrigerador. NOTA: Coloque un soporte adicional a las puertas mientras se mueven las bisagras. No deje que los imanes de la puerta soporten toda la carga de las puertas mientras usted está trabajando. 2.
CARACTERISTICAS 1) Luz Interior. 2) Control de Temperatura del Refrigerador. 3) Control de Temperatura del Congelador. 4) Estantes Desmontables del Rerfrigerador. 5) Cubierta del Vidrio para Cajón de Frutas y Verduras. 1 9 2 3 4 5 6 6) Cajón de Frutas y Verduras 7) Estante de Alambre del Congelador. 8) Cesta del Congelador. 9) Estantes de la Puerta del Refrigerador (2). 10) Revestimientos de Puerta CANSTORMF: Para guardar latas de gaseosas, jugo o cerveza, de 355 ml.
CARACTERISTICAS CAMBBIAR LA LUZ Por favor, siga los siguientes pasos Desenchufe su refrigerador antes de empezar. 1. Saque la cubierta de la luz destrabando la pestaña inferior hacia arriba (la pestaña inferior está ubicada en el medio de la parte inferior de la cubierta de la luz). 2. Saque los LEDs tirando hacia abajo y desconectándolos, es mejor usar su pulgar en el frente de los LEDs y sus dedos en la parte de atrás, cerca del conector. 3. Coloque los LEDs nuevos enchufándolos en el conector. 4.
INSTRUCCIONES OPERADORAS CONTROL DEL REFRIGERADOR CONTROLES DE TEMPERATURA Su refrigerador cuenta con un control separado para regular de manera independiente la temperatura de cada sección. Los controles de temperatura están ubicados en la parte trasera de la sección del refrigerador (vea la Fig. A). Fig.
CUIDADO Y MANTENIMIENTO Sisteme de refrigeración Este refrigerador incluye un sistema de enfriamiento ‘libre de escarcha’, lo cual significa que nunca tendra que scongelar el compartimiento del freezer. El descongelamiento se realiza automáticamente mediante un elemento calefactor de descongelamiento y un temporizador de descongelamiento programado de fábrica para funcionar (en ciclos) después de aproximadamente 3 horas de ciclado continuo del compresor.
SOLUCIÓN SUGERIDA A menudo, los problemas son sencillos y no es necesario hacer una llamada de reparación, use esta guía de resolución de problemas para encontrar una posible solución. Si la unidad sigue funcionando mal, llame a los números gratuitos de un centro Danby de servicio autorizado. Tel: 1-800-26- PROBLEMA 1) No funciona. (1-800-263-2629). CAUSA POSIBLE SOLUCIÓN • No hay voltaje en el contacto. • Verifique que la clavija esté conectada. • Clavija desconectada. • Conecte la clavija.
GARANTÍA LIMITADA PARA LIMITED IN-HOME APPLIANCE WARRANTY ELECTRODOMÉSTICO This quality product is warranted to be free from manufacturer’s defects in material and workmanship, provided that the unit is used under the normal operating conditions intended the manufacturer. Este producto debycalidad está garantizado contra defectos de fabricación, incluyendo partes y mano de obra, siempre y cuando laThis unidad seisutilice de funcionamiento paraLimited las que fue diseñado.
FROST FREE REFRIGERATOR RÉFRIGÉRATEUR SANS GIVRE All repair parts are available for purchase or special order when you visit your nearest service depot. To request service and/or the location of the service depot nearest you, call the TOLL FREE number. Toutes les pièces de rechange ou commandes spéciales sont disponibles à votre centre de service régional autorisé. Pour obtenir le service et/ou la localité de votre centre de service régional, signalez le NUMÉRO D’APPEL SANS FRAIS.