Microwave Oven The model number can be found on the serial plate located on the back panel of the unit. Model • Modèle • Modelo DMW1400W All repair parts available for purchase or special order when you visit your nearest service depot. To request service and/or the location of the service depot nearest you, call the TOLL FREE NUMBER.
OWNER’S MANUAL MANUEL D'UTILISATION MANUAL DEL USUARIO Model • Modèle • Modelo DMW1400W CAUTION: Read and Follow All Safety Rules and Operating Instructions Before First Use of This Product. PRÉCAUTION: Veuillez lire attentivement les consignes de sécurité et les instructions d'utilisation avant l'utilisation initiale de ce produit. PRECAUCIÓN: Lea y observe todas las reglas de seguridad y las instrucciones de operación antes de usar este producto por primera vez. Microwave Oven Owners Manual . . . . . .
INSTRUCTION MANUAL AND COOKING GUIDE MICROWAVE OVEN MODEL: DMW1400W TABLE OF CONTENTS • Precautions to Avoid Possible Exposure to SAFETY ...........................................Pages 2-5 Excessive Microwave Energy • F.C.C.Statement • Important Safety Instructions • Proper and Safe Use of Your Oven • Grounding Instructions • Materials you can use in microwave oven • Materials to be avoided in microwave oven INSTALLATION .............................
PRECAUTIONS TO AVOID POSSIBLE EXPOSURE TO EXCESSIVE MICROWAVE ENERGY (a) Do not attempt to operate this oven with the door open since open-door operation can result in harmful exposure to microwave energy. It is important not to defeat or tamper with the safety interlocks. (b) Do not place any object between the oven front face and the door or allow soil or cleaner residue to accumulate on sealing surfaces. (c) Do not operate the oven if it is damaged.
14. More/Less (Más/menos): Permite “agregar” o “quitar” tiempo de cocción ( aprox. un 7%) a cualquier programa de cocción. NOTA: Esta característica sólo se puede utilizar antes de oprimir el botón "Start" para activar el horno. Oprima el botón Más Menos Pantalla Tiempo de cocc. bIG SAL T (1+7%) T (1-7%) a) Oprima el botón "More". En la pantalla se leerá "bIG" y el tiempo de cocción aumentará en un 7%. b) Oprima el botón "Less". En la pantalla se leerá "SAL" y el tiempo de cocción disminuirá en un 7%..
11. Do not cover or block any ventilation openings on the oven. 12. Do not store or use this appliance outdoors. 13. Do not use this oven near water, near a kitchen sink, in a wet basement or near a swimming pool. 14. Do not immerse cord or plug in water. 15. Keep cord away from heated surfaces. 16. Do not let cord hang over edge of table or counter. 17. When cleaning door and oven surfaces that meet when door is closed, use only mild, non abrasive soaps or detergents applied with a sponge or soft cloth.
IMPORTANT SAFETY INSTRUCTIONS GROUNDING INSTRUCTIONS This appliance must be grounded. In the event of an electrical short circuit, grounding reduces the risk of electric shock by providing an escape wire for electric current. This appliance is equipped with a cord having a grounding wire with a grounding plug. The plug must be plugged into an outlet that is properly installed and grounded.
Materials you can use in microwave oven Utensils Remarks Dinnerware Microwave-safe only. Follow manufacturer's instructions. Do not use cracked or chipped dishes. Glass Jars Always remove lid. Use only to heat food until just warm. Most glass jars are not heat resistant and may break. Glassware Heat-resistant oven glassware only. Make sure they do not have any metallic trim. Do not use cracked or chipped dishes. Oven Cooking Bags Follow manufacturer's instructions.
Countertop Installation 1. Select a level surface that provides enough open space for air intake and/or outlet vents. • A minimum clearance of 7.5 cm (3") is required between the oven and any adjacent wall. One side must be open. • Leave a minimum clearance of 30 cm (12") above the oven. • Do not remove the legs from the bottom of the oven. • Blocking the air intake and/or outlet openings can damage the oven . • Place the oven as far away as possible from radios and TV's.
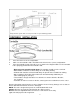
Safety interlock system: Shuts off oven power if door is opened during operation TURNTABLE INSTALLATION 1. 2. 3. Place the roller rest on the cavity bottom. Make sure the turntable shaft is installed inside the hole in the (center) cavity bottom. Place the turntable on top of the roller rest as shown in the diagram. Make sure the turntable hub is properly positioned on the turntable shaft. • Never place the turntable upside down. The turntable should never be restricted.
COOKING GUIDE COOKING PRINCIPLES AND TECHNIQUES The advantages of microwave cooking are speed and efficiency. For warming, heating, and defrosting, nothing compares. Here are a few tips that will make microwave cooking easier and more enjoyable. Microwave Cooking Principles: Because microwave cooking requires only one-quarter to one-third the time of conventional cooking, the same cooking principles become even more important.
TROUBLESHOOTING Some problems are minor in nature and can be easily rectified. Compare the problem you are having against the chart below and try the "possible remedy" to resolve the problem. If the microwave oven still does not work properly, contact the nearest authorized service center. (or call our Toll Free Line at: 1 800 26 DANBY) PROBLEM POSSIBLE CAUSE POSSIBLE REMEDY Oven will not start • Electrical cord for oven is not plugged in. • Door is open. • Wrong operation is set.
CARE AND MAINTENANCE • Exterior The outside surface (cabinet) is painted. Clean the outer cabinet with mild soap and water. Rinse and dry with a soft cloth. Do not use any type of household or abrasive cleaner. Wipe the oven window on both sides with a damp cloth to remove any spills or spatters. Wipe the front side of the door with a cloth dampened slightly with water only. Dry with a soft cloth. Do not scrub or use any chemical cleaners.
Control Panel and Features: DMW1400W 1. Display Window: counts down cooking time in seconds during cooking programs. Also displays time of day clock when oven is not in use. 2. Program Indicators: Stage 1 & Stage 2: indicates current cooking stage. Defrost Weight: shows the selected weight of defrost foods. Defrost Time: shows the selected time of defrosting. Cups: the number of liquid foods. Auto Start: oven starts automatically when set time is reached. Lock: indicates the child safe lock is set.
2. Auto Defrost By Weight: Microwave Oven automatically calculates defrost time based on weight entered. Please refer to the below chart for details. Press Key Pad Defrost Program Food Category Weight Scope Once dEF 1 Chicken 0.1 ~ 6.0lbs. Twice dEF 2 Meat 0.1 ~ 4.0lbs. Three Times dEF 3 Fish 0.1 ~ 3.0lbs. a) Press the "Auto Defrost" key, the display will show the available defrost programs. Press the "Auto Defrost" key repeatedly to scroll through the available programs.
4. Two Stage Microwave Cooking: Allows you to program two different power levels and two different cooking times within the same cooking program. STAGE 1: a) Press "Power" key once to select "Stage 1" cooking, the (red) indicator light and PH 1 are displayed. b) Press "Power" key repeatedly to select appropriate (Stage 1) power level. c) Enter (Stage 1) cooking time by pressing number keys in sequence. Example: if you want a cooking time of 10:00, press 1,0,0,0.
6. Soup: Allows you to cook three different servings. Please refer to the below chart for details. Press Key Pad Program Display Once Twice Three Times 1 2 3 Soup Serving Cooking Time 6 oz. (170 grams) 9 oz. (250 grams) 12 oz. (340 grams) See Cooking Chart a) Press the "Soup" key repeatedly to scroll through the available servings. b) The (red) indicator light "No", "Stage 1" and program appear in the display.
10. Dinner Plate: Allows you to cook three different Dinner Plate servings. Please refer to the below chart for details. Press Key Pad Program Display Dinner Plate Serving Once 6.0 6 oz. Twice 9.0 9 oz. Three Times 12.0 12 oz. Cooking Time See Cooking Chart a) Press the " Dinner Plate" key repeatedly to scroll through the available servings. b) The (red) indicator light "oz", "Stage 1" and program appear in the display.
14. More/Less: Allows you "add" or "reduce" cooking time (by approx. 7%) from any selected cooking program. NOTE: This feature can only be used before the "Start" key is pressed putting the oven into operation. Press Key Pad More Less Program Display Cooking Time bIG SAL T (1+7%) T (1-7%) a) Press the "More" key, the word "bIG" is displayed and cooking time will be increased by 7%. b) Press the "Less" key, the word "SAL" is displayed and cooking time will be decreased by 7%.
Cooking Time Chart for 1 Touch Recipes Model No. DMW1400W Item Display Popcorn 1.75oz. 3.5oz Soup 1 2 3 Muffin 1 2 3 Potato 6.0 12.0 18.0 Pizza 1 2 3 DinnerPlate 6.0 9.0 12.0 Vegetable 6.0 12.0 18.0 Beverage 1 2 3 Approx. Weight Serving 1.75oz. (50g) 3.5oz. (100g) 6 oz. (170g) 9 oz. (255g) 12 oz. (340g) 6 oz. (170g) 9 oz. (255g) 12 oz. (340g) 6.0 oz.(170g) 12.0 oz. (255g) 18.0 oz. (350g) 1 Slice 2 Slices 3 Slices 6.0 oz. (170g) 9.0 oz. (255g) 12.0 oz. (350g) 6.0 oz. (170g) 12.0 oz. (350g) 18.0 oz.
LIMITED PRODUCT WARRANTY MICROWAVE OVENS Carry-in service only. This quality product is warranted to be free from manufacturer’s defects in material and workmanship, provided that the unit is used under the normal operating conditions intended by the manufacturer. This warranty is available only to the person to whom the unit was originally sold by Danby or by an authorized distributor of Danby, and is non-transferable.
Microwave Oven The model number can be found on the serial plate located on the back panel of the unit. Model • Modèle • Modelo DMW1400W All repair parts available for purchase or special order when you visit your nearest service depot. To request service and/or the location of the service depot nearest you, call the TOLL FREE NUMBER.
OWNER’S MANUAL MANUEL D'UTILISATION MANUAL DEL USUARIO Model • Modèle • Modelo DMW1400W CAUTION: Read and Follow All Safety Rules and Operating Instructions Before First Use of This Product. PRÉCAUTION: Veuillez lire attentivement les consignes de sécurité et les instructions d'utilisation avant l'utilisation initiale de ce produit. PRECAUCIÓN: Lea y observe todas las reglas de seguridad y las instrucciones de operación antes de usar este producto por primera vez. Microwave Oven Owners Manual . . . . . .
MANUEL D’INSTRUCTIONS ET GUIDE DE CUISSON FOUR À MICRO-ONDES MODEL: DMW1400W TABLE DES MATIÈRES SÉCURITÉ......................Pages 19-23 • Énoncé de la FCC • Mises en garde contre l’exposition possible à une énergie micro-onde excessive • Consignes de sécurité importantes • Utilisation appropriée et sécuritaire de votre four • Instructions de mise à la terre • Matériaux pouvant être utilisés dans un four à micro-ondes • Matériaux à éviter dans un four à micro-ondes INSTALLATION..............
/MD GARANTIE LIMITÉE SUR LES FOURS À MICRO-ONDES Service après-vente en atelier seulement. Ce produit de qualité est garanti contre les vices de matériaux et de fabrication, à condition qu’il soit utilisé dans des conditions d’utilisation normales telles qu’elles sont établies par le fabricant. La présente garantie non transférable n’est offerte qu’à la personne qui a acheté la première ce produit vendu par Danby ou un marchand autorisé Danby.
Tableau de cuisson pour les recettes 1 touche Modèle DMW1400W Type d’aliment Affichage Maïs soufflé 1.75 oz. Soupe Muffin Pomme de terre Pizza Repas Légumes Breuvage 3.5 oz. 1 2 3 1 2 3 6.0 12.0 18.0 1 2 3 6.0 9.0 12.0 6.0 12.0 18.0 1 2 3 Poids approx. de la portion 1,75 oz. 3,5 oz. 6 oz 9 oz 12 oz 6 oz 9 oz 12 oz 6 oz 12 oz 18 oz 1 morceau 2 morceaux 3 morceaux 6 oz 9 oz 12 oz 6 oz 12 oz 18 oz 8 oz 16 oz 24 oz 35 Temps de cuisson approx.
MISES EN GARDE CONTRE L’EXPOSITION POSSIBLE À UNE ÉNERGIE MICRO-ONDE EXCESSIVE (a) Ne tentez pas d’utiliser ce four lorsque la porte est ouverte, car vous pourriez être exposé à une énergie micro-onde dangereuse. Il est important de ne pas tenter de modifier ou d’éliminer les verrous de sécurité. (b) Ne placez pas d’objets entre l’avant et la porte du four, et assurez-vous que les surfaces d’étanchéité ne comprennent aucun résidu accumulé. (c) N’utilisez pas le four s’il est endommagé.
11. Ne recouvrez et ne bloquez pas les ouvertures de ventilation sur l’appareil. 12. Ne rangez et n’utilisez pas cet appareil à l’extérieur. 13. N’utilisez pas ce four près d’une source d’eau, d’un évier, d’une piscine ou dans un sous-sol humide. 14. N’immergez pas le cordon d’alimentation ou la prise dans l’eau. 15. Tenez le cordon d’alimentation loin des surfaces chauffantes. 16. Ne laissez pas le cordon d’alimentation pendre le long du comptoir. 17.
14. Réglage plus / moins (touche « More/Less ») : Permet d’accroître ou de réduire le temps de cuisson d’environ 7 % au sein du programme choisi. N.B. : cette fonction ne peut être activée qu’avant d’appuyer sur la touche « Start ». Le four sera ensuite activé. Appuyez sur More Less Affichage Temps de cuisson bIG SAL T (1+7%) T (1-7%) a) Appuyez sur la touche « More ». « bIG » s’affichera et le temps de cuisson augmentera de 7 %. b) Appuyez sur la touche « Less ».
10. Repas (touche « Dinner Plate ») : Permet la cuisson de trois portions différentes. Veuillez vous reporter au tableau ci-dessous pour les détails. Appuyez sur la touche Affichage Portion Une fois Deux fois Trois fois 6.0 9.0 12.0 6 oz 9 oz 12 oz Temps de cuisson Voyez le tableau de cuisson a) Appuyez sur la touche « Dinner Plate » de façon répétée pour faire dérouler les portions. b) Le voyant (rouge) « Oz », « Stage 1 » et le programme apparaîtront. c) Appuyez sur la touche de démarrage « Start ».
CONSIGNES DE SÉCURITÉ IMPORTANTES INSTRUCTIONS DE MISE À LA TERRE Cet appareil doit être mis à la terre. En cas de courtcircuit électrique, la mise à la terre réduit le risque de chocs électriques en permettant au courant de s’échapper par un fil de sortie. Cet appareil est muni d’un cordon d’alimentation avec fil et prise de mise à la terre. La fiche doit être branchée dans une prise qui est installée et mise à la terre de façon appropriée.
Matériaux pouvant être utilisés dans un four à micro-ondes Ustensiles Remarques Vaisselle N’utilisez que de la vaisselle allant au micro-ondes. Respectez les instructions du fabricant. N’utilisez pas de la vaisselle ébréchée ou craquelée. Contenants en verre Enlevez toujours le couvercle. N’utilisez que pour légèrement chauffer. La plupart des contenants en verre ne résistent pas à la chaleur et peuvent casser. Articles en verre N’utilisez que des articles résistant à la chaleur.
6. Soupe (touche « Soup ») : Permet la cuisson de trois portions différentes. Veuillez vous reporter au tableau ci-dessous pour les détails. Appuyez sur la touche Affichage Portion de soupe Temps de cuisson Une fois 1 6 oz. (170 g) Voyez le tableau Deux fois 2 9 oz. (250 g) de cuisson Trois fois 3 12 oz. (340 g) a) Appuyez sur la touche « Soup » de façon répétée pour faire dérouler les portions. b) Le voyant (rouge) « No », « Stage 1 » et le programme apparaîtront.
4. Cuisson par micro-ondes en deux étapes : Permet de programmer deux niveaux d’intensité différents et deux temps de cuisson différents au sein d’un même programme de cuisson. NIVEAU 1 : a) Appuyez sur la touche « Power » une fois pour choisir le niveau de cuisson 1 (« Stage 1 »). Le voyant (rouge) s’allumera et « PH 1 » s’affichera. b) Appuyez sur « Power » de façon répétée pour choisir l’intensité (pour le niveau 1).
Installation sur le comptoir 1. Choisissez une surface de niveau et assurez-vous qu’il y a assez d’espace pour l’entrée et les sorties d’air. • Un jeu minimal de 3 po (7,5 cm) est requis entre le four et tout mur adjacent. Un des côtés doit être ouvert (sans obstruction). • Un jeu minimal de 12 po (30 cm) est requis au-dessus du four. • N’enlevez pas les pieds se trouvant sous le four. • Le fait de bloquer l’entrée et les sorties d’air peut endommager le four.
Coffrage Éclairage intérieur Panneau de commande Porte Système de blocage de sécurité coupant l’alimentation si la porte est ouverte pendant la cuisson. INSTALLATION DU PLATEAU TOURNANT Plateau tournant Support 1. 2. 3. Pivot (face inférieure) Placez le support à l’intérieur du four. Assurez-vous que la tige du plateau tournant est installée à l’intérieur du trou (au centre). Placez le plateau tournant sur le support, tel qu’il est montré dans le diagramme.
2. Décongélation automatique selon le poids (touche « Auto Defrost ») : Le four à micro-ondes calcule automatiquement le temps de décongélation selon le poids entré. Veuillez vous reporter au tableau ci-dessous pour les détails. Appuyez sur la touche Programme Catégorie Poids Une fois dEF 1 Volaille 0,1 ~ 6 lb Deux fois dEF 2 Viande 0,1 ~ 4 lb Trois fois dEF 3 Poisson 0,1 ~ 3 lb a) Appuyez sur la touche « Auto Defrost ». L’affichage indiquera les programmes de décongélation possibles.
Panneau de commande et caractéristiques 1. Fenêtre d’affichage : affiche le compte à rebours en secondes du du temps de cuisson pendant un programme ; affiche aussi l’heure 2 lorsque vous n’utilisez pas le four. 2. Indicateurs de programme : « Étape 1 » et « Étape 2 » : indiquent le niveau de cuisson actuel. 3 « Poids de Décongélation »: montre le poids choisi pour la décongélation. « Durée de Décongélation »: indique le temps choisi pour la décongélation. 4 « Tasses » : indique la quantité de liquides.
GUIDE DE CUISSON PRINCIPES ET TECHNIQUES DE CUISSON La rapidité et l’efficacité sont quelques-uns des avantages de la cuisson par micro-ondes. Il n’y a rien de comparable pour faire chauffer, cuire et décongeler. Voici quelques trucs qui rendront votre expérience plus agréable et vous faciliteront la tâche.
DÉPANNAGE Certains problèmes sont de moindre importance et peuvent aisément être corrigés. Consultez le tableau ci-dessous et voyez si la « solution possible » permet de résoudre le problème.
ENTRETIEN • Extérieur La surface extérieure (coffrage) est peinte. Nettoyez l’extérieur du coffrage avec un savon doux et de l’eau, rincez puis séchez au moyen d’un chiffon doux. N’utilisez pas un nettoyant ménager ou un abrasif. Nettoyez l’écran de la porte des deux côtés au moyen d’un chiffon humide pour éliminer les éclaboussures. Nettoyez l’avant de la porte avec un chiffon humide légèrement trempé dans l’eau. Séchez avec un chiffon doux. N’utilisez pas un tampon à récurer ou un nettoyant chimique.