
Use and Care Manual

Operating Instructions
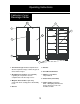
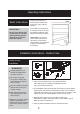
Shelf Instructions
locked position, tilt the shelf
as shown in Fig C and pull
outward.
To re-install, ensure the shelf
is resting securely on the sup-
port brackets and push shelf
inward until it locks into place.
Please Note: The bottom
shelf in both sections of the
cabinet are not secured in
place (locked). Do not attempt
to pull on the shelf when
IMPORTANT!
Do not cover shelves with
aluminum foil or any other
material that will prevent
adequate air circulation
within the cabinet.
Fig C
8
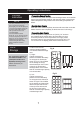
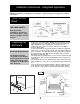
Caster Roller
Installation
Fig.1
Fig.2
Fig.3
a
b
c
a
b
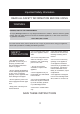
WARNING!
on top of the cabinet and
avoid slanting the cabinet
when moving it.
Do not let children climb the
cabinet when moving it to
Please do not use the cabinet
outside in bad weather to
1. Take out the 2 castors (Fig.1 rear wheel) and caster
with brake (Fig.2 front wheel) and (8) M5x10 screws
2. This installation requires two people. One person to tilt the cabinet
back and the other person to assemble the casters on the cabinet.
Assemble the 2 casters (Fig.2 front wheel) in the front bottom of the
M5x10 screws for each wheel.
assemble the casters at the back bottom of the cabinet with (2)
it is stocked.
To remove a shelf from a
Unplug powercord and
release the brake before
Do not put any goods
moving the cabinet.
another location.
Push the cabinet from the
rear making sure the door
does not open.
avoid a short circuit. Have the
unit under a canopy incase it
rains.
3. Release brake (Fig.2 front wheel) "OFF" position and
cabinet and fix them with (2) M5x10 screws for each wheel.
4. Twist the wheel clockwise and move the cabinet freely.
(Fig.3 C) from spare parts box.
Installation Instructions - Outdoor Use