OWNER'S MANUAL GUIDE DU PROPRIi_TAIRE MANUALDEL USUARIO DWC656BLS CAUTION: ReadandFollowAllSafelyRulesand Ope_ting InstructionsBeforeFirst UseofThisProduct. . i SAVE THESE INSTRUCTIONS[ Table of Contents .................... 1 Table des mati_res ................... 12 ATTENTION: Avantdefairsfonctionnercette machine,lisezet suivezroutesies censlgneade s_curit_de ce guideen premierlleu_ SAUVEGARDEZ w u Indtce ..............................
Important Safety Information Safety Precautions Grounding Instructions 3 4 ............
Welcome to the Danby family. We're proud of our quality products and we believe in dependable service. Start Here!...Before You'l! see it in this easy-to-use manual and you'll hear it in the friendly voices of our consumer service department. Tel:1-800-26-1_llBby ° Best of all, you'll experience these values each time you use your wine cooler. That's important, because your new appliance will be part of your family for a long time.
READ ALL SAFETY INFORMATION BEFORE USING An empty wine cooler Is a very dangerous attraction :to Children; Remove either the gasket, " latches; lids; lock and/or doors from unused or discarded appliances,or take soma other action.. to guarantee It hartnless. ' • : " = DON'T WAIT, DO IT NOWl : , " i: .
_This appfiance must be grounded, In the event of an electrical short circult, groundtng reduces the risk of electric .... shock by providing an escape wire for the electric current. WA NIN : app,aooe iseqo,ppod Do not under any circumcut or remove the with° poworhaving a stances third (ground) prong from the grounding wire with a ground_ Impmpe_ use0f the ing plug.
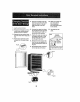
1, Tempered Glass Door: Tinted for UV protection while still allowing for easy Interior viewing. 2. Electronic Controls: For regulating the temperatureof the wine cooler_ 4. Shelves: Partiallyslide out for easy access to your wine, 5. Child Proof Lock with Key 6. Leveling Leg 3. Magnetic Door Gasket: Tight fitting seals retaln all the coolingpowerand humidlty levels, 7.
The electronic control panel allows lot total cabinet lempera_ure conlrol as well as the option of displaying (current) and modifying (setiing) the cabinet lempera* lure in either the Fahrenheit or CeIsius scale, When you lirst plug in your Wine Cooler the LED will display the current cabinet temperature in Fahrenheit and the thermostat will be set to 50 °F (10 "C) The fo]_owingparagraphswill explainhow to modify the aforementionedsetlingeto suit your requirements; Adjusting the temperature; • Press either
The maximum capacity o! the DWC656 Is 65'_(750ml) wine bottles. * When stockedas per instructiOnS.
5, Remove the plastic screw cap from the top }efthand (Fig E3) side and install It on the top fight hand side of the door frame. 10. Make sure to align the door and cabinet before fastening the lower hingescrews to the cabinet. 1o Lay the unit on it'sback° 2. Remove the kickplate by removing the three retainingscrews, (locations shown in Fig El) 3, Remove the three screws located on the lower door hinge (Fig E2)o 4. Pull the door downward until it releases from the upper hinge pin, 6.
Allow the wine cooler door to remain open for a few minutes after manual cleaning to air out and dry the inside of the wine coo_ercabinet NOTE: Be certain the power is off before cleaning any part of this appliance. Walls, Floor, Inside Window, and Shelves Humidor Water deposits and dust can be removed with a damp cloth. : : :: ; ....
Before You Call For Service Problem Possible Cause What to do No Power. A fuse in your home may be blown or the circuit breaker tripped. Replace fuse or reset circuitbreaker_ Power surge, Unplug the wine cooler,wait a few seconds and then plug it back Ino Plugnot fully Inserted into wall outlet Make sure the 3-prong plug on the wine cooler isfully inserted In outlet. Temperature setting Verifythe temperaturecontrolsetting° adjust if neccessary.
LIMITED WINE COOLER WARRANTY This qua{ely pm_cliswarranted Iobeline {tom manu{acturefs dereols Inmalarial andwodimnnsh_p, plovlded }hat }he unit {sused under {he normal opemling co_ilions intended bythema_faclarer This wmmnly_savailable only to}he person towhomlheunit wasoriginally sold byOanbyorbyansulherized disIfibulor olDanby, andisnon.lransle_le TERt_S OFWAFIRANTY Plastic paris, ar_ warranted fur }hirly (30) drays on_/from purchase dale.
Inforrnations de s_curit6 importantes Precautions Instructions de mise & la terre 15 t6 Instructions de fonctionnement Caract6ristiques de votre refroidisseur de vin Commandes de votre refroidisseur de vin 17 18 R_glage de la temperature Rangement pour le Vtns Instruction relatives aux tabletts 18 19 19 Renversement de la Porte Modification 2O du sens de la porte Soin et nettoyage Conseils utiles 21 21 21 Comment nettoyer !'int6rieur Comment nettoyer l'ext_rieur D_pannage Avant de placer un appe
Bienvenue dans la famitle Danby, Nous sommes tiers de nos produits de qualit_ et croyons au bien fond_ de fournir une assistance fiable & nos clients. Vous le d_couvrirez par ce guide facile d'utilisation et vous pourrez rentendre en provenance des voix amicates de notre service d'assistance & la client#leo T61.:1-800-26- !i3_1111_" Mais, ce qui est encore mieux, vous pourrez b_n_ficier de ces valeurs &chaque utilisation de votre refroidisseur de vin.
LISEZ TOUTES LES INFORMATIONS AVANT DE FAIRE FONCTIONNER DANGER, RISQUE DES ENFANTS DEVIENNENT COINCER DE S¢:CURITE I'APPAREIL DANS L'APPAREiL :, • ' Un refroldisseurde vln vlde_estune attra_TondangerBuseaUxenfants. Enlevetles joints=_tanCh._ as, le,s=loquets, iese0uvercles oU lesl pone des appare,s que I apparellne present?adcun danger, . Pour m nlmiser N ATTENDEZ PASI i qul ne sent pas u!gIser,,ou .
Cat appare}Jdolt _tre mts& la terre.
® 1. Porte en Verre Tremp_: Telnt_pour 4. Tablette: Les tablettecoulissantesfacflitent I'acc_s au vtn, prot_ger centretee rayonsUV tout en permettantde voltfacIlement le contenudu cabIneto 5. Verrou & l'dpreuve 2. Controls Electronlques: R_gulation de la temperaturedu refroidtsseur de vin. 3. Joint Etanche Magndtlque: Le joint _tanche permetde conserverle nlveaude temperatureet d'humidlt_ & I'int_rieur du cabinet. des enfants 6. Pleds AdJustables 7.
_[O,Io] I i | ill _,.1i.[o[_._,..,.]Ke[._lVLe -- Le panneau de commande 81ectronique parma! un contr61e total de Is temperature du boitier, de m_me que I'afflchage el la modification de la temperature du bo_iier, en Fahrenheit ou en Celsius, Hu_.J._,u .J A T Lorsque vous branchez votre reImidisseur & vin pour la premiere lois. le DEL af_che _alemp_tature r_,elle du boitier en Fahrenheit, el le thermostat eat r_g_ 50" F (10_' C).
; DWC656 eat65 boutellles ' utiiis"6t iesinStruciiohs Fig° A -Teblette sup_rleure bouteflles sur la tablette eup_rEeure,dlx (10) bouteHIessur chaquetablettelnterm_,dtaireet onze (1t) bouteflles sur la teblette fnf_rleure (Fig, (3) pour une capactt6 tota?ede rangementde solxante-ctnq(85) boutetlles, Afin d'attetndrela capacttdmaxfmale de sotxante-clnq (65) boutellles,Uest ndcessaire de rangerquatre (4) boutellles en eftemance darts la portion arrl_re de la tab?ottoet deux tangles de bouteflles face vers
RetFrezle bouchonde plas_quede 10. Assurez-vous d'eflgner ta ',As_ la gauche sup_rieuredu la porte at |e bottler cadrede porte (Fig E3) et eventde serrer lee vie tns_lez-la b,la dro|tesup_deure de la chern_rs du cadre de la porte. Inf6deure au boilie_ 1. Couchez I'eppereli sur son dos. 2. Retlrez |eplaquede basss an d_vissant leeIrols v_sde serrage (volr FIg_El) 3.
Laissezla porte de la machine ouvarta durant queiques minutes poura_rer et ass_chert'int_rfeurde t'armolre spree nettoy* age. NOTE : Avant de nettoyer quelque partle qua ce salt de cat apparetl, assurez-, vous qua l'alimentation est couple. Parois, Rancher, Int_rieur de la Visi_re R_servoirs D'Humidit_ et Tablettes iiiii!_!ii :nett_yent !_dUstr!el_ s,r Certafnes _claboussures d'eau at poussi_respauvant _tre essuy_es avec des essutatout° D'autrea tachee peuvant ndcessttar un ltnga hurnide.
Avant de placer un appel de service Problems Cause possible L'apperell n'est pas aliment6 Un fuslble de votro panneau Remplacez le fus]bleou de distribution pout _tre grtlI_ r_armez le dlsJoncteur. ou le dtsJoncteurd_clanch_. Ce qu'il faut fairs Surtension.
GARANTIE LIMITEE DE RAFRAICHISSOIRS DE VINS Catappare_ dequali1_ eel garantle exempl delout vice dematlbre premise eldefabeca{ion, s'il est u_lis_ donslos condlicns n(_rme_es {ecommand_es per Ielabdcant Carlagaranlie n'esteffedequ'AI'acheleur inilialdeI'eppnreil vandt_ parDanbyouparFundeesnsdsh_eleursegt_sele_lenspaul61ret_onsf6{_e CONDITIONS Leepi_ses enplastique sent garani_s pour Irenlo (301 jeers :_ulemenl _ port]r dob dale del'aehal, sanseacune prolengal}on p_e PmmiZ_m24mo_e Pondanl lee premi_Fa
Informaci6n lmportante de Seguridad Precauctones de Segurldad Instrucciones de Conexl6n a Tierra 27 28 Instrucciones de Operaci6n Caracteristicas de su Heladera para Vinos Controles de su Heladera para Vinos Ajuste de Temperature Almacenamiento de Vinos Instrucciones de los Estantes Inversbn de _e_um 29 30 30 31 31 de Puerta 33 Inversi6n de Apertura de Puerta Cuidado y Limpieza 34 34 34 Consejos 0tiles C6mo limplar el Interior C6mo limptar el Exterior Diagn6stico de Problemas 35 Antes de Llamar pe
Bienvenido a la familia Usted Io podr_, apreciar en este manual f&cil de Danby, Estamos orgulIosos de nuestros produclos de aita calidad y creemos en el servicio confiable. usar, y Io escuchar& en las voces amistosas de nuestro departamento de servicio al consumidor. Tel.: 1-800-26- Danby" Sobre todo, usted apreciar& estas ventajas cada vez que use su heladera para vinos. Eso es importante, ya qua su nuevo artefacto formar_ parte de su familia por mucho tiempo.
LEA TODAS LAS INSTRUCCIONES DE SEGURIDAD ANTES DE UTILIZARLA Una be!adera para vlnos vaCfa ssuna attacC!6nmuy pgifgrosapara los nilios.: Remueva ia junta,. las trabas,!a rnanlja ylo las pUertasdelos artafaCtosque no se usen o ss hayan desechado, o tome algunaotra madlda pare garantlzarqua seen Inofanstvas. .......
Este artefaoto debeser conectado a tierra. En case de un carte clrcuitoel_ctrtco, la conexlSn a tlerra reduce el rlesgo de una descarga el_ctrtca propordonando un cable Pare obtener el major resultsdo, enchufe este artefacto en su proplo tomacordente pare evltar qua las lutes titilen, quemar un fusible o disparar una Uavet_rmlcao Este artefacto v)ene con un cable de altmentacI6n qua Nunca, bajo nlnguna drcunstancla, carte o remueva ia tercera pata (tlerra) de{ enchufe.
/ ® 1, Puerta de Vldrio Templado: Permits 4, Estantes: Se desllzan hacla fuera para factlttar el acceso al vlno_ vet fdcEImsnte el interior.Polarizadaspara proteger contrala radtact6n UV. 5,Trabas con Ilave a prueba de nlSos. 2, Controles Electrdnlcos: Para regular la temperatura de ta heladera para vinos, 3. Juntas Magndticas de la Puesta: LasJuntasajustadasmantienentodo el poder de enffiamfentoy los nivelesde humedad. 6. Patas Niveladoras 7.
El panelde controlelectr6ntco permitsel control totalde la temperaturedel gabinateasf come la opc16nde mostrar(actual)y modificar(ajustar)la temperaturedal gaWneteen grades Fahrenheit o Celsius.
La _P_e!d_d:m_!rna* d_ !a DWC656 es de=65bote!-_ capacldadde alrnacenarnlentode sesenta y cfnco(65) boteltas, deber_guardar cuatro(4) botellas altemattvarnenteen ta parte de atr_ del estante pars vinos y dos filas de boteilas mirando hacla adeiante en el estante superlor come se muestra en la ias en caaa uno ae loscuatm estantes dol rnodto, y once (11) botellae en el estante inferior (Fig, C) lo cual alcanza una capacldad total de almaceham|ante de sesenta y ctnco (65) botella de vlno_ Sl las condiclonesd
t. Acu_to la untdadsobresuparts posterior. 2. Quite ;a rejlllaqut tandolosires tomHiosde sujadan.(Su ub}caci6n se muestraen Fig,El), 5. Quite la tapapldsticade toeodfi10. Asag_resode aliSarla clospare lorntllosde le parts supepuertaconel gebfnete rior(Fig E3) izqu}erday coESquelos antes de @ustarlos tomllan la parle supedordoreche dol losde la b]sagrainferiora! marcode la puarta gablnete_ 6.
DsJe lapuertade laheladera psra vinosablertapor unos mlnulos luego de Umplarla pars qus sa venUle y pars secar e! Inledor del gablnete_ NOTA: Veriflque qua la unldad est_ apagada antes de Ilmpiar cualquiera de sus partes. Paredes, Humidores Piso, Interior de las Puertas y Estantes Algunos sedlmentos del agua y tlerra pueden quttarse con una toalla seca de papel, otros pueden necesftar un trapo hL_medo. _ :z_, ¸,_;_:_I_:;;__:_: Ldvelos culdadosamente en ague tibia, jabonosa.
Antes de Llamar par Asistencia Problema Posibfe Causa Qu_ Hacer No Enelende, Puede tener un fusible quemado o una ilave t_rm!ca ab[erta en su instalaclSnei6ctrtca. Reemptace el fusible o enelenda la liave general. SobrevoltaJe. Desenchufe el equlpo, espere unos segundos y vuetva a enchufarlo. El enchufe no est_ comp[etamente Insertado en el tomacorrlente.
_,e,_ ENFRIADORES GARANT{A DE VINO LIM rT_,,DA Esle produclo deca]_ad e_ garenti_de coni_ de#aries defebricecien, [nc_We_o parses y manede_re,siernp_ yceaseIounkind seulilk:e bejo beeoedi.
Free-Standing Wine Cooler The modal number can be found on the serial plate located on the back panel of the unit, Model,Mod_le,Modelo All repair parts available for pumhasa Dr special order when you visit your nearest service depot,, To request service and/or the location of the service depot nearest you, cab the TOLL FREE NUMBER.