OWNER’S USE AND CARE GUIDE GUIDE D’UTILISATION ET SOIN DE D'ENTRETIEN MODEL • MODÈLE CAUTION Read and follow all safety rules and operating SYDNEY - SSWC056D1B PRAGUE - SSBC056D1B / SSBC056D2B PRÉCAUTION Veuillez lire attentivement les consignes de sécurité et les instructions d’utilisation avant l’utilisation initiale de ce produit. DANBY PRODUCTS LIMITED, ONTARIO, CANADA N1H 6Z9 DANBY PRODUCTS INC., FINDLAY, OHIO, USA 45840 2015.08.
1-844-455-6097 DO NOT RETURN THIS UNIT TO THE RETAILER WITHOUT FURTHER INSTRUCTIONS Dear Valued Customer: We hope your Silhouette appliance fulfills all of your entertaining needs. Your satisfaction is our priority. Please contact our Customer Care Center toll-free via 1.844.455.6097 for any inquiries you may have about your new purchase.
CONTENTS TABLE DES MATIÈRES Owner’s Use and Care Guide...........................................................1-12 • Safety Instructions • Before Use Read and follow all safety rules and operating • Installation Instructions instructions before first use of this product. • Features • Operating Instructions • Care and Maintenance • Troubleshooting • Warranty CAUTION: AVERTISSEMENT : Guide d’utiliser et soin propriètaire..............................................
Thank you for choosing Silhouette We know you’re excited. We are too! However, the more familiar you are with your new appliance, the better experience you will have. We therefore strongly suggest that you read this Owner’s Manual before plugging in your new appliance. It contains important operational information that will help you make full use of the technical features available in your appliance.
Important Safety Information READ AND FOLLOW ALL SAFETY INSTRUCTIONS IMPORTANT WARNING An empty unit is a very dangerous attraction to children. Remove either the gasket or lid from unused appliances, or take some other action that will guarantee it harmless. DANGER: Risk of child entrapment. Before you throw away your old unit: • Take off doors. • Leave the shelves in place so that children may not easily climb in. DON’T WAIT! DO IT NOW! This appliance must be grounded.
Important Safety Information READ AND FOLLOW ALL SAFETY INSTRUCTIONS GROUNDING INSTRUCTIONS This appliance is equipped with a cord having a grounding wire with a grounding plug. The plug must be plugged into an outlet that is properly installed and grounded. This appliance must be grounded. In the event of an electrical short circuit, grounding reduces the risk of electric shock by providing an escape wire for the electric current.
Installation Instructions LOCATION Selecting the proper location will ensure peak performance levels for your appliance. Choose a location where the unit will not be exposed to heat emitting sources (e.g. a fireplace or a barbeque). The cooler should not be exposed to direct sunlight. Do not use product near water, for example in a wet basement, near a swimming pool or sink. To achieve operating efficiency, the recommended (room ambient) operating temperatures should be between 16°C (61°F) to 32°C (90°F).
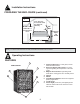
Installation Instructions PREPARING THE ENCLOSURE (continued) Fig F 1-1/2” dia. hole *if electrical outlet is in adjacent cabinetry 34-3/4” From Underside of Countertop to Floor 24” Min* 2” Electrical Access 6” Cabinets Square and Plumb 24” min Important: The listed depth requirement for the installation is assuming that the electrical outlet is located in the adjacent cabinetry or is flush mounted in the rear wall, not surface mounted in the enclosure. Operating Instructions FEATURES 2 1.
Operating Instructions FEATURES 2 SSBC056D1B SSBC056D2B 4 5 3 1 6 1. Tempered Glass Door: Low-E glass, used to reflect and absorb heat. 2. Electronic Display and Controls: For viewing and regulating the temperature of the Beverage Centre. 3. Magnetic Door Gaskets: Tight fitting seals retain all the cooling power and humidity levels. 4. Shelves 5. Handle 6. Front Mounted Exhaust: Allows for integrated (built-in) applications. 7. Leveling Legs 8.
Operating Instructions FUNCTION INSTRUCTION Door Ajar Alarm Function • If the door is not closed completely the alarm will sound after 5 minutes. Please close the door completely to avoid the loss of cold energy. The alarm will stop once the door is closed. Temperature Memory Function • If power is lost the set temperature will be saved by the unit. Once the power is back on the unit will return to the same set temperature.
Operating Instructions SSWC056D1B SHELVES Important: Do not cover the gap on the racks with aluminum foil or any other material that will prevent adequate air circulation within the cabinet. To remove wine shelves: 1. Fully extend the shelf you wish to remove . 2. Lift the front of the shelf up. 3. Holding the shelf track, push the shelf in, then up to release from the rear dampers.
Operating Instructions DOOR REVERSAL Fig 1A Fig 1B Fig 1C Fig 1D Fig 1E 1. 2. 3. 4. 5. 6. 7. 8. 9. 10. Fig 1F Bottom Hinge (Right) Screws Door Axis Screws Mechanical Switch Top Hinge (Right) Screws Top Hinge (Left) Plug Bottom Hinge (Left) 1. Open the door to a 90° angle, take out 2 screws from the lower door axis (3), remove the door (refer to Fig. 1A), then pull out the door and door axis (Fig. 1A). 2.
Care and Maintenance CLEANING YOUR APPLIANCE Cleaning the Inside: • Walls, floor, inside window and shelves - Some water deposits and dust can be removed with a dry paper towel, others may require a damp cloth. Cleaning the Outside: • Outer Case - It is important to keep the area clean where the door seals against the cabinet. Clean this area with a soapy cloth. Rinse with a damp cloth and let dry. • Control Panel and Door - Wipe with a damp cloth and dry thoroughly.
Troubleshooting Occasionally, a problem is minor and a service call may not be necessary- use this troubleshooting guide for a possible solution. If the unit continues to operate improperly, call an authorized service depot or our Toll Free Number 1-844-4556097 for assistance.
LIMITED IN-HOME APPLIANCE WARRANTY LIMITED IN-HOME APPLIANCE WARRANTY This quality product is warranted to be free from manufacturer’s defects in material and workmanship, provided that the unit is used under the normal operating This quality product warranted to be free from manufacturer’s defects in material and workmanship, provided that the unit is conditions intended by theismanufacturer. used under the normal operating conditions intended by the manufacturer.
Merci d’avoir choisi Silhouette Nous savons que vous êtes excité. Nous sommes aussi! Cependant, le plus que vous vous familiarisez avec votre nouvel appareil, le mieux va être votre expérience. Nous suggérons donc de lire ces instructions avant connecter votre nouvel appareil. Ce manuel contient des informations opérationnel important qui vous aidera à faire un usage pleine de les caractéristiques techniques disponibles dans votre appareil.
Consignes de sécurité importantes PRENDRE CONNAISSANCE DE TOUTES LES INFORMATIONS RELATIVES À LA SÉCURITÉ AVANT D’UTILISER LE PRODUIT AVERTISSEMENT IMPORTANT! Un refroidisseur vide peut représenter un attrait dangereux aux enfants. Retirer le joint d’étanchéité, les loquets, les couvercles ou portes des appareils ménagers inutilisés, ou prenez d’autres mesures qui assureront que l’appareil ne posera aucun danger. DANGER : Risque de piéger un enfant.
Consignes de sécurité importantes PRENDRE CONNAISSANCE DE TOUTES LES INFORMATIONS RELATIVES À LA SÉCURITÉ AVANT D’UTILISER LE PRODUIT MISE À LA TERRE Cet appareil doit être mis à la terre. Dans l’éventualité d’un court-circuit, la mise à la terre procure un chemin direct contournement du courant pour prévenir l’électrocution des manipulateurs de l’appareil. L’appareil est muni d’un cordon électrique comprenant un fil de mise à la terre et une fiche de terre.
Consignes d’installation ENDROIT Le choix du bon emplacement permettra à votre appareil d’avoir un rendement maximal. Choisissez un endroit où l’appareil ne sera pas exposé à des sources de chaleur (p.ex., une cheminée ou un barbecue). N’utilisez pas ce produit près de l’eau, par exemple dans un sous-sol humide, près d’une piscine ou d’un évier.
Consignes d’installation Fig E 34-3/4 po Trou de 1 1/2 po *si la prise murale n'est pas dans l'ouverture d'installation 2po Comptoir au plancher 24 po Min. Accès Électrique 6po Équerre Armoire et plomberie 24 po min Important : Le requirement de profondeur pour l’installation suppose que la prise murale est localisée dans une autre armoire ou est monté dans le mur, pas monté sur la surface dedans l’ouverture. Consignes d’utilisation CARACTÉRISTIQUES 2 1.
Consignes d’utilisation CARACTÉRISTIQUES 2 SSBC056D1B SSBC056D2B 4 5 3 1 6 1. Portes en verre trempé : Verre à faible émissivité, utilisé à réfléchir et absorber la chaleur. 2. Controls électroniques : Contrôle de la température de l’unité. 3. Joint étanche magnétique : Le joint étanche permet de conserver le niveau de température et d’humidité à l’intérieur du cabinet. 4. Étagères 5. Poignée 6. Échappement sur le devant : Pour des applications intégrées cabinet. 7. Pieds de nivellement 8.
Consignes d’utilisation INSTRUCTION DE FONCTION Fonction d’alarme de rappel de porte ouverte • Si vous oubliez de fermer la porte ou celle-ci n’est pas bien fermée, l’alarme retentit au bout de 5 minutes. Veuillez fermer complètement la porte et éviter que le froid s’échappe. L’alarme s’arrête une fois la porte est fermée.
Consignes d’utilisation SSWC056D1B INSTRUCTIONS POUR TABLETTES Important : Ne recouvrez pas l’espace sur les tablettes en verre d’une feuille d’aluminium ou de quelque autre matériau, cela pour ne pas nuire à la circulation adéquate de l’air dans l’enceinte. Pour retirer les clayettes à vin : 1. Étirer complètement la clayette que vous désirez retirer. 2. Soulever vers le haut la partie avant de la clayette. 3.
Consignes d’utilisation RENVERSEMENT DE LA PORTE Fig 1A Fig 1B Fig 1C Fig 1D Fig 1E 1. 2. 3. 4. 5. 6. 7. 8. 9. 10. Fig 1F Charnière inférieure (droite) Vis Axe de la porte Vis Interrupteur mécanique Charnière supérieur (droite) Vis Charnière supérieure (gauche) Bouchon Charnière inférieure (gauche) 1. Ouvrez la porte à 90 degrés, puis enlevez les 2 vis de l’axe inférieur de la porte (3) et enlevez la porte (Fig. 1A), maintenant, tirez sur la porte et l’axe de la porte (Fig.1A) pour les enlever. 2.
Soins et entretien NETTOYAGE DE VOTRE APPAREIL Comment nettoyer l’intérieur : • Parois, plancher, intérieur de la visière et tablettes - Cetraines éclaboussures d’eau et poussières peuvent être essuyées avec des essuie-tout. D’autres taches peuvent nécessiter un linge humide. Comment nettoyer l’extérieur : • Extérieur de l’armoire - Il est important de garder la région de scellement de la porte sur l’armoire propre. Nettoyez avec un tissu savonneux, rincez le région et puis séchez.
Dépannage De temps en temps, un problème est mineur et un appel de service peut ne pas être nécessaire. Utilisez ce guide de dépannage pour trouver une solution possible. Si l’unité continue de fonctionner incorrectement, appelez un dépôt de service autorisé ou le numéro sans frais pour obtenir de l’assistance. Tel : 1-844-455-6097.
GARANTIE SURWARRANTY LIMITED IN-HOMELIMITÉE APPLIANCE ÉLECTROMÉNAGER This quality product is warranted toAPPAREIL be free from manufacturer’s defects in material and workmanship, providedÀthatDOMICILE the unit is used under the normal operating conditions intended by the manufacturer.
MODEL • MODÈLE SSWC056D1B SSBC056D1B SSBC056D2B All repair parts are available for purchase or special order when you visit your nearest service depot.To request service and/or the location of the service depot nearest you, call the TOLL FREE number.