IMPORTANT! DO NOT CROSS OR CUT THE RED CABLE REMEMBER TO MEASURE, VERIFY AND RECORD THE RESISTANCE Installation Manual Electric Heating Cable Manuel d'installation Câble chauffant électrique DanfossLX TM BRINGING WARMTH TO LIFE Manual de instalación Cable de calefacción eléctrica
Table of Contents Danfoss LX Floor Heating System .............................................................................................................................................................................................. 2 LX Cable Specifications ..................................................................................................................................................................................................................
Danfoss LX Floor Heating System CAUTION! It is important that this equipment is installed only by qualified electricians who are familiar with the proper sizing, installation, construction and operation of floor warming system and the hazards involved. The heating cable is designed for under floor heating purposes only. Note! The installation shall be in accordance with the manufacturer’s instructions and national and local codes.
Danfoss LX typical installations and applications Ceramic tiles Thermostat sensor Thinset cement adhesive Danfoss LX Directly on plywood: Plywood on joists Joists Insulation (optional) Directly on concrete. Ceramic tiles Thin set cement adhesive Danfoss LX Thermostat sensor Concrete Alternative method: self-leveling cement is recommended for large surfaces and the following floor materials: engineered wood, laminate, floating floors, vinyl, linoleum and carpet.
General Installation Guidelines 1 Step 1. PLAN LAYOUT Make a sketch layout or a floor plan of the room; include all permanent furnishings such as toilets, bathtubs, appliances, cabinetry, etc. Indicate all dimensions required to determine the available floor area and the position of the LX thermostat. TIP: Danfoss recommends that the installation is documented with photos to note the location of connections and the sensor. Step 2.
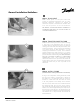
IMPORTANT: the sensor conduit must be centered in the cable loop (between two red heating wires). Use duct tape to close the end of the conduit so that thinset can't penetrate the conduit. Use duct tape to hold the sensor conduit into the groove to prevent it from floating up when the mortar or thinset is poured. If the sensor is installed directly in the mortar bed, use duct tape to secure to subfloor. 4 Step 4.
6 Step 6. BEGIN LAYING THE LX CABLE Place the cable so that the connection point and the temperature sensor are in their intended positions and bring the power lead cable to the thermostat or connection box. Begin laying the LX cable according to the layout developed in Step 1. DO NOT CUT OR SHORTEN THE RED HEATING CABLE! Do not expose it to any mechanical stress. Avoid walking on the heating cable. Wear only shoes with soft soles. Use Danfoss LX strapping to secure the cable to the subfloor.
Step 7. DANFOSS LX STRAPPING INSTRUCTIONS Space the strapping at a distance of 2’ to 3’ (maximum recommended spacing is 3 feet). Secure the strapping to the subfloor with adhesive, staples, nails, or double-sided tape. Standard cable spacing is 3” c-c.
Step 8. CONNECT POWER SUPPLY AND THERMOSTAT (Also see Appendix A) The connection of the power supply and the LX (GFCI) thermostat must be done by a qualified electrician in accordance with the National Electrical Code (NEC) and the Canadian Electrical Code (CEC). The electrician should connect the floor sensor to the thermostat, take a final resistance reading and record it on the warranty card. Step 9.
EXTENDED WARRANTY For a period of ten (10) years from the date of purchase Danfoss warrants that the Danfoss LX cable is free from defects in material, design and workmanship. The extended warranty is only valid if the warranty certificate has been properly completed and mailed, and the installation is in accordance with the installation instructions. The defective Danfoss LX cable has to be inspected by or submitted to Danfoss or an authorized Danfoss LX dealer.
Système de chauffage de plancher Danfoss LX ATTENTION ! Il est important que cet équipement soit installé uniquement par des électriciens qualifiés, familiarisés avec le dimensionnement adéquat de l'installation, la conception et le fonctionnement des systèmes de chauffage de plancher. Il faut également qu'ils soient conscients des risques inhérents à ce type d'installation. Le câble chauffant est conçu exclusivement pour le chauffage de plancher.
InstaIlations et appIications typiques de Danfoss LX Tuiles de céramique Sonde de thermostat Directement sur du contreplaqué Mortier ciment-colle Danfoss LX Contreplaqué sur poutrelles Poutrelles Isolation (facultatif) Directement sur du béton.
Directives générales d'installation 1 Étape 1 : SCHÉMA D'INSTALLATION Réaliser un croquis d'installation ou un plan d'étage de la pièce ; inclure tout le mobilier permanent comme les toilettes, baignoires, appareils, rangements, etc. Indiquer toutes les dimensions requises pour déterminer l'aire de plancher disponible et la position du thermostat LX. CONSEIL : Danfoss conseille de documenter l'installation avec des photos afin de noter l'emplacement des branchements et de la sonde.
IMPORTANT : le conduit de sonde doit être centré dans la boucle de câble (entre deux fils chauffants rouges). Utiliser du ruban adhésif en toile pour fermer l'extrémité du conduit et ainsi empêcher toute introduction de mortier ciment-colle. Utiliser ce même adhésif pour fixer le conduit de sonde dans la rigole et l'empêcher de flotter lors de l'application du mortier ou du mortier ciment-colle.
6 Étape 6 : POSE DU CÂBLE LX Placer le câble de sorte que le point de connexion et la sonde de température se trouvent en position adéquate et acheminer le câble d'alimentation jusqu'au boîtier de thermostat ou de raccordement. Commencer à poser le câble LX conformément au schéma développé à l'étape 1. NE PAS COUPER OU RACCOURCIR LE CÂBLE CHAUFFANT ROUGE ! Ne l'exposer à aucune contrainte mécanique. Éviter de marcher sur le câble chauffant. Porter uniquement des chaussures à semelles souples.
Étape 7 : INSTRUCTIONS DE CERCLAGE DANFOSS LX Procéder au cerclage à intervalles réguliers de 60 cm-90c m (intervalles maximales: 90cm.) : Fixer le cerclage au sous-plancher avec de la colle, des clous, des agrafes ou du ruban adhésif double-face. L'espacement standard du câble correspond à une distance centre à centre de 7 cm.
Étape 8 : CONNEXION DE L'ALIMENTATION ET DU THERMOSTAT (Voir l'Annexe A) La connexion de l'alimentation et du thermostat LX (GFCI) doit être réalisée par un électricien qualifié, conformément au National Electrical Code (NEC) et au Code canadien de l’électricité (CCE). L'électricien doit connecter le capteur de sol au thermostat, effectuer un dernier relevé de la résistance et noter le résultat sur la fiche de garantie.
PROLONGATION DE GARANTIE Pendant une période équivalant dix (10) ans à compter de la date d'achat, Danfoss garantit que le câble Danfoss LX est exempt de défauts de matériau, conception et main d'œuvre. La prolongation de garantie est valable uniquement si le certificat de garantie a été correctement rempli et envoyé, et si l'installation est conforme aux instructions. Le câble Danfoss LX défectueux doit être examiné par Danfoss ou soumis à l'expertise de ses services ou d'un revendeur agréé de Danfoss LX.
Sistema de calefacción por suelo radiante Danfoss LX ¡PRECAUCIÓN! Es importante que la instalación de este equipo corra únicamente a cargo de electricistas cualificados que estén familiarizados con las dimensiones, la instalación, la fabricación y el uso del sistema de calefacción por suelo radiante y los peligros que conlleva. El cable de calefacción se ha concebido solo a efectos de calefacción por suelo radiante.
Instalaciones y aplicaciones típicas de Danfoss LX Baldosas cerámicas Directamente sobre contrachapado:. Sensor de termostato Cemento adhesivo de capa delgada Danfoss LX Contrachapado sobre vigas Vigas Aislamiento (opcional) Directamente Directamente sobre hormigón:.
Pautas generales de instalación 1 Paso 1. PLANO DE MONTAJE Realice un esbozo o un plano del suelo de la sala; incluya todos los accesorios permanentes como son los inodoros, las bañeras, los aparatos, la marquetería, etc. Indique todas las dimensiones necesarias para determinar la zona del suelo disponible y la posición del termostato LX. CONSEJO: Danfoss recomienda documentar la instalación con fotos para que se vea la ubicación de las conexiones y el sensor. Paso 2.
IMPORTANTE: El tubo del sensor debe centrarse en el circuito cerrado del cable (entre dos hilos rojos de calefacción). Use cinta para conductos para cerrar el extremo del conducto y que la capa delgada no pueda penetrar en él. Use cinta para conductos para sujetar el conducto del sensor en la ranura y evitar que flote cuando se vierta el mortero o la capa delgada. Si el sensor se instala directamente en el lecho de mortero, use cinta para conductos para fijarlo bajo el suelo. 4 Paso 4.
6 Paso 6. TENDIDO DEL CABLE LX Coloque el cable de manera que el punto de conexión y el sensor de temperatura estén en sus debidas posiciones y lleve el cable de alimentación al termostato o la caja de conexiones. Empiece a tender el cable LX según el plano desarrollado en el paso 1. ¡NO CORTE NI ACORTE EL C ABLE ROJO DE CALEFACCIÓN! Se recomienda especialmente sacar fotografías del cable LX montado antes de instalar el suelo. Mida y registre la resistencia en la tarjeta de garantía.
Paso 7. INSTRUCCIONES DE FLEJADO DANFOSS LX Espacie los flejes cada 60-90 cm. Asegure el flejado debajo del suelo con adhesivo, grapas, clavos o cinta de doble cara. El espaciado estándar del cable es de 7,62 cm c-c.
Paso 8. CONEXIÓN DE LA FUENTE DE ALIMENTACIÓN Y EL TERMOSTATO (Véase el Apéndice A) La conexión de la fuente de alimentación y el termostato GFCI LXstat debe realizarla un electricista cualificado de acuerdo con el Código eléctrico nacional (NEC) y el Código eléctrico canadiense (CEC). El electricista también es quien debe introducir el cable del sensor en el conducto instalado y conectarlo al termostato. Debe registrarse en el certificado de garantía una última lectura de resistencia.
AMPLIACIÓN DE GARANTÍA Danfoss ofrece cobertura de la malla Danfoss LX por defectos de material, diseño y fabricación durante un período de diez (10) años a partir de la fecha de compra. La ampliación de garantía solo es válida si se ha cumplimentado el certificado de garantía y se ha enviado por correo y si la instalación es conforme con las instrucciones de instalación. Cualquier cable Danfoss LX defectuoso debe enviarse a Danfoss o a un distribuidor Danfoss LX autorizado para su inspección.
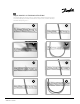
088L3390 - 06/2009 L2 (N) Danfoss LX Max. load 16 Amps Danfoss LX Load/Charge/Carga Danfoss LX Thermostat Thermostat Danfoss LX Termostato Danfoss LX Power lead Liaison Froide Cable en frío 16A Max L2(N) L1(L) Power lead Liaison Froide Cable en frío Sensor/Sonde/Sensor (No polarity/sans polarité/ninguna polaridad) 240 (120) VAC L1 (L) Max.
Wall Wiring Diagram Diagramme de câblage du mur Digrama eléctrico de la pared Single or double gang box Boîte simple ou double Caja sola o doble Power lead in conduit Liaison Froide dans un conduit Cable en frío en conducto Power lead Liaison Froide Cable en frío LX mats Sonsor in conduit Sonde dans un conduit Sensor en conducto Cement Ciment Cemento Flooring / Plancher / Suelo 088L3390 - 06/2009 27
Danfoss can accept no responsibility for possible errors in catalogues, brochures, other printed materials, and website information. Danfoss reserves the right to alter its products without notice. This also applies to products already on order provided that such alteration can be made without subsequent changes being necessary in specifications already agreed upon. All trademarks in this material are property of the respective companies.