
Installation guide


9
VMBME102
in a newly-built house, this has normally been taken into account
during construction, and the joists where the heat pump will be
located have been reinforced. Always check that this has been car-
ried out when installing into a newly-built house. Avoid positioning
the heat pump in a corner as the surrounding walls may amplify its
noise. It is also important to adjust the heat pump using the adjust-
able feet so that it is horizontal to the base.
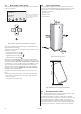
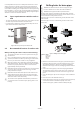
2.4 Space requirement around the outdoor
unit
• To ensure the function of the outdoor unit, there must be at least
300 mm of space behind and 1500 mm at the front.
• For maintenance work there must be approximately 300 mm of
space at the sides of the outdoor unit.
Figure 9: Necessary service space for outdoor unit.
2.5 Recommended location of outdoor unit
When positioning the outdoor unit, note the following:
⚠
The outdoor unit does not have to be positioned in any spe-
cific direction.
⚠
Noise is produced from the outdoor unit when the fan is in
operation, remember this when positioning to reduce distur-
bance in your own home as well as to any neighbours.
⚠
When the outdoor unit is defrosting, water will drip straight
down under the unit. The area around the outdoor unit must
therefore be properly drained in order to catch the water
(approximately 2 litres per defrost).
⚠
Remember that the outdoor unit must have a certain amount
of room in order to function and for servicing, see “Heat
pump information” chapter.
⚠
Remember that the water that drips from the outdoor unit
during defrost must be able to drain into the ground. The
outdoor unit must therefore not be positioned on asphalt or
slabs where water cannot drain easily.
⚠
The outdoor unit’s adjustable stand must be positioned on
a secure base such as wooden sleepers, paving slabs or cast
footings.
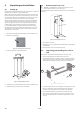
3 Drilling holes for brine pipes
⚠
NOTE! Ensure that the holes for the insert pipes are posi-
tioned so that there is room for the other installations.
⚠
NOTE! The brine pipes shall have separate lead-ins.
The brine pipes must be insulated from the heat pump, through
the walls and outside the house all the way to the collector so as to
avoid condensation and prevent heat loss.
If the brine pipes are to be routed above ground, drill holes in the
walls for them.
If the brine pipes are to be routed below ground see the instruc-
tions below.
Figure 10: Drilling holes for brine pipes.
Position Name
1 Insert pipe
2 Brine pipe
3 Mortar
4 Sealant
1. Drill holes in the wall for the insert pipes (1) for the brine pipes.
Follow the dimension and connection diagrams in the section
“Heat pump information”. If there is any risk of groundwater
infiltration at brine pipe lead-ins, watertight grommets must be
used.
2. Position the insert pipes (1) in the holes sloping downwards.
The inclination must be at least 1cm every 30cm. Cut them at
an angle (as illustrated) so that rain water cannot get into the
pipes.
3. Insert the brine pipes (2) into the insert pipes in the installation
room.
4. Fill in the holes in the wall with mortar (3).
5. Ensure that the brine pipes (2) are centred in the insert pipes (1)
so that the insulation is distributed equally on all sides.
6. Seal the insert pipes (1) with a suitable sealant (foam) (4).