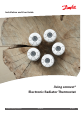
Installation and User Guide living connect® Electronic Radiator Thermostat Danfoss Heating Solutions VIIDH102 11/2013 1
Installation Guide living connect® Installation Guide 1. Installation 1.1 Identify your living connect® thermostat . . . . . . . . . . . . . . . . . . . . . . . . . . . . . . . . . . . . . . . . . . . . . 4 1.2 In the package . . . . . . . . . . . . . . . . . . . . . . . . . . . . . . . . . . . . . . . . . . . . . . . . . . . . . . . . . . . . . . . . . . . . . . 4 1.3 Overview of valve adapters . . . . . . . . . . . . . . . . . . . . . . . . . . . . . . . . . . . . . . . . . . . . . . . . . . . . . .
User Guide living connect® User Guide 3. Overview of display and control buttons . . . . . . . . . . . . . . . . . . . . . . . . . . . . . . . . . . . . . . . . . . . . . . . . 12 4. Connecting living connect® to a Danfoss Link™ system 4.1 Configuring rooms in Danfoss Link™ CC . . . . . . . . . . . . . . . . . . . . . . . . . . . . . . . . . . . . . . . . . . . . 12 4.2 Connecting living connect® to Danfoss Link™ CC . . . . . . . . . . . . . . . . . . . . . . . . . . . . . . . . . . . . 12 4.
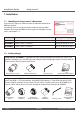
Installation Guide living connect® 1. Installation 1.1 Identify your living connect® thermostat LIVING CONNECT living connect® comes in several versions to meet the demands of different markets. You identify your version by the code number on the box label. Adapters for a range of different valves types are available as accessories, see chapter 1.3. Code no. 014G0001 INTELLIGENT RADIATOR THERMOSTAT DANFOSS RA CONNECTION Version characteristics 5702420110257 Quick guide languages 014G0001 Incl.
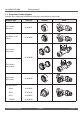
Installation Guide living connect® 1.3 Overview of valve adapters Adapters for a wide range of different valve types are available as accessories. Adapter type Code no. For Danfoss RA valves 014G0251 For M30 x 1.
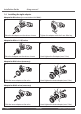
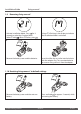
Installation Guide living connect® 1.4 Installing the right adapter Adapter for RA valves (pre-mounted on 014G0001) 1. 2. Place the RA adapter on the valve as shown. Tighten the adapter with the 2 mm Allen key. Adapter for M30 x 1.5 (K) valves 1. 2. Place the K adapter on the valve as shown. Hand-tighten the K adapter (max. 5 Nm). Adapter for RAV valves (accessory) 1. 2. Click the inner adapter on the valve. Hand-tighten the outer adapter (max. 5 Nm). Adapter for RAVL valves (accessory) 6 1.
Installation Guide living connect® Adapter for RTD valves (accessory) 1. 2. Place the RTD adapter on the valve as shown. Hand-tighten the RTD adapter (max. 5 Nm). Adapters for M28 valves (accessories) Please follow the instructions supplied with the valve adapter for the specific M28 valve. 1.5 Inserting the batteries Remove the battery cover and insert two AA batteries. Make sure the batteries are correctly oriented. Rechargeable batteries must not be used.
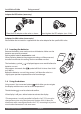
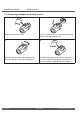
Installation Guide living connect® 1.7 Installing living connect® 1. 2. living connect® must be in Installation Mode to be fixed correctly onto the valve. This is indicated by a large, flashing M in the display. Installation Mode can be selected by pressing for 3 seconds until M is displayed, then release and press again. Screw living connect® onto the adapter and tighten by hand (max. 5 Nm). While slightly pressing forward, turn living connect® clockwise untill it locks, then tighten. 3. 4.
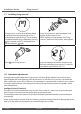
Installation Guide living connect® 1.9 Removing living connect® 1. 2. Activate Installation Mode: Press for 3 seconds to select the Function Menu. Select M with . When M flashes, press A large M is flashing in the display to indicate that Installation Mode is activated. . 3. 4. Remove the battery cover and the batteries. Insert the Allen key or similar into the hole to lock the adapter ring. Turn counterclockwise to unscrew living connect® from the adapter. 1.
Installation Guide living connect® 1.11 Removing an adapter from living connect® 10 1. 2. Remove the battery cover. Insert a small hex key or similar into the locking hole to lock the adapter ring. 3. 4. With the hex key locking the adapter ring, turn the adapter in the shown direction. Put back the battery cover. Mount living connect® on another valve adapter according to the instructions supplied with the adapter.
Installation Guide living connect® 2. Technical specifications Thermostat type Programmable electronic radiator valve controller Recommended use Residential (pollution degree 2) Actuator Electromechanical Display Grey digital with backlight Software classification A Control PID Transmission frequency / range 868.42 MHz / up to 30 m Power supply 2 x 1.5 V alkaline AA batteries Power consumption 3 μW in standby, 1.
User Guide living connect® 3. Overview of display and control buttons Low battery symbol Temperature set point* Network connection Alarm Lock Frost protection Use these buttons to navigate within the menu and to adjust the temperature. Use this button to select the menu and confirm choices. * living connect is displaying the set temperature, not the measured room temperature. 4. Connecting living connect® to a Danfoss Link™ system 4.
User Guide 3. living connect® 4. Room Devices Bedroom, North Add Room Devices 1 The room contains: 0x ^ Keep the device within 1 meter of the controller and get ready to begin installation. Press here when ready: ^ The configuration is invalid: Room has no devices at all. Begin registration n Add a device 2 Press the installation-button on the device now. Remove a device ? ? Select “Add a device”. Press “Begin Registration”, and then press and release on the thermostat. 5. 6.
User Guide living connect® 4.3 Testing the connection 1. 2. 3. Press for at least 3 seconds until M is displayed. Press until LI is displayed. Press to make the connection. LI disappears when the connection is made. If no connection can be made, the alarm and antenna symbols will both be flashing. Refer to “Technical questions” at www.living.danfoss.eu 5. Additional settings 5.1 Adjusting to radiator/room conditions Press Press for at least 3 seconds until M is displayed.
User Guide living connect® 5.2 Open-window function living connect® features an Open-window function, which closes the valve if the room temperature is falling dramatically, thus reducing the heat loss. The heat is turned off in the entire room for up to 30 minutes, before living connect® returns to its original settings. When Open-window has been activated, the function is quarantined for 45 minutes.
Installation and User Guide living connect® Installer Danfoss A/S Haarupvaenget 11 DK-8600 Silkeborg Denmark Phone: +45 7488 8000 Fax: +45 7488 8100 www.danfoss.com www.living.danfoss.