Service guide PAHT / PAHT G pumps PAHT 50-90 / PAHT G 50-90 Disassembling and assembling hpp.danfoss.
Service guide | Disassembling and assembling PAHT and PAHT G 50-90 Table of Contents 1. Introduction 1. Introduction .............................................................................................................................................................. 2 2. Disassembling the pump ..................................................................................................................................... 2 3. Inspection ..................................................
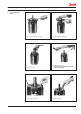
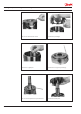
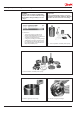
Service guide | Disassembling and assembling PAHT and PAHT G 50-90 2. Disassembling the pump 1. Loosen and remove 4 screws. 2. Remove mounting flange. 3. Remove spring. 4. Remove shaft sealing. Caution: Avoid to scratch the sealing surface on the shaft. 5. Remove 2 guide pins. 6. Remove O-ring. 180R9172 | 521B1092 | AX234886502908en-000402 | 2022.
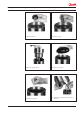
Service guide | Disassembling and assembling PAHT and PAHT G 50-90 7. Turn pump upside down. 8. Loosen and remove 10 screws. 9. Remove cover. 10. Remove pistons and retainer plate. 4 11. Remove retainer ball 180R9172 | 521B1092 | AX234886502908en-000402 | 2022.
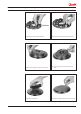
Service guide | Disassembling and assembling PAHT and PAHT G 50-90 12. Remove retainer 13. Remove spring 14. Remove cylinder barrel. 15. Remove port plate. 16. Remove 1 guide pin. 17. Turn pump upside down and remove 2 washers. 180R9172 | 521B1092 | AX234886502908en-000402 | 2022.
Service guide | Disassembling and assembling PAHT and PAHT G 50-90 6 18. Loosen and remove 6 screws. 19. Remove port flange. 20. Remove 1 guide pin. 21. Remove O-ring from port flange. 22. Loosen thrust plate from cylinder barrel. 23. Remove thrust plate. 180R9172 | 521B1092 | AX234886502908en-000402 | 2022.
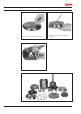
Service guide | Disassembling and assembling PAHT and PAHT G 50-90 24. Remove O-rings from thrust plate. 25. Remove backup rings from thrust plate. 26. Remove 1 guide pin from end cover plate. 27. Loosen and remove screw from swash plate. 28. Remove swash plate. 29. Remove 2 guide pins from end cover plate. 180R9172 | 521B1092 | AX234886502908en-000402 | 2022.
Service guide | Disassembling and assembling PAHT and PAHT G 50-90 30. Remove O-ring from end cover plate. 31. Remove shaft sealing from mounting flange. Pump disassembled 8 180R9172 | 521B1092 | AX234886502908en-000402 | 2022.
Service guide | Disassembling and assembling PAHT and PAHT G 50-90 3. Inspection Valve and thrust plate Valve and thrust plate 1. Neither valve plate nor thrust plate must show any sign of wear. 2. Hold a ruler against surface of plate and check tightness against a light source. 3. Check that both O-rings and back-up rings are not broken and do not show severe wear. Swash plate Pistons 4. Check that surface of swash plate is smooth and without any large scratches (depth more than 0.1 mm). 5.
Service guide | Disassembling and assembling PAHT and PAHT G 50-90 WARNING: Do not use silicone when assembling the pump. Do not reuse disassembled O-rings; they might be damaged. Always use new O-rings. 1. Lubrication: • To prevent seizing-up, lubricate all threads with PTFE lubrication type. • O-rings inside pump may be lubricated only with clean filtered water. • O-rings for port flange, mounting flange and flushing valve must be lubricated.
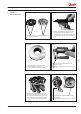
Service guide | Disassembling and assembling PAHT and PAHT G 50-90 5. Mount port flange on housing. Use pin as guide. 6. Mount 6 screws (M8x55). 7. Tighten screws to 30Nm. 8. Turn pump upside down. 9. Mount 1 guide pin inside the housing on the back side of the port plate. 10. Mount port plate. Be aware of orientation/ guide pin. 180R9172 | 521B1092 | AX234886502908en-000402 | 2022.
Service guide | Disassembling and assembling PAHT and PAHT G 50-90 12 11. Mount backup rings on the thrust plate. 12. Mount O-rings on the thrust plate. 13. Spray with water on cylinder barrel and thrust plate. 14. Mount thrust plate on cylinder barrel. 15. Press thrust plate into cylinder barrel. 16. Mount cylinder barrel in housing. 180R9172 | 521B1092 | AX234886502908en-000402 | 2022.
Service guide | Disassembling and assembling PAHT and PAHT G 50-90 17. Mount spring. 18. Mount retainer on top of the spring. 19. Spray with water and mount retainer ball. 20. Place retainer plate on top of retainer ball. 21. Spray with water and mount pistons. 22. Spray with water and mount O-ring on end cover. 180R9172 | 521B1092 | AX234886502908en-000402 | 2022.
Service guide | Disassembling and assembling PAHT and PAHT G 50-90 14 23. Mount 2 guide pins on endcover. 24. Mount swash plate. 25. Mount screw (M8x20). 26. Tighten screw to 30Nm. 27. Mount 1 guide pin on housing. 28. Spray piston shoes with water. 180R9172 | 521B1092 | AX234886502908en-000402 | 2022.
Service guide | Disassembling and assembling PAHT and PAHT G 50-90 29. Mount endcover on the housing. 30. Mount 10 screws (M8x20). 31. Tighten 10 screws to 30Nm. 32. Turn pump upside down and mount 2 guide pins. 33. Spray with water and mount O-ring. 34. Spray shaft sealing with water before mounting. 180R9172 | 521B1092 | AX234886502908en-000402 | 2022.
Service guide | Disassembling and assembling PAHT and PAHT G 50-90 16 35. Mount shaft sealing. 36. Use tool and press shaft sealing into place. 37. Mount transparent ring. 38. Mount metal ring. 39. Mount spring. 40. Mount special tool on shaft. 180R9172 | 521B1092 | AX234886502908en-000402 | 2022.
Service guide | Disassembling and assembling PAHT and PAHT G 50-90 41. Spray with water. 42. Mount sealing (smallest diameter pointing down). 43. Mount mounting flange. 44. Mount 4 screws. 45. Tighten screws to 30Nm. 46. Finished. 180R9172 | 521B1092 | AX234886502908en-000402 | 2022.
Service guide | Disassembling and assembling PAHT and PAHT G 50-90 180B4252 - Swash plate set (PAHT 50) 180B4255 - Swash plate set (PAHT 63) 180B4258 - Swash plate set (PAHT 70) 180B4253 - Swash plate set (PAHT 80) 180B4256 - Swash plate set (PAHT 90) 11 1 End cover CW AISI 316 31 1 Swash plate AISI 431 x x x x x 32 1 Screw M8 x 20 AISI 304 x x x x x 34 2 Pin ø4 x 14 AISI 304 x x x x x 61 1 Cylinder barrel AISI 431 62 1 Spring 1.
Service guide | Disassembling and assembling PAHT and PAHT G 50-90 6. Exploded view for PAHT 50-90 180R9172 | 521B1092 | AX234886502908en-000402 | 2022.
Service guide | Disassembling and assembling PAHT and PAHT G 50-90 180B4326 - Swash plate set (PAHT G 50) 180B4327 - Swash plate set (PAHT G 63) 180B4328 - Swash plate set (PAHT G 70) 180B4329 - Swash plate set (PAHT G 80) 180B4330 - Swash plate set (PAHT G 90) 11 1 End cover CW AISI 316 31 1 Swash plate AISI 431 x x x x x 32 1 Screw M8 x 20 AISI 304 x x x x x 34 2 Pin ø4 x 14 AISI 304 x x x x x 61 1 Cylinder barrel AISI 431 62 1 Spring 1.
Service guide | Disassembling and assembling PAHT and PAHT G 50-90 8. Exploded view for PAHT G 50-90 180R9172 | 521B1092 | AX234886502908en-000402 | 2022.
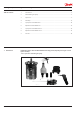
Service guide | Disassembling and assembling PAHT and PAHT G 50-90 Tool sets Qnt. 22 Designation 180Z0237 - Tool set (PAH / PAHT / PAHT G 50-90) 9. 1 Shaft bush, topedo x 1 Press tool 1 x 1 Press tool 2 x 180R9172 | 521B1092 | AX234886502908en-000402 | 2022.
Service guide | Disassembling and assembling PAHT and PAHT G 50-90 180R9172 | 521B1092 | AX234886502908en-000402 | 2022.
© Danfoss | DCS-SGDPT/SI | 2022.