
Installation manual

Starting up
Initial startup of Solar-Log500
144 of 268 Solar-Log
1000/500/200
Installation
7.3 Initial startup of Solar-Log
500
The initial startup of Solar-Log
500
is performed through the unit display and
using the keypad. For further details of startup and configuration, please refer
to Section 9 “Solar-Log
500
: Configuration at the unit“, Page 193.
Requirements
All cables and accessories (if any) have been connected to the Solar-
Log
200
.
The Solar-Log
200
is connected to an internet router.
The DHCP service is enabled on the internet router.
DHCP is also enabled on the PC or laptop.
Easy Installation
From firmware version 2.4.0 the initial start up can be carried out with the Easy In-
stallation configuration wizard depending on the language and country selected.
However, Easy Installation can currently only be used with certain inverters.
The Solar-Log™ then carries out the initial start up intuitively step by step:
For more information, please refer to the Quick Start Guide supplied.
When the unit is first switched on, you will be asked to select a language for
the display and the PC controls, and to select your country ( Page 195):
1 Select the desired display language from the list
2 Press ENTER to save
3 Select your country from the list.
4 Press ENTER to save
With “Easy Install”, the next steps are completed automatically. These are:
Automatic inverter search
The inverter must be connected to the Solar-Log
500
and be feeding
into the network, so that the communication module can operate.
Internet registration – the unit must be connected to an internet rout-
er with automatic IP Address allocation.
If you exit “Easy Install” at this point, you can complete it at a later time:
In the menu, select Easy Install
Initial configuration
The other configuration steps can be performed on a PC or laptop.These include:
Configure inverter data ( Page 162)
Set the order of the inverters ( Page 158)
Make the network settings if necessary ( Page 150)
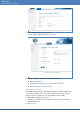
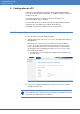
Enter the address http://solar-log in the address bar of the web browser.
For further details, please refer to Section 8 “Configuration at a PC“,
Page 148.