
Flowlight Booster Pump Instruction Manual

5
MOUNTING YOUR PUMP
Locate your pump in a cool place. Do not allow direct exposure to sunshine during operation, or
the motor may overheat. Allow free flow of air around the motor for cooling. SHELTER IT
FROM RAIN AND SUN, or it will be a mess in a few years.
The pump may be mounted horizontally or vertically. If vertically, FACE THE PUMP HEAD
DOWNWARD. RIGID MOUNTING IS NOT required in most installations. In a non-battery
system, starting is gradual and the pump does not jerk with the start. In a battery system, it will
jerk slightly, but simply mounting it to a small wooden board is sufficient to stabilize it. The
pump may be hung vertically on a rope. Observe the pump and see that it is not likely to
overstress or loosen pipes as it starts. DO NOT mount the pump directly to a wall or wood floor
in your home. It will increase the noise.
CHANGING PUMP HEAD POSITION: If you wish to face the pump's fittings sideways or
downward, you may rotate pump head to a different position by removing the four bolts that
secure the pump to the motor. If your pump looks like the picture on P.1, do this: Remove the
four hex-head bolts from the round plate, then rotate pump head to new position. REALIGN
THE PUMP AND MOTOR SHAFTS, or the coupler will bind and wear. This is simple. When
you remove the round plate, notice that the bolt holes are oversized for alignment adjustment.
Reposition as desired, but leave the bolts loose. BEFORE installing the pump, drop a teaspoon
of water into the inlet and run the pump (on 12 volts is OK for the 24v pumps). Slide the plate
around so it settles into the position where there is NO VIBRATION, then tighten the bolts firmly.
HANDLE YOUR PUMP CAREFULLY! Never hammer on it, clamp it in a vice or drop it. Pump-
motor alignment is critical. DO NOT DISTURB THE ALLEN-HEAD BOLTS holding the
mounting plate to the motor UNLESS you wish to rotate the pump head to a different position.
The shaft coupler between the motor and pump should turn easily using two fingers.
Sometimes after a period of dry storage, the pump will stick. If you can't turn the coupler, put a
bit of water in the pump intake and turn the coupler with pliers to "crack" it loose. Do this by
turning it BACKWARDS. If it sticks again, see “Troubleshooting”.
IF YOU ARE NOT EXPERIENCED WITH WATER SUPPLY
INSTALLATION, PLEASE CONSULT LOCAL SOURCES regarding:
(1) Freeze protection
(2) Choice and sizing of pipe
(3) Plumbing design in general.
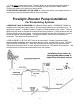
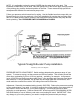
INSTALLATION IN A DRILLED WELL CASING
INSIDE A 6-INCH WELL CASING, SPECIAL ELBOWS ADAPTERS are required. The elbows
fit 1/2" polyethylene (black flex) pipe. MEASURE CAREFULLY to determine the length of pipe
you need. SUBTRACT 1.5% TO ALLOW FOR PIPE AND ROPE STRETCH.
Assemble according to diagram. A priming plug is not needed. Before lowering the pump,
place the intake into a bucket of clean water and run the pump until water exits. Now it is