
Flowlight Booster Pump Instruction Manual

9
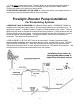
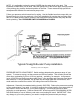
NOTE: It is preferable to place the pump LOWER than the water level in the tank. This
illustrates an alternative, not an ideal. Note the upward rise of the suction pipe, the high position
of the priming plug, and the horizontal position of the filter. These measures help prevent air
entrapment that restricts flow and causes pump noise.
Follow your pressure switch instructions for wiring. Use the flexible hose that comes with your
Booster Pump (cut it into two sections). Our Easy Installation Kit contains the tee fitting at the
tank, a DC-rated pressure switch, and all of the small parts shown between the pump and the
house plumbing. See PRESSURE SWITCH DIAGRAM on PAGE 20
Typical Flowlight Booster Pump installation
Illustration by Home Power Magazine
PRESSURE SWITCH ADJUSTMENT: Switch settings determine the pressure range of your
system. To conserve energy, set the pressure as LOW as feasible. This will also prevent the
motor from overheating if you run it for long periods -- sprinkling, for example. Low pressure
(even 15-20 PSI) may deliver excellent water flow IF your plumbing and hoses are sized larger
than minimum. If not yet plumbed, use at least one size larger pipe than conventional, and
avoid restrictive connections such as 3/8" tubing often used to feed sinks.
Adjustment: Start with the standard setting (usually 30/50 PSI). Reduce the pressure according
to your requirements, if you wish. It is wise to measure the current used by your pump (with an
amp meter in series with the line, your system metering). Current draw will rise in direct
proportion to outlet pressure. Pressure should NOT be set beyond 50 PSI MAXIMUM (65 PSI
with 2910 Model) or loss of efficiency and motor over-heating will result. IMPORTANT: After
any change to your cut-in pressure, you need to readjust the pressure tank pre-charge.