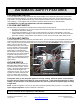
IPP Insert / Built-In IPP Bay View Insert / Built-In FPP FPP Bay View Freestanding Freestanding Toll Free Technical Support 1 - 866 - 456 -9269 My local “Pelpro” dealer is: Manufactured by: To register your purchase www.dansons.com/support READ THIS ENTIRE MANUAL BEFORE YOU INSTALL AND USE YOUR HEATER.
Dear PELPRO Pellet Stove Owner: CONGRATULATIONS on the purchase of your PELPRO wood pellet appliance! You have selected the finest in residential wood pellet heating technology. Let us pass on a few "tips" concerning installing your stove and heating with wood pellets. 1. Whether you install your stove yourself or hire a professional installer, a quality installation is a must for the safety of your family and for efficient, satisfactory operation of your stove. 2.
TABLE OF CONTENTS INTRODUCTION -----------------------------------------------------------------------------------TABLE OF CONTENTS ---------------------------------------------------------------------------SAFETY PRECAUTIONS ------------------------------------------------------------------------SPECIFICATIONS --------------------------------------------------------------------------------AUTOMATIC SAFETY FEATURES -------------------------------------------------------------INSTALLATION OPTIONS -----------
SAFETY PRECAUTIONS o Do not operate the heater if you smell smoke coming from the heater. Push the “OFF” Touch pad, monitor your heater, and call your dealer. o Never use gasoline, gasoline-type lantern fuel, kerosene, charcoal lighter fluid, or similar liquids to start or ’freshen up’ a fire in this heater. Keep all such liquids well away from the heater while it is in use. o Don’t unplug the heater if you suspect a malfunction. Push the “OFF” Touch pad and inspect the heater.
SAFETY PRECAUTIONS . . . Continued o Disconnect the power cord before performing any maintenance. NOTE: Touching the OFF touch pad does not disconnect all power to the heater. o Do not throw this manual away. This manual has important operating and maintenance instructions that you will need at a later time. Always follow the instructions in this manual. o Do not place clothing or other flammable items on or near the heater.
SPECIFICATIONS HEATING SPECIFICATIONS Approx. Heating capacity (sq. feet) * Approx. Fuel burn rate per hour ** Hopper Capacity - Traditional Stove / Insert Hopper Capacity – Bay View Free Standing Hopper Capacity – Bay View Insert / Built-In 800 – 2,000 1.5 – 5 lbs 40 lbs 60 lbs 40-60 lbs Approx. Burn time at lowest setting Approx. Burn time at lowest setting Approx.
AUTOMATIC SAFETY FEATURES L250 HIGH LIMIT SWITCH Your pellet appliance has a high temperature limit switch installed. If the temperature at the back of the firebox reaches approximately 250deg F., the switch will shut off the electricity going to the Vacuum Switch and to the Auger Motor. The auger will automatically stop, and the appliance will shut down when the exhaust temperature cools (120deg F). If this happens call your dealer or Dansons Customer Service (1-866-456-9269).
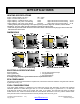
INSTALLATION OPTIONS READ THIS ENTIRE MANUAL BEFORE YOU INSTALL AND USE YOUR PELPRO HEATER. FAILURE TO FOLLOW INSTRUCTIONS MAY RESULT IN PROPERTY DAMAGE, BODILY INJURY OR EVEN DEATH! (See specific Installation details for clearances and other installation requirements) The two PELPRO models are the: “FPP” Freestanding: a Traditional styled stove (figure 1), and a Bay View style(figure 2); and the “IPP” Fireplace Insert / Built-In: a Traditional style (figure 3), and a Bay View style (figure 4).
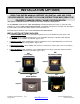
INSTALLATION CHECK LIST Unless you are knowledgeable and experienced in stove installation, we recommend your PELPRO stove receive a Pre-delivery Check and be installed by your local Specialty Retailer or Certified HVAC Service Depot. COMPLETE THIS CHECK LIST PRIOR TO LIGHTING YOUR FIRST FIRE: _____ Carefully read this "Owner's Manual”. SAVE THIS MANUAL. _____ Obtain final inspection and approval by local building officials.
EXHAUST SYSTEMS (GENERAL) PELLET VENT MUST MAINTAIN A MINIMUM 3” CLEARANCE TO ANY COMBUSTIBLE (INSTALL VENT AT CLEARANCES SPECIFIED BY THE VENT MANUFACTURER). DO NOT CONNECT THE PELLET VENT TO A VENT SERVING ANY OTHER APPLIANCE OR STOVE. DO NOT INSTALL A FLUE DAMPER IN THE EXHAUST VENTING SYSTEM OF THIS UNIT. PELLET VENT TYPE: Must be an approved 3” or 4” Diameter Type ”PL” vent, vented to the outside (fig.
EXHAUST SYSTEMS . . . Continued PELLET VENT TERMINATION: (Figures 7 & 8) Termination must be a minimum of 6” above the chimney (B) (note: the chimney must meet local codes for height above the roof or other obstructions) Must have an approved cap (to prevent water from entering) or a 45* elbow downturn If the termination is located on a windy side of house, an approved house shield is recommended to prevent soot from accumulating on the side of the house.
OUTSIDE AIR Outside air is REQUIRED ON ALL MOBILE HOME INSTALLATIONS. Outside air is strongly recommended for all other installations. Failure to install intake air may result in improper combustion as well as the unit smoking during power failures. Metal pipe, ONLY, either solid or flexible, must be used in all outside air installations.(B) NOTE: Non-metallic material MUST NOT BE USED for outside air installations.
FREESTANDING STOVE INSTALLATION STOVE PLACEMENT: Stove must be placed so that no combustibles are within, or can swing within (i.e. drapes doors), 36” of the heater. If the stove is placed in a location where the ceiling height is less than 7’, it must follow the requirements in the section “Alcove Installation”. Stove and floor protection must be installed on a level secure floor FLOOR PROTECTION REQUIREMENTS: The stove must be installed on a non-combustible floor protector (i.e.
FREESTANDING INSTALLATION . . . continued CLEARANCES – “CORNER INSTALLATION”: 45 CORNER THROUGH THE WALL 45 CORNER INTERIOR VERTICAL 12” 1” 1” 3” 2” 6” 2” 6” Figure 12 Figure 13 Note: If interior vertical vent is used, the clearance to the back wall is determined by the upward-turned elbow or “Tee”. It will vary in depth depending on the brand of PL vent used. Before placing the stove, connect the elbow or “Tee” and measure off the 3” clearance.
FREESTANDING INSTALLATION . . . continued THROUGH THE WALL, DIRECT INSTALLATION. (Figure 16) 1. Select the location for your stove, design the exhaust system and determine the brand and size of "PL" vent to be used. 2. Position the floor pad, (C). 3. Following the "PL" vent manufacturer's specifications, mark and cut a hole through the wall to accommodate the wall thimble, (A), and the outside air pipe, (B), if outside air is to be used. Install the wall thimble, (A).
FREESTANDING INSTALLATION VERTICAL INSTALLATIONS: . . . continued (Figures 17 - 22) Your stove may be installed using many different vertical designs. Follow the same basic steps in locating your stove, attaching the exhaust system and outside air intake to your stove as described in "FREESTANDING INSTALLATION" and the "PL" vent manufacturer's procedures for installing through a wall, ceiling, eve and roof.
MOBILE HOME INSTALLATION CAUTION: DO NOT INSTALL STOVE IN SLEEPING ROOM THE STRUCTURAL INTEGRITY OF THE MANUFACTURED HOME FLOOR, CEILING/ROOF MUST BE MAINTAINED! Your PELPRO stove has been tested and listed for mobile home installation. It may be installed in a mobile home as a "Free Standing Stove", a "Hearth Stove", or as an "In Insert" installed in an existing wood or coalburning fireplace or as an "Built –In Insert" installed with a mantel.
FIREPLACE INSERT INSTALLATION VENTING INTO AN EXISTING CHIMNEY: CAUTION: MAKE SURE THE CHIMNEY AND FIREBOX ARE CLEAN AND FREE OF SOOT AND ASHES BEFORE INSTALLATION BEGINS. FAILURE TO DO SO MAY RESULT IN THE TRANSFER OF SOOT INTO THE ROOM BY WAY OF THE CONVECTION FAN. The PELPRO Insert may be installed in a masonry or factory built fireplace as shown in Figure 25 & 26 INSTALLING SOLID-FUEL INSERTS INTO FACTORY BUILT FIREPLACES: The insert must be tested and meet the requirements of UL 1482 (U.S.
FIREPLACE INSERT INSTALLATION … CONTINUED When installing into a masonry chimney, it is recommended that the exhaust vent be extended to the top of the chimney as shown to the lower right. However, if the vent pipe does not extend to the top of the chimney, the pipe must extend a minimum of 18” above the damper. You must seal the damper area with a steel plate when using the direct connection method.
BUILT-IN INSERT INSTALLATION CAUTION: DO NOT BLOCK VENT OPENING The PELPRO Insert may be framed directly into a wall as either a horizontal or vertical vent installation see (figure 27, 28). The exhaust installation requirements are the same as for a freestanding stove. Refer to “Installing your Freestanding Stove” for information concerning installation and proper hook-up of the exhaust. NOTE: Built-In Installations require Enclosure Kit #ACI-3HZ Horizontal Vent or #ACI-3VL Vertical Vent.
BUILT-IN INSERT INSTALLATION . . . CON’T PELLET VENT MUST MAINTAIN A MINIMUM 3” CLEARANCE TO ANY COMBUSTIBLE (INSTALL VENT AT CLEARANCES SPECIFIED BY THE VENT MANUFACTURER). DO NOT CONNECT THE PELLET VENT TO A VENT SERVING ANY OTHER APPLIANCE OR STOVE. DO NOT INSTALL A FLUE DAMPER IN THE EXHAUST VENTING SYSTEM OF THIS UNIT.
OPERATING YOUR STOVE The operations and maintenance of your PELPRO stove are unique and should not be considered to be like a wood, coal stove, gas, electric, propane or oil heater. Cautions: Do not try to operate your stove with viewing or ash pan doors open. Pellets will not feed under these circumstances and a safety concern may arise from sparks or fumes entering room. Burn only pellet fuel that complies with PFI standards.
LIGHTING YOUR STOVE Before lighting a fire check to ensure the Burn Grate is clean and adjusted and the Ash Tray is not full. For safety reasons use extra caution when lighting a stove that is HOT! Lighting stove manually (No Igniter) In the NON-Thermostat Mode Lighting stove with Auto-Ignitor In the NON-Thermostat Mode 1. Push firmly on the FEED RATE or START touch pad.
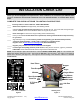
THE CONTROLS Basic Overview The AcuTron II or III digital control board was designed to give you flexibility on how you want to operate your stove. The AcuTron can be operated as a MANUAL control or by a THERMOSTAT. When operating in the Thermostat option, you can also choose to run your appliance in the ON/OFF mode or the LOW/HIGH mode. The START or FEED RATE touch pad allows electricity to flow to your stove's electrical components for 15 minutes.
THE CONTROLS … CONTINUED TRIM POTS (Fine Tune Adjustments)– Factory Settings The COMBUSTION FAN (FAN), HI (4) and LO (1) FEED RATE trim pots have been preset at the factory, but may need to be adjusted onsite after your installation is complete. Due to different installation setups, length and size of venting, and pellet fuel quality, the preset from the factory will not always be correct. These settings will accommodate virtually all wood pellet fuels.
PERFORMANCE ENHANCEMENT TIPS Quality care and quality pellets will help your stove operate at its peak efficiency. Consider: If any fines are noticed in the pellets or in the hopper, you may wish to screen the pellets. Periodically check the hopper to make sure there are no fines or pellets building up in the corners of the sloping sides. Clean and polish the hopper as needed. Be diligent in performing your CLEANING and MAINTENANCE requirements.
Wall Thermostat (option) OPERATION Your pellet appliance is capable of running in an automatic mode with the use of a wall thermostat. The “AcuTron” gives you a choice, “ON / OFF on Demand” or “LOW / HIGH”. The ON / OFF mode automatically turns the heater On and will Shut Off on demand. The LOW / HIGH mode will keep your heater active and cycle between #1 (LOW) setting and your selected (HIGH) setting.
INITIAL APPLIANCE BURN SETUP IT IS CRITICAL FOR THE CORRECT OPERATION OF YOUR STOVE THAT THE BURN GRATE, AIR INLET DAMPER, COMBUSTION FAN SPEED, AND 1 & 4 FUEL RATE BE SET CORRECTLY! A HIGH QUALITY FIRE should burn with a brisk, yellow flame. A flame exhibiting a lazy, orange or sooty characteristic is a poor quality and inefficient flame. A poor flame produces less heat, increases sooting and may cause a smoky exhaust. If a poor flame exists for any period of time, clean your stove and exhaust system.
PELLET FUEL The performance of your pellet appliance is greatly affected by the type and quality of wood pellets burned. As the heat output of various quality wood pellets differ, so will the performance and heat output of your appliance. PELLET QUALITY Your PELPRO stove, with its standard “E Z Clean Grate”, is designed to burn APFI/FFI, "Premium" or "Standard" quality wood pellets.
ASH AND CLINKERS …. CONTINUED CLINKERS are those solid, glassy or porous accumulations that may result from burning some types of wood pellets. Clinkers are formed in the bottom of the burn grate and if left undisturbed will accumulate and shut off the combustion air. As clinkers grow and shut off combustion air the fire becomes orange/brown and lazy. Pellets may build up in the burn grate. The firebox and window becomes sooty. Exhaust gases may become smoky.
CLEANING YOUR EZ–CLEAN GRATE To clean the grate, pull rod on front of stove back and forth a few times, once or twice per day. IMPORTANT: Be sure you PUSH the rod in fully for normal operation. INSERTING, REMOVING & ADJUSTING THE BURN GRATE The burn grate top, (G), must fit and seal firmly on the upper lips, (H), of the burn box, (A).
REQUIRED ROUTINE CLEANING Proper care of your PELPRO pellet appliance is required for peak, sustained performance. The need for and frequency of cleaning depends on the amount of pellets burned, pellet quality, length of time since last cleaning and the quality of the fire. While becoming acquainted with your new stove and the types of local pellets, inspect your BURN GRATE, BURN POT, HEAT TUBES, ASH PIT, and WINDOW daily and clean until a pattern of cleaning requirement is determined.
PERIODIC MAINTENANCE SOOT - FLY ASH: The by products of combustion contain small particles of fly ash. Fly ash will collect in the exhaust venting system and restrict the flow of flue gases. Incomplete combustion, (such as during startup) shutdown or incorrect operation of the room heater will lead to some sort of soot formation which will collect in the exhaust system. Because of this it is important that the exhaust system be inspected and cleaned at least once a year to determine if cleaning is needed.
PERIODIC MAINTENANCE … CONTINUED INSPECT AND CLEAN THE CHIMNEY: [ELECTRICAL CORD UNPLUGGED] Under some conditions fly ash build up in the chimney system may occur rapidly. The fly ash will collect in the exhaust venting system and restrict the flow of the flue gases. Incomplete combustion, such as occurs during startup, shutdown, or incorrect operation of the room heater will lead to some soot formation which will collect in the exhaust venting system.
TROUBLE SHOOTING Proper cleaning, maintenance and the use of quality pellets will prevent the more common stove operational problems. However, when your stove is simply operating poorly or not at all, the following trouble shooting tips may be helpful. WARNING: Disconnect the electrical cord prior to opening the sides of your stove for any inspection, cleaning, maintenance or service work. NEVER perform any inspection, cleaning, maintenance or service on a HOT STOVE. PROBLEM SOLUTION Orange, lazy flame.
LIMITED WARRANTY The PELPRO wood pellet appliance, carries a five (5) year limited warrant for from the date of sale to the original owner against defects and workmanship on all steel parts, (excluding the burn grate), and one (1) year on electrical components. There specifically is no warranty on the paint, glass, burn grate, fire brick and all gaskets or against damage caused from corrosion.
APPENDIX “A” OPTIONAL ACCESSORIES Description Model Doors c/w neo-ceramic glass - Brass Trim APDRGAS Grate - "Super Grate" ACSUGR Hearth Extension ACHEEX Hopper Extension - 6" high (approx. 50lbs.) APHOEX06 Hopper Extension - 12" high (approx. 100lbs.
Appendix “B” REPLACEMENT PARTS Description Air Deflector Air Deflector Louvre - Brass Air Deflector Louvre - Stainless Steel Assembly Packages Auger Motor Model ACADB ACADS ACAMTRAS - includes (1) 2.
REPLACEMENT PARTS …continued Description Insert Shroud Trim Insert Shroud Trim - Small - Brass Insert Shroud Trim - Small - Stainless Steel Insert Shroud Trim - Large - Brass Insert Shroud Trim - Large - Stainless Steel Model AGSHTSG AGSHTSS AGSHTLG AGSHTLS Insert Sliding Top Trim Insert Sliding Top Trim - Black Insert Sliding Top Trim - Gold Plated Insert Sliding Top Trim - Nickel Plated AGITBAS AGITGAS AGITNAS Log Set Log Set - handcrafted stainless steel - 1 pc.
Service & Maintenance Log Toll Free Technical Support 1 - 866 - 456 -9269 DEALER: PURCHASER’S NAME: ADDRESS: ADDRESS: CITY: STATE/PROV: CONTACT: CITY: PHONE #: ZIP/PC: STATE/PROV: PHONE #: PURCHASE DATE: INSTALL DATE: INSTALLED BY: STOVE MODEL: SERIAL NUMBER: WAS UNIT PRE BURNED: SPECIAL COMMENTS: MAINTENANCE LOG SERVICE DATE TECHNICIAN DESCRIPTION OF WORK DONE See www.dansons.