
Installation

Maintenance
Your new faucet is designed for years of trouble-free performance. Keep it looking new by cleaning it periodically
with a soft cloth.Avoid abrasive cleaners, steel wool and harsh chemicals as these will dull the finish and void your warranty.
Warranty Registration:
Please log on to gerberonline.com to register your product today.
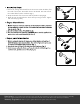
Adjustable Wrench /Llave ajustable /Clé à molette
Needle-nose Pliers /Alicates de extremos finos / Pince à bec effilé
1. Remove the existing showerhead from the shower arm. Clean the debris from
the inside of the shower arm and the shower arm threads. Run water to flush
the residual debris from the inside arm (Fig 1).
2. Wrap the threads of the shower arm with the plumber's tape (included) (Fig 2).
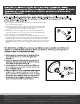
3. Attach the new showerhead to the shower arm by turning clockwise. Tighten
with a wrench (Fig 3 & 4).
Adjustable Wrench /Llave ajustable /Clé à molette
Needle-nose Pliers /Alicates de extremos finos / Pince à bec effilé
1. Remove the existing showerhead from the shower arm. Clean the debris from
the inside of the shower arm and the shower arm threads. Run water to flush
the residual debris from the inside arm (Fig 1).
2. Wrap the threads of the shower arm with the plumber's tape (included) (Fig 2).
3. Attach the new showerhead to the shower arm by turning clockwise. Tighten
with a wrench (Fig 3 & 4).