
Installation

Maintenance
Your new faucet is designed for years of trouble-free performance. Keep it looking new by cleaning it periodically
with a soft cloth.Avoid abrasive cleaners, steel wool and harsh chemicals as these will dull the finish and void your warranty.
Warranty Registration:
Please log on to gerberonline.com to register your product today.
4.
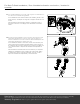
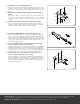
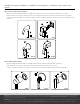
Installing the Showerarm with Trim Ring & Showerhead / Installer le
bras de douche avec la bride et la pomme de douche / Instale el brazo
de la ducha con la brida y la ducha
4-1 Apply pipe tape to the threads on both ends of the showerarm.
Slide the showerarm trim ring onto the showerarm and install the
showerarm to the elbow located in the wall cavity. Tighten and align
this to sit horizontally. Before installing the showerhead, flush the
shower piping with water to clear any debris.
Apposez du ruban pour tuyau sur le filetage des deux extrémités du
bras de douche. Glissez l’anneau de garniture sur le bras de douche
et installez le bras de douche sur le coude de la cavité murale. Serrez
le bras et alignez-le pour qu’il soit à l’horizontale. Avant d’installer la
pomme de douche, rincez les tuyaux de la douche avec de l’eau pour
enlever tout débris.
Aplique cinta selladora a las roscas de ambos extremos del brazo de
ducha. Deslice el anillo de guarnición de la ducha en el brazo de la
ducha e instale el brazo en el codo ubicado en la cavidad de la pared.
Ajústelo y alinéelo para que quede en posición horizontal. Antes de
instalar el cabezal de ducha, purgue la tubería de la ducha con agua
para limpiar los residuos.
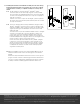
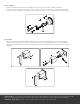
4-2Install the showerhead and tighten with a wrench.
Installez la pomme de douche et serrez-la avec une clé.
Instale el cabezal de ducha y ajuste con una llave.
4.1
4.2