
Operation Manual


8
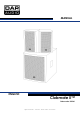
Clubmate II™
Ordercode: D3264
Set Up and Operation
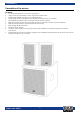
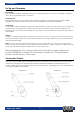
The satellite
The Club Mate satellite is designed to produce a mid/high spectrum of sound. The satellite is equipped
with a 8” LF loudspeaker and a 1” HF driver.
The subwoofer
Feel the bass with this 15” subwoofer. The subwoofer cabinet is powered through a powerful 400W
amplifier. The subwoofer also has a built in 2 x 150W amplifier for powering the satellites.
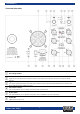
Connecting
Connect the cables coming from the mixer to the XLR line input (3, 8) or the RCA input (14, 15) sockets of
the subwoofer. Depending on the mixer’s output sockets use either a Jack, XLR or RCA cable. Use a
Speakon cable to connect the to satellite (13, 16) outputs of the subwoofer to the speakon input (18) of
the satellites.
Linking
Connect a standard microphone cable from the first unit’s aux (12, 17) outputs to the second unit’s Line
Inputs (3, 8). Repeat this for each stack. Make sure that when using multiple tops, they are placed with a
proper projection angle.
Note: Do not supply power before all components of the system are set up and connected properly.
Make sure that the Club Mate system is always the last component, which is switched on! When shutting
down, the Club Mate should be the first system, to be switched off.
Before plugging the unit in, always make sure that the power supply matches the
product specification voltage. Do not attempt to operate an 115V specification
product on 230V power, or vice versa.
Connection Cables
Take care of your cables, always holding them by the connectors and avoiding knots and twists when
coiling them: This gives the advantage of increasing their life and reliability. Periodically check your
cables. A great number of problems (faulty contacts, ground hum, discharges, etc.) are caused entirely
by using unsuitable or faulty cables.
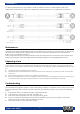
Unbalanced
Balanced