
Operation Manual


7
Clubmate III™
Ordercode: D3265
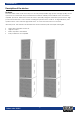
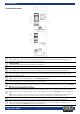
Overview Satellite
GND button
When this button is pressed, it separates the signal ground from the chassis ground, enabling you to
eliminate potential ground loops or low-frequency hum.
Loudness button
Push this button to get a fuller sound at low volume levels.
Air cooling window
Fullrange out XLR output
This parallel output allows you to connect the subwoofer and/or link more satellites in parallel.
Fullrange in Combo input
The input equipped with 3 pole XLR/jack socket is electronically balanced to accept the (line) signal
from any mixing console.
Signal LED
Lights if there is an input signal present at the fullrange in (16) input.
Volume control
This control allows you to adjust the satellite volume level.
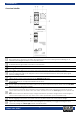
Power switch
Do not supply power before the whole system is set up and connected properly. Make sure the 115/230V
(21) switch is set to the proper voltage.
IEC connector with integrated fuse holder
This connector is meant for the connection of the supplied main cord. Connect one end of the power
cord to the connector, the other end to the mains, and then turn on the Power (19) switch to operate the
unit.
Note: Please make sure that the supply voltage matches the operation voltage before connecting the
unit to mains. Replace the fuse only with a fuse of same specification (115V:T12A/230V:T6,3A).
115V/230V Switch
Before plugging in the power cord, make sure the 115/230V switch is set to the proper voltage.
Limit LED
Lights if the units limiting circuit is active. If the LED lights up constantly, we suggest lowering the input
volume by turning the volume (18) control counterclockwise.