Core Mix-4 USB ORDERCODE D2304 Highlite International B.V.
Congratulations! You have bought a great, innovative product from DAP Audio. The DAP Audio Core Mix-4 USB brings excitement to any venue. Whether you want simple plug-&-play action or a sophisticated show, this product provides the effect you need. You can rely on DAP Audio, for more excellent audio products. We design and manufacture professional audio equipment for the entertainment industry. New products are being launched regularly. We work hard to keep you, our customer, satisfied.
DAP Audio DAP Audio Core Mix-4 USB™ Product Guide Warning ........................................................................................................................................................................... 3 Unpacking Instructions ............................................................................................................................................. 3 Safety Instructions .............................................................................................
Warning FOR YOUR OWN SAFETY, PLEASE READ THIS USER MANUAL CAREFULLY BEFORE YOUR INITIAL START-UP! Unpacking Instructions Immediately upon receiving this product, carefully unpack the carton and check the contents to ensure that all parts are present, and have been received in good condition. Notify the dealer immediately and retain packing material for inspection if any parts appear damaged from shipping or the carton itself shows signs of mishandling. Save the carton and all packing materials.
Do not connect this system to a dimmerpack. Do not switch the system on and off in short intervals, as this would reduce the system’s life. Do not open the device and do not modify the device. Do not drive the inputs with a signal level bigger, than required to drive the equipment to full output. Do not plug Mics into the console (or stagebox) while Phantom Power is on. Also mute the monitor / Pa system when turning Phantom Power on or off.
Connection with the mains Connect the device to the mains with the power-plug. Always pay attention, that the right color cable is connected to the right place. International L N EU (including UK) From April 2004 Brown Blue Green/Yellow North America Pin Black White Green Phase Neutral Protective Earth Make sure that the device is always connected properly to earth! Return Procedure Returned merchandise must be sent prepaid and in the original packing, call tags will not be issued.
Description of the device The Core Mix-4 USB is a 4 channel DJ club mixer with 12 analogue inputs and 2 independent USB audio interfaces. This makes it easy to connect your laptop and route the audio of your DJ software directly through the Core MIX-4 USB. It has independent variable fx sends for each channel which makes it possible to be creative with external effects. The return is controlled by a short fader.
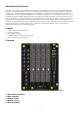
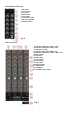
Microphone Channels 1. Mic input 2. Level control 3. Hi control 4. Mid control 5. Low control 6. Send level control 7. Mic On/Off switch 8. Talkover switch Fig. 2 Main Channels 9. Selection switch (CD / Phono / Line) 10. Selection switch (CD / USB1 / Line) 11. Channel VU meter 12. Selection switch (CD/ USB2 / Line) 13. Selection switch (CD / Phono – MP3 / Line) 14. Gain control 15. Hi control 16. Mid control 17. Low control 18. Send control 19. Cue button 20. Channel fader 21. Assign switch 22.
Master section 24. Output L/R signal VU meter 25. Master volume control 26. Balance control 27. Return fader 28. Channel fader curve switch Fig. 4 Monitor section 29. Cue level 30. Cue mix control 31. Cue low level 32. Cue level 33. Phones output Fig. 5 Record Module 34. EQ button 35. USB slot 36. SD card slot 37. Display 38. Repeat button 39. Stop button 40. Play/Pause button 41. / button 42. / button 41. Skip button 42. Skip button 43. Del(ete) button 44. Rec(ord) button Fig.
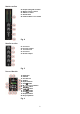
Rear Fig. 7 45. Power switch 46. Stereo/mono switch 47. Master RCA unbalanced output 48. Booth RCA unbalanced output 49. Record RCA unbalanced output 50. Channel 4 Line RCA input 51. Channel 4 Phono RCA Input 52. Channel 4 CD RCA input 53. Channel 3 Line RCA input 54. Channel 3 CD RCA input 55. Channel 2 Line RCA input 56. Channel 2 CD RCA input 57. Channel 1 Line RCA input 58. Channel 1 Phono RCA input 59. Channel 1 CD RCA input 60. AC inlet with integrated fuse holder 61. Trim output control 62.
Installation Remove all packing materials from the Core Mix-4 USB. Check that all foam and plastic padding is removed. Connect all cables. Always disconnect from electric mains power supply before cleaning or servicing. Damages caused by non-observance are not subject to warranty. Set Up and Operation Before plugging the unit in, always make sure that the power supply matches the product specification voltage. Do not attempt to operate a 120V specification product on 230V power, or vice versa.
Main Channels 9. Selection switch (CD/Phono/Line This switch allows you to assign the line (57), the phono (58) or the CD (59) input to channel 1. 10. Selection switch (CD/USB1/Line) This switch allows you to assign the CD (56), the USB 1 (68) or the line (55) input to channel 2. 11. Channel VU-meter This meter is a multi-step LED; respectively the green LEDs show -30, -20, -15, -10, -7, -4, -2, -1 and 0dB. The yellow LEDs show +1, +2, +4 and +6dB. The red LEDs show +10dB and +15dB.
22. Crossfader The crossfader allows you to mix evenly from one channel to another channel. 23. Crossfader slope switch This switch allows the user to select from three types of crossfader curve response. • In the left position, the curve produces a rapid signal rise. (As soon as the cross fader lever leaves the A side, the B channel sound is produced.) • In the right position, the curve operates to produce an even, neutral rise throughout the cross fader’s movement.
Caution: Depending on the type of headphones connected to the Headphones jack, the Core mix 4 USB is capable of producing high output levels via the phones output. Therefore, make sure to turn the control all the way to the left (minimum setting) before connecting the headphones. Be aware of the fact that listening to loud sound pressure levels over a longer period of time leads to hearing-damage! Record Module 34. EQ button Pushing the EQ button allows you to select a preset EQ curve.
Rear Fig. 13 45. Power switch Do not supply power before the whole system is set up and connected properly. 46. Stereo/mono Switch When set to mono, the master output becomes a monaural combination of L+R. 47. Master RCA unbalanced output Use these outputs to connect an amplifier with unbalanced inputs. 48. Booth RCA unbalanced output Use these outputs to connect an amplifier with unbalanced inputs. 49. Record RCA unbalanced output Use these to connect a recording device. 50.
Fig. 14 59. Channel 1 CD RCA input Use to connect a CD player. 60. AC inlet with integrated fuse holder This connector is meant for the connection of the supplied main cord. Connect one end of the power cord to the connector, the other end to the mains, then turn on the power switch to operate the unit. Note: Please make sure that the supply voltage matches the operation voltage before connecting the unit to mains. Replace the fuse only with a fuse of same specification (T1A). 61.
Operations Replacing a (cross)fader Replacing a (cross)fader should only be carried out by a qualified technician. Damages caused by unproper (cross)fader replacement are not subject to warranty. Removing the fader cover Fig. 15 1. Remove the buttons of the faders indicated by the dotted line circles. 2. Remove the four screws indicated by the solid line circles. 3. Now you’re able to remove the fader cover. Fig. 16 4. Now you have easy access to the faders and crossfader. Replacing a fader 1.
Replacing the crossfader 1. 2. 3. 4. Remove the four screws indicated by the solid line circles. Gently remove the fader and disconnect the connector. Re-attach the connector to the new fader and place the fader back gently. Replace the fader cover and fix the screws.
Connection Cables Take care of your cables, always holding them by the connectors and avoiding knots and twists when coiling them: This gives the advantage of increasing their life and reliability. Periodically check your cables. A great number of problems (faulty contacts, ground hum, discharges, etc.) are caused entirely by using unsuitable or faulty cables.
Compensation of interference with balanced connections Maintenance The DAP Audio Core Mix-4 USB requires almost no maintenance. However, you should keep the unit clean. Disconnect the mains power supply, and then wipe the cover with a damp cloth. Do not immerse in liquid. Do not use alcohol or solvents. Keep connections clean. Disconnect electric power, and then wipe the audio connections with a damp cloth. Make sure connections are thoroughly dry before linking equipment or supplying electric power.
Product Specifications • Input channels: • Output channels: • Channel EQ High frequency: High range: Mid frequency: Mid range: Low frequency: Low range: • Microphone EQ High frequency: High range: Mid frequency: Mid range: Low frequency: Low range: • USB Port: • Frequency response: • T.H.