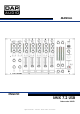
MANUAL ENGLISH IMIX 7.2 USB Ordercode: D2353 Highlite International B.V.
IMIX 7.2 USB Table of contents Warning ...............................................................................................................................................................................2 Unpacking Instructions .................................................................................................................................................2 Safety Instructions .........................................................................................................
IMIX 7.2 USB Warning FOR YOUR OWN SAFETY, PLEASE READ THIS USER MANUAL CAREFULLY BEFORE YOUR INITIAL START-UP! Unpacking Instructions Immediately upon receiving this product, carefully unpack the carton and check the contents to ensure that all parts are present and have been received in good condition. Notify the dealer immediately and retain packing material for inspection if any parts appear damaged from shipping or the carton itself shows signs of mishandling.
IMIX 7.2 USB Never let the power-cord come into contact with other cables! Handle the power-cord and all connections with the mains with particular caution! Never remove warning or informative labels from the unit. Never use anything to cover the ground contact. Never leave any cables lying around. Do not insert objects into air vents. Do not connect this system to a dimmerpack.
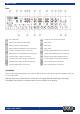
IMIX 7.2 USB Connection with the mains Connect the device to the mains with the power-plug. Always pay attention, that the right color cable is connected to the right place. International L N EU Cable UK Cable US Cable BROWN RED YELLOW/COPPER BLUE BLACK SILVER YELLOW/GREEN GREEN GREEN Make sure that the device is always connected properly to the earth! Pin FASE NUL EARTH Return Procedure Returned merchandise must be sent prepaid and in the original packing, call tags will not be issued.
IMIX 7.
IMIX 7.
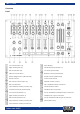
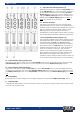
IMIX 7.2 USB Functions 1/2/3. Equalizer section (hi/mid/low) The microphone channel’s equalizer section allows shaping of the incoming audio signal. All input channels are fitted with 3-band EQ. The hi (2) and low (1) shelving controls have their frequencies fixed at 5 KHz and 120 Hz respectively. The mid (3) range control has a peaking response frequency at 800 KHz. All 3 bands have up to 12dB cut and boost, with a centre detent for off.
IMIX 7.2 USB 9. Input selection switch (channel 1/2) With this you are able to assign the line (39/40) input or the USB (42/43) input to the according channel. If the line input is selected, the according channel display (16) shows the text you have assigned to it with the display select (16) switch. If the USB input is selected, the channel display (16) shows USB 1 or USB 2 depending on the channel. 10. Channel VU-meter This meter is a multi-step LED.
IMIX 7.2 USB 18. Output signal VU-meter (master A/B) This meter is a multi-step LED. The accurate level indication allows you to monitor the output signal level at anytime, and match with other devices. 19. Balance control By using the bal(ance) control you can adjust the balance between the left and the right channel. If you use a mono source (input left mono) the control works as a pan(orama) control and lets you change the input signal’s position within the stereo image. 20.
IMIX 7.2 USB 29. Phone/line button Use this button to configure both aux (26,28) inputs for either line level or phone level. When the input level is too low, press the line/phone level switch. When the light is on, the level of the input signal will be boosted. The phone level adjusts the input sensitivity into the correct level for MP3 players, smartphones or tablets. Now you can playback your MP3 devices directly without signal loss. 30.
IMIX 7.2 USB 41. GND screw Use to connect the ground wire of your turntable. 42. USB 2 port This USB port can be used to connect the IMIX-7.2 to your PC/ laptop. The USB port is bidirectional, the input can be assigned to channel 2 by means of the channel select (9) switch. The output of the USB port is connected to rec A (35) output. This means that you’re only able record a channel with your software if the channel is assigned to master A. 43. USB 1 port This USB port can be used to connect the IMIX-7.
IMIX 7.2 USB Set Up and Operation Before plugging the unit in, always make sure that the power supply matches the product specification voltage. Do not attempt to operate a 115V specification product on 230V power, or vice versa. Connection Cables Take care of your cables, always holding them by the connectors and avoiding knots and twists when coiling them: This gives the advantage of increasing their life and reliability. Periodically check your cables.
IMIX 7.2 USB Troubleshooting DAP Audio IMIX-7.2 USB This troubleshooting guide is meant to help solve simple problems. If a problem occurs, carry out the steps below in sequence until a solution is found. Once the unit operates properly, do not carry out following steps. 1. 2. 3. 4. 5. If the device does not operate properly, unplug the device. Check power from the wall, all cables, connections, etc. If all of the above appears to be O.K., plug the unit in again.
IMIX 7.
©2013 DAP Audio