IT’S ALL ABOUT INSTALLING QUALITY INSTILLING CONFIDENCE Exterior Door Installation
DAP Exterior Door Weatherization Installation Instructions SITE PREPARATION Before beginning exterior door installation be sure that the weather resistive barrier (WRB) has been installed according to WRB manufacturer’s instructions. Tape and repair any tears or holes in WRB. Ensure that rough opening meets the required dimensions for door size as per door manufacturer’s instructions. Assemble necessary materials for installation.
Step 2 Install DAP® Jamsill Guard® Sill Pan • Measure and dry fit sill pan before assembly. • Place left and right sill pan corners tight against framing. • Measure center section and cut if necessary to maintain 2” overlap onto recessed pan corners. Center section must fit within recessed area of corners. Apply DAP® Rapid Fuse or PVC cement to recessed areas of corner pieces (blue areas).
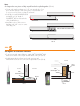
Step 3 Install Door Into Rough Opening INSIDE • Before setting door into the RO, apply 1/4” to 3/8” bead of DYNAFLEX® 800 to the back side of the perimeter brick molding to seal brick molding to door frame. Be sure to seal the miter joint at jamb and head. Apply a second 1/4” to 3/8” bead of DYNAFLEX® 800 to back of brick molding as shown in FIG 3. • From outside, set threshold of door unit into the opening and tilt into place by pressing jamb and head brick molding to exterior wall sheathing.
Note: For larger doors two pieces of drip cap will need to be spliced together. (FIG 4e) • Create end caps by making two 1/2” cuts at right side of one piece and the left side of the other; place overhead and cut to one piece to fit. Ensure overlap of at least 4”. • Seal lap joint with DYNAFLEX® 800 and apply a 3/8” bead of DYNAFLEX® 800 to the back side of the head flashing. ✁ • Install above door and secure to building with 3/8” screw in center of the lap joint.
dapspecline.