
Product guide
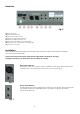


Table Of Contents

11
15. Phantom Power LED
This LED indicates when the phantom power is switched on
for the microphone inputs. After switching on the mixer, the
red LED should not light up. So both balanced and
unbalanced microphones can be connected. Unbalanced
microphones may be damaged if the Phantom power is
activated however unbalanced microphones are rarely to
be found these days.
16. Aux 1 return
This control allows you to adjust the Aux 1 level to the main
mix.
17. Power LED
The green power LED lights when the Sessionmix is turned on.
If after switching the device on, the LED does not light, make
sure that the AC adapter is connected properly. If the LED
still doesn’t light up after everything is connected right,
please contact your DAP audio dealer.
Fig. 9
18. Aux 2 return
This control allows you to adjust the Aux 2 level to the main mix.
19. Aux 1 to Aux 2 switch
This button allows you to route the output of the Aux 1 to the Send of Aux 2 allowing you to switch two
internal external effects in series.
20. Phones/ Control room fader
This fader allows you to adjust the control room/ phones output volume.
Caution: Depending on the type of headphones connected to the phones jack, the Powermix is
capable of producing very high output levels via the phones output. Therefore, make sure to turn the
control all the way down (minimum setting) before connecting the headphones.
Listening to loud sound pressure levels over a longer period of time leads to hearing damage!
21. LED VU meter
22. Assign 2TK to main mix
Use this button to assign the 2TK input to the main mix. The level of the 2TK input is fixed.
23. Assign 2TK to the Phones/ Control room group
Use this button to assign the 2TK input to the Phones/ Control group. The level of the 2TK input is fixed.
24. Main mix fader
This fader allows you to adjust the main mix level.