DS-CM-12MP3 ORDERCODE D2184
Congratulations! You have bought a great, innovative product from DAP Audio. The DAP Audio DS-CM-12MP3 brings excitement to any venue. Whether you want simple plug-&-play action or a sophisticated show, this product provides the effect you need. You can rely on DAP Audio, for more excellent audio products. We design and manufacture professional audio equipment for the entertainment industry. New products are being launched regularly. We work hard to keep you, our customer, satisfied.
Dap Audio Dap Audio DS-CM-12MP3™ Product Guide Warning.........................................................................................................................................................................2 Safety-instructions...................................................................................................................................................2 Operating determinations..............................................................................................
WARNING FOR YOUR OWN SAFETY, PLEASE READ THIS USER MANUAL CAREFULLY BEFORE YOUR INITIAL START-UP! Unpacking Instructions Immediately upon receiving this product, carefully unpack the carton and check the contents to ensure that all parts are present, and have been received in good condition. Notify the dealer immediately and retain packing material for inspection if any parts appear damaged from shipping or the carton itself shows signs of mishandling. Save the carton and all packing materials.
Never remove warning or informative labels from the unit. Never use anything to cover the ground contact. Never leave any cables lying around. Do not insert objects into air vents. Do not connect this system to a dimmerpack. Do not switch the system on and off in short intervals, as this would reduce the system’s life. Do not open the device and do not modify the device. Do not drive the inputs with a signal level bigger, than required to drive the equipment to full output.
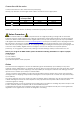
Connection with the mains Connect the device to the mains with the power-plug. Always pay attention, that the right color cable is connected to the right place. International L N EU (including UK) From April 2004 Brown Blue Green/Yellow North America Pin Black White Green Phase Neutral Protective Earth Make sure that the device is always connected properly to earth! Return Procedure Returned merchandise must be sent prepaid and in the original packing, call tags will not be issued.
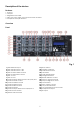
Description of the device Features • 10 inputs • 3 outputs • Assignable cross fader • Gain, bass, mid, treble, pan control for each channel • Headphone with split function Overview Front Fig.
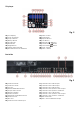
SD-player Fig. 2 32) LCD Display 33) Loop Out Button 34) Loop In Button 35) Reloop Button 36) SD card slot 37) Time Buton 38) Single Button 39) Folder/ Track Encoder 40) Pitch Bend Amount Indicator 41) Pitch Control 42) Pitch Button 43) Repeat Button 44) Cue Button 45) Play/Pause Button 46) Fast Reverse Button 47) Fast Forward Button 48) Pitch – Button 49) Pitch + Button Backside Fig.
Installation Remove all packing materials from the DS-CM-12MP3. Check that all foam and plastic padding is removed. Connect all cables. Always disconnect from electric mains power supply before cleaning or servicing. Damages caused by non-observance are not subject to warranty. Functions 1. MIC Electronically balanced XLR-type input for connecting low impedance microphone. The input has exremely low noise hum. When connecting a microphone make sure that the pin assignment is correct.
8. Selection Switch (Phono Aux / SD/ Line ) With this switch you can select between two sets of inputs or the built in SD-player per channel. Set the Aux/Phono (65, 68) selector in phono position if you want to connect a turntable. To the Aux/Phono (64, 67) input on the rearpanel. 9. Gain Use this control to match the connected devices optimally to your DS-CM-12MP3.
24. Output L Signal VU Meter This meter is a multi-step LED; respectively the green LEDs show -40, -30, -20, -10, -7, -4 and -2dB. The red LEDs show +0, +2, +4, +7 and +10dB. The accurate level indication allows you to monitor the output signal level at anytime, and match with other devices. 23. Balance Use to set the balance between the Left and right master output. 25. Output R Signal VU Meter This meter is a multi-step LED; respectively the green LEDs show -40, -30, -20, -10, -7, -4 and -2dB.
39. Track/ Folder selection Press the control and turn to select the desired folder. Release the control and turn to select the desired track. 41. Pitch Fader: Use this fader to adjust the pitch of the track. Turn to the right to increase the pitch, turn to the left to decrease the pitch. 42. Pitch: If you push this button, you can adjust the pitch with the pitch fader. 43. Repeat: Use this button to repeat one track or all tracks of your medium. 44.
59. Record RCA Unbalanced Out Use these to connect a recording device. 60. Channel 4 Line 4 RCA Input Use to connect a line level device. 61. Channel 3 Line 3 RCA Input Use to connect a line level device. 62. Channel 3 Aux 3 RCA Input Use to connect a line level device. 63. Channel 2 Line 2 RCA Input Use to connect a line level device. 64. Channel 2 Aux 2/ Phono 2 RCA Input Use to connect either a phono or line level device depending on the position of the Channel 2 Aux 2/ Phono 2 (65) switch. 65.
4. Stop Playback There are two ways to stop playback: 1. Press the Play/Pause button during playback to pause at that point. 2. Press the Cue button during playback to return to the cue point and enter pause condition. Fig. 10 5. Pausing • Press the Play/Pause button to switch between play and pause. • The play indicator flashes when the pause mode is set. • Playback resumes when the Play/Pause button is pressed again. 6. Setting a Cue Point • Press the Play/Pause button to switch between play and pause.
2) Pitch-Bending • The BPM increases or decreases respectively while the PITCH BEND + or PITCH BEND - button is pressed. • The BPM increase depends on how long you hold the button. If you hold the button for about 5 seconds, the BPM will go either to +8/ +16/ +24% for PITCH BEND + or -8/ -16/ -24% for PITCH BEND -. If you tap the button, the BPM will only change a little so you can change the beat slightly without audible changing in the music.
Compensation of interference with balanced connections 14
Maintenance The DAP Audio-CD-Player DS-CM-12MP3 requires almost no maintenance. However, you should keep the unit clean. Disconnect the mains power supply, and then wipe the cover with a damp cloth. Do not immerse in liquid. Do not use alcohol or solvents. Keep connections clean. Disconnect electric power, and then wipe the audio connections with a damp cloth. Make sure connections are thoroughly dry before linking equipment or supplying electric power. Replacing the crossfader 1.
Product Specification • Model: • Power: • Light: • Weight: • Dimensions (WxHxD): DAP Audio DS-CM-12 100 – 240 V~, 50/60 Hz, 29W BNC, 12 Volt, max. 5W 2.8 kg 483 x 180 x 100 mm Input Sensitivities: • Microphone 1: • Microphone 2: • Phono: • Aux: • Line: -54dBu, 2 mV at 2.2 kΩ -60dBu, 1 mV at 2.2 kΩ -54dBu, 2 mV at 47 kΩ at 1 kHz.
Design and product specifications are subject to change without prior notice. Website: www.Dap-audio.info Email: service@highlite.
09 Dap Audio.