
Product guide


8
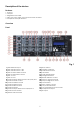
8. Selection Switch (Phono Aux / SD/ Line )
With this switch you can select between two sets
of inputs or the built in SD-player per channel.
Set the Aux/Phono (65, 68) selector in phono
position if you want to connect a turntable. To
the Aux/Phono (64, 67) input on the rearpanel.
9. Gain
Use this control to match the connected devices
optimally to your DS-CM-12MP3. With the fader
and Master fader set to ¾ stroke, Adjust the gain
with a loud input signal in such a way that the
Red LED’s on the Master VU-meters (24, 25) do not
light up.
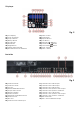
10/ 11 / 12. Channel EQ Treble/Mid/Low
Each channel is fitted with 3-band EQ. The Treble
(10) and Bass (12) shelving controls have their
frequencies fixed at 12 Khz and 80 Hz
respectively. The Mid range control (11) has a
center frequency of 1 kHz. The Bass band has up
to 30 dB cut and 12 dB boost, the Mid band has
Fig. 5 up to 35 dB cut and 12 dB boost and the High
band has up to 15dB cut and up to 12dB boost. All
three bands have a centre detent for “OFF”. Turning the Equalizer level control to the right amplifies
the frequency range, turning to the left attenuates the signal. Minor changes to the Equalizer control
usually produce the best results. Try to avoid excessive enhancement of the MID band.
13. Channel Fader
Use the faders to control the levels of channel 1-4.
14. Selection Switch (Aux 4/ SD/ Line 4)
With this switch you can assign the Aux 4 (31) input, the built in SD-card player or the line 4 (60)
input to channel 4.
15. Cue
The Cue button (pre fade listening) is designed to route the channel input to the monitor section
independent of the individual channel’s volume fader setting. It is possible to assign more than one
channel simultaneously to the Cue bus.
16. Master Fader
This fader allows you to adjust the output signal to the Master (26) output.
17. Mono Switch
18. X-assign A
Use this switch to assign the Right-side of the crossfader (20) to an input channel (zero is Off).
19. Fader Start A
This switch activates the fader start function for the channel selected by X-assign A (18).
20. Crossfader
The crossfader allows you to mix evenly from one channel to another channel.
21. Fader Start B
This switch activates the fader start function for the channel selected by X-assign B (22).
22. X-assign B
Use this switch to assign the Left-side of the crossfader (20) to an input channel (zero is Off).