
Product guide

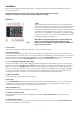


Table Of Contents

9
25 /26 /27. Equalizer SECTION (Master 1-3)
The mixer’s Equalizer section allows shaping of the incoming audio signal. All mono input channels are
fitted with 3-band EQ. The High (27) and Low (25) shelving controls have their frequencies fixed at 12KHz
and 80Hz respectively. The Mid (24) range control has a peaking response frequency at 2.5KHz. All 3
bands have up to 12dB cut and boost, with a centre detent for. Turning the Equalizer to the right amplifies
the frequency range, turning to the left attenuates the signal. Minor changes to the Equalizer control
usually produce the best results. Try to avoid excessive enhancement of the MID band.
28. Headphones Level
This control allows you to adjust the headphones’ volume.
29. Headphone
You can connect a pair of headphones with an impedance of 32 - 600 Ohm to the headphones
connector. It is a 6,3mm/ 1/4” TRS socket, wired as Tip=left, Ring=right and sleeve = ground.
Caution: Depending on the type of headphones connected to the Headphones jack, the EM-7.3 is
capable of producing high output levels via the phones output. Therefore, make sure to turn the
control all the way to the left (minimum setting) before connecting the headphones. Be aware of the
fact that listening to loud sound pressure levels over a longer period of time leads to hearing damage!
30.PFL Split Switch
This switch controls the routing to your headphone. In split mode the PFL signal is send to the Left ear
of the headphone connected to the Headphone output (28) the master signal is send to the Right ear
of the headphone. In normal mode the PFL and master signal are send to both ears of the headphone.
Fig. 6
31. Remote Power Supply Input Socket
This is the remote AC power supply input socket for the EM-7.3. It is a special three core socket. Please use
the supplied DAP audio adapter only.
32. Power On/Off
Do not supply power before the whole system is set up and connected properly.
33. With/ Without Mic Switch
Use this switch if you don’t want your microphone signal at the record outputs (22/46).
34. Master 3 Level Switch
This selector allows you, to set the output level (0,75V or 1,5V) for the Master 3 outputs.
35. Master 2 Level Switch
This selector allows you, to set the output level (0,75V or 1,5V) for the Master 2 outputs.
36. Master 1 Level Switch
This selector allows you, to set the output level (0,75V or 1,5V) for the Master 1 outputs.
37. Channel 5 Gain
Channel 5 input level is determined by the Gain control. With the Gain control you can adjust the line
input-sensitivity, while optimally matching the incoming signals to the mixer’s internal operation level. The
high gain of this mixer is ideal when dealing with very low input levels.