MANUAL ENGLISH DVMP-250 V1 Ordercode: D1133 Highlite International B.V.
DVMP-250 Table of contents Warning ...............................................................................................................................................................................2 Unpacking Instructions .............................................................................................................................................2 Safety Instructions ..................................................................................................................
DVMP-250 Warning Unpacking Instructions Immediately upon receiving this product, carefully unpack the carton and check the contents to ensure that all parts are present, and have been received in good condition. Notify the dealer immediately and retain packing material for inspection if any parts appear damaged from shipping or the carton itself shows signs of mishandling. Save the carton and all packing materials.
DVMP-250 IMPORTANT: The manufacturer will not accept liability for any resulting damages caused by the non-observance of this manual or any unauthorized modification to the system. Never let the power cord come into contact with other cables! Handle the power-cord and all connections with the mains with particular caution! Never remove warning or informative labels from the unit. Never use anything to cover the ground contact.
DVMP-250 Connection with the mains Connect the device to the mains with the power-plug. Always pay attention, that the right color cable is connected to the right place.
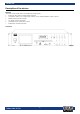
DVMP-250 Description of the device Features The DAP-audio DVMP-250 is a 2U Karaoke DVD player • Supports all common audio/video formats • Contains S-Video, TV, Component Video, VGA, HDMI and BNC video outputs • Balanced XLR audio outputs • 19” Rack mounts included • Headphones 6,3 mm jack output • IR Remote control included Overview Fig.
DVMP-250 Frontside Fig. 02 Power switch R/L button Display IR Remote sensor Disc holder Source button LCD Display Play/pause Direct access buttons Eject button Fast reverse button Return button Fast forward button Flat button Previous button button Time button Phone input Sharp button Level control Repeat button SD port Video button USB A port Next button Backside Fig.
DVMP-250 Remote control Fig. 04 Source button Step button A-B button Sharp button (key control) Nor button (key control) Menu button N/P button OK button Eject button Cursor right button Flat button (key control) R/L button Cursor up button Return button Setup button Next button Cursor left button Previous button Time button Video out button Cursor down button Prog.
DVMP-250 Names and functions Below is a description of the functions of the controls. 01) Power switch This is the main power switch. Press to turn the device on or off. 02) Display 03) Disc holder Place the disc in the holder. Push the eject (17/40) button to open and close the disc holder. 04) LCD display 05/53) Direct access buttons Use these buttons to select a track directly. You can also use the 10+ button to move 10 tracks forward. E.g.
DVMP-250 23/64) Video button Pushing this button allows you to switch between YUV, VGA and S-Video modes. 24/62) Next button Use this button to skip to a following track. 25) HDMI out Connect the input of a HDMI monitor to this output. 26) Audio stereo RCA unbalanced out Connect an unbalanced line input of your mixer/ amplifier to this output. 27) RCA coax out Connect a digital audio input of your mixer/amplifier to this output. 28) RCA video out Connect the video input of your TV-set to this output.
DVMP-250 68) Zoom button Pushing this button allows you to change the zoom factor. 69) Angle button Push this button to change the camera angle. This button is only functional if a DVD has this option. 70) Clear button Push this button to clear the numbers you just entered by using the direct access (5/33) buttons. 71) Mute button Push this button to mute the audio outputs. 72) Copy button Not functional in this version of the software. Installation Remove all packing materials from the device.
DVMP-250 Operations 01) Preparation • When you want to watch a DVD film, turn the TV-set on and select the video input connected to the DVD player. • If you want to listen to audio via your audio installation, turn the audio system on and select the DVD player input. 02) Normal Playback • Push the power (01) switch on the front panel to switch the DVD player on. The start logo appears on the TV screen.
DVMP-250 12) Program Push prog (65) to open the on screen program menu. • • • • • 13) • 14) • • 15) • 16) • 17) • The DVMP-250 allows you to program up to 16 tracks/chapters. Use the cursor (42/44/46/59) buttons to navigate through the menu. Use the direct access (05/53) buttons to insert a desired track/chapter in the selected program number. When finished, move to the onscreen play button using the cursor (42/44/46/59) buttons and confirm the choice by pushing the OK (58) button.
DVMP-250 Before switching off the power When you have finished using the DVD player, before switching off the power, be sure that the disc holder (03) has been closed with the eject (17/40) button. CAUTION: • Do not forcibly close the disc holder when the power is off. • Do not switch off the power, when the disc holder (03) is open. • Switch off the power after the disc holder (03) has been closed with the eject (17/40) button.
DVMP-250 System Setup When you push the setup (43) button, the setup menu will be displayed. You can select five tabs: A. General B. Audio C. Dolby D. Video E. Preference When you have entered the setup menu you can use the cursor (42/44/46/59) buttons to navigate and select desired items. When you have selected an item, push the OK (58) button to confirm the entry. A.
DVMP-250 Note: Available aspect ratios will be printed on the back of a DVD packaging. Some DVDs are recorded in cinema widescreen format (16:9) and others in standard format (4:3). Some DVDs are recorded in both formats and may thus feature the Pan Scan function. If available, the Pan Scan function will allow the 4:3 format to fill out the entire screen. However, a part of the picture will be cut off on both sides.
DVMP-250 04) Captions Use the cursor (42/44/46/59) buttons to switch the Captions function On or Off. 05) HDCD Use the cursor (42/44/46/59) buttons to set up the HDCD. Only works with HDCD media. Depending on the CD sound quality, there are three options which you can choose from: • Off: When this option is selected, you can play normal CDs. • 1X: When this option is selected, you can play 44.1K CDs. • 2X: When this option is selected, you can play 88.2K CDs.
DVMP-250 B. Audio Setup Includes: 01) Speaker Setup Use the cursor (42/44/46/59) buttons to select Speaker Setup and push the OK (58) button to open the Speaker Setup menu. The speaker setupmenu gives allows you to adjust the following parameters: • • • • Downmix: LT/RT: A kind of Dolby Pro Logic format. It is used when the unit is connected to a Dolby Pro receiver through stereo RCA cables.
DVMP-250 • Test Tone Allows you to generate a test tone. Use the cursor (42/44/46/59) buttons to select and change parameters and push the OK (58) button to confirm. 02) Spdif Setup Use the cursor (42/44/46/59) buttons to select Spdif Setup and push the OK (58) button to open the Spdif Setup menu. The Spdif setup page allows you to set up the digital sound format that comes from the coaxial or optical output on the rear panel.
DVMP-250 04) CH EQ Setup Use the cursor (42/44/46/59) buttons to select CH EQ Setup and push the OK (58) button to open the CH EQ Setup menu. This menu allows you to setup: • Preset EQ Type You can choose between Rock, Pop, Live, Dance, Techno, Classic, Soft or switch the EQ off. • Bass Boost On or off. • Super Bass On or off. • Treble Boost On or off. Use the cursor (42/44/46/59) buttons to select and change parameters and push the OK (58) button to confirm.
DVMP-250 This menu allows you to setup a preset reverb algorithm. Concert, Living Room, Hall, Bathroom, Cave, Arena, Church or switch the reverb effect off. Use the cursor (42/44/46/59) buttons to select and change parameters and push the OK (58) button to confirm. C. Dolby Setup This menu is used for setting up Dolby functions and includes: 01) Dual mono mode Here you can choose between stereo, left mono channel, right mono channel or mixed mono.
DVMP-250 02) Dynamic Range To avoid disturbing the neighbours at night, you can use this function to reduce the sound effects volume without changing the original tone. Use the cursor (42/44/46/59) buttons to adjust the dynamic range between off and full. D.
DVMP-250 02) TV Mode Use the cursor (42/44/46/59) buttons to select: • • P-Scan Interlace 03) Quality Use the cursor (42/44/46/59) buttons to select Quality and push the OK (58) button to open the Quality Setup menu. This menu allows you to setup: • Sharpness Use the cursor (42/44/46/59) buttons to adjust sharpness between Medium, Low and High. Push the OK (58) button to store. • Brightness Use the cursor (42/44/46/59) buttons to adjust brightness between -20 and +20. Push the OK (58) button to store.
DVMP-250 • • • Hue Use the cursor (42/44/46/59) buttons to adjust hue between -9 and +9. Push the OK (58) button to store. Saturation Use the cursor (42/44/46/59) buttons to adjust saturation between -9 and +9. Push the OK (58) button to store. Luma Delay Use the cursor (42/44/46/59) buttons to select either 0T or 1T. Push the OK (58) button to store. 04) HDMI Use the cursor (42/44/46/59) buttons to select HDMI Setup and push the OK (58) button to open the HDMI Setup menu.
DVMP-250 E. Preference This menu allows you to set up: 01) TV Type 02) Audio This menu item is not functional in this software version. Use a DVD disc’s menu to setup the language. 03) Subtitle This menu item is not functional in this software version. Use the title (52) button. 04) Disc Menu This function allows you to select a language for the setup menu. You can choose between English, French, Spanish, Chinese, Japanese, Korean, Russian and Thai in this version.
DVMP-250 05) Parental Use the cursor (42/44/46/59) buttons to set up a filter to block certain DVDs. 06) Password Use the cursor (42/44/46/59) buttons to select Password and push the OK (58) button to open the Password Setup menu. This menu allows you to set up a password. 07) Default Use the cursor (42/44/46/59) buttons to select reset. Confirm your selection by pushing the OK (58) button. Now the DVMP-250’s default settings will be restored.
DVMP-250 Setup examples Connection of a television set Connection of a television set using an A/V-cable If your TV-set has an S-video input, the DVD-player can be connected with an S-video cable. If the TV set has no S-video input use an A/V cable.
DVMP-250 Connection of an amplifier with digital audio input and TV-set If the amplifier has a coaxial input, the karaoke player can be connected with a coax cable. Do not use a coaxial cable and an optical cable at the same time! Maintenance The DAP Audio-CD-Player DVMP-250 requires almost no maintenance. However, you should keep the unit clean. Disconnect the mains power supply, and then wipe the cover with a damp cloth. Do not immerse in liquid. Do not use alcohol or solvents. Keep connections clean.
DVMP-250 Product Specifications Power supply: Power consumption: S/N ratio: Frequency response: THD: Audio output: Analog audio outputs: Digital audio outputs: Headphones output: Video outputs: Accepted media: Frequency response: Dimensions: Weight: Remote control batteries: AC 100V-240V, 50/60 Hz 30 Watt >85dB 20Hz – 20kHz <0,01% XLR 6dBv RCA 0dB Unbalanced RCA Balanced XLR BNC Optical 6,3 mm stereo jack S-Video TV Component Video VGA HDMI BNC DVD, VCD, CD, CDR, MP3, MP4, RM, USB, SD 20Hz – 20kHz 482 x
DVMP-250 Notes Ordercode: D1133 29
DVMP-250 Ordercode: D1133 30
©2014 DAP Audio