Core Kontrol D4i ORDERCODE D1260 Highlite International B.V.
Congratulations! You have bought a great, innovative product from DAP Audio. The DAP Audio Kontrol D4i brings excitement to any venue. Whether you want simple plug-&-play action or a sophisticated show, this product provides the effect you need. You can rely on DAP Audio, for more excellent audio products. We design and manufacture professional audio equipment for the entertainment industry. New products are being launched regularly. We work hard to keep you, our customer, satisfied.
DAP Audio DAP Audio Kontrol D4i™ Product Guide Warning ...................................................................................................................................................................................................3 Safety Instructions.............................................................................................................................................................................3 Operating Determinations..........................................
Warning FOR YOUR OWN SAFETY, PLEASE READ THIS USER MANUAL CAREFULLY BEFORE YOUR INITIAL START-UP! Unpacking Instructions Immediately upon receiving this product, carefully unpack the carton and check the contents to ensure that all parts are present, and have been received in good condition. Notify the dealer immediately and retain packing material for inspection if any parts appear damaged from shipping or the carton itself shows signs of mishandling. Save the carton and all packing materials.
Do not drive the inputs with a signal level bigger, than required to drive the equipment to full output. Only use system indoor, avoid contact with water or other liquids. Avoid flames and do not put close to flammable liquids or gases. Make sure you don’t use the wrong kind of cables or defective cables. When using a power adaptor, make sure that the available voltage is not higher than stated on the rear panel.
Return Procedure Returned merchandise must be sent prepaid and in the original packing, call tags will not be issued. Package must be clearly labeled with a Return Authorization Number (RMA number). Products returned without an RMA number will be refused. Highlite will not accept the returned goods or any responsibility. Call Highlite 0031-455667723 or mail aftersales@highlite.nl and request an RMA prior to shipping the fixture.
Description Features The Kontrol D4i is a DAP audio Core series is a 4 Channel Midi controller with 2 analog inputs. Note: The virtual DJ LE software version does not support the analog inputs. To take full advantage of all functions of your Kontrol D4i, you need to buy the Virtual DJ Pro Full version.
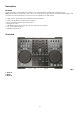
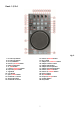
Deck 1-3/2-4 Fig. 2 1. FX select up button 2. FX select up button 3. FX on/off button 4. Hotcue 1/2 beats button 5. Pitch control fader 6. x½/shift button 7. Loop in/smart loop button 8. Key lock/pitch button 9. Jogwheel 10. Cue button 11. Sync/master button 12. Parameter 1 control 13. Auto loop button 14. Parameter 2 control 15. Hotcue 2/4 beats button 16. Key control 17. Sample rec/smart cue button 18. Sample volume control 19. Sample play button 20. Sample select up button 21.
Mixer Fig. 3 29. Channel gain control 30. Channel hi control 31. Channel mid control 32. Channel low control 33. Load/view 1 button 34. Filter control 35. Load/view 3 button 36. Cue button 37. Crossfader assign L switch 38. Crossfader assign R switch 39. Channel fader 40. Crossfader 41. Master control 42. Booth control 43. Track select encoder 44. Load/view 2 button 45. Load/view 4 button 46. Back button 47.
Frontside Fig. 4 48. Touch sensitivity control jogwheel A 49. Touch sensitivity control jogwheel B 50. Mic input jack 51. Mic volume control 52. Channel 3 input switch 53. Crossfader slope switch 54. Channel 3 input switch 55. Cue mix control 56. Headphone volume control 57. Headphone output jack Backside Fig. 5 58. Power on/off switch 59. DC In 7,5V 2A 60. USB connector 61. Master XLR out L/R 62. Master RCA out L/R 63. Booth RCA out L/R 64. Channel 4 RCA input 65. Channel 4 line/phono switch 66.
Names and Functions Below is a description of the functions of the controls. Deck Functions 1. Effects select up button Tapping this button allows you to select one of the available effects in forward direction. The included Virtual DJ LE software gives you access to seven effects as shown below. 2. Effects select down buttons Tapping this button allows you to select one of the available effects in backwards direction. The included Virtual DJ LE software gives you access to seven effects as shown below.
15. 2/4 beats button The Kontrol D4i allows you to store up to four hot cue points per deck. See page 15/16: “Setting a hot cue point in pause mode” and “Setting a hot cue point in play mode”. While in autoloop mode, tapping this button allows you to start a 4 bar autoloop. 16. key control This control allows you change the key of the song while the tempo remains unchanged. 17. Sample rec/smartcue button This button allows you to start/stop recording a sample.
Mixer Functions 29. Channel gain The gain control allows you to adjust the input-sensitivity for a channel. And thus optimally matching the incoming signals to the mixer’s internal operation level. 30/ 31/ 32. Channel equalizer section (hi/mid/low) Use the 3 band equalizer to adjust the tone for each channel by using the hi, mid and low controls. 33. Load/view 1 button Pushing this button loads the selected track in deck 1 and activates the cue function for channel 1.
Front Functions 48. Touch sensitivity A control This control allows you to adjust the touch sensitivity of jogwheel A. 49. Touch sensitivity B control This control allows you to adjust the touch sensitivity of jogwheel B. 50. Microphone input ¼” jack balanced microphone input. This input will function best with balanced TRS jacks. 51. Microphone volume control Use to adjust the volume of the microphone channel. 52. Channel 3 input switch This switch will only be recognized in the virtualdj pro full version.
Back Functions 58. Power on/off switch Allows you to turn the device on or off. 59. DC in 7,5V 2A Use the included adapter only. 60. USB connector To connect your Kontrol D4i to a PC / laptop/ Mac. 61. Master XLR out L/R Use these outputs to connect an amplifier/mixer with balanced inputs. 62. Master RCA out L/R Use these outputs to connect an amplifier/mixer with unbalanced inputs. 63. Booth RCA out L/R Use these outputs to connect an amplifier/mixer with unbalanced inputs. 64.
Operations Selecting Folders • Make sure you’re in the file system/ folder structure panel (see page 24). Push the back (46) button to return to the file system/ folder structure panel if you are in the file/ search results panel. Dial the track select (43) encoder to browse the folders. • Push the track select (43) encoder to open the desired folder. Now you’re in the file/ search results panel and are ready to select a track as described before.
Setting a hot cue point in play mode • During play mode, push the desired hot cue (1/2 beats (4), 2/4 beats (15), 3/8 beats (22), 4/16 beats (23)) button. • The hot cue point is stored while playback resumes. • The hot cue point will be indicated in the waveform display as shown in figure 6. (Hot) Cue Points Fig.
Loop play • Push the in/smart loop (7) button to set the loop start point the button will start blinking. • Push the out/reloop (26) button to set the loop end point. After the end point is set, the playback will enter the loop play from start point to end point repeatedly. Both the in/smart loop (7) button and the out/reloop (26) button will blink. • Tap the out/reloop (26) button to cancel the loop play. Both the in/smart loop (7) and out/reloop (26) buttons will dim.
Software Installation System requirements: PC Minimum system requirements: Intel® Pentium® 4 or AMD Athlon™ XP 1280x1024 resolution DirectX compatible soundcard 512MB RAM 50MB free on the hard drive Recomended system requirements: Intel® Core™ 2 or AMD Athlon™ X2 1280x1024 resolution Multi-channel DirectX compatible soundcard 1024MB RAM 200MB free on the hard drive Additional requirements for Video mixing: 2048MB (2GB) RAM ATI™ or NVIDIA® video card w/256MB of Dedicated DDR3 RAM V
Installation procedure: Be sure to turn off the power supply to all equipment as well as the computer. Use an USB cable to connect the Kontrol D4i and your computer. Turn on the power supply of your Kontrol D4i, your computer and then your amplifier/ active speakers. Insert the CD-ROM into the computers CD-drive and follow the instructions. Running the setup program. Follow the steps below. 1.
4. The Setup screen will pop up. Click the Typical button. 5. The Installation screen will pop up. Click the Install button. 6. If the installation is finished the screen below will pop up. Press the finish button to complete your installation.
Running the Virtual DJ-software for the first time 1. Double click the Virtual DJ icon on the desktop. A pop up screen asking you to enter your serial number will pop up. 2. Double click the Virtual DJ icon on the desktop. A pop up screen asking you to enter your serial number will pop up. 3. Enter the serial number you received with your purchase (sticker on inside CD-cover flap) and click the OK button. 4. Virtual DJ will check for a new version (this can be disabled in the configuration section).
To the right of the soundcard menu are two drop down menus to choose respectively the first and the second soundcard. In the example shown, the first two channels of the Kontrol D4i’s internal soundcard are routed to the master outputs and second two channels are routed to the headphones output. When setup correctly, press the apply button and then press the OK button.
Interface zones Before beginning to use Virtual DJ, familiarize yourself with the controls and zones of the Software. Upon opening the application, an interface is displayed. Interfaces called skins feature different configurations, layouts and functionality of the software. Let’s begin by selecting Internal Mixer interface to become familiar with the most important features of the software. To change to a different skin while the software is running, click on the Config menu and select the skins tab. 1.
Browser panels 1. File System/Folder Structure 2. File/Search Results For more information on the Virtual DJ software, we suggest checking the Support Section on http://www.virtualdj.com/ . Here you can find manuals, forums etc. Sampler panels Gives you acces to more sample parameters. For more information on the Virtual DJ software, we suggest checking the Support Section on http://www.virtualdj.com/ . Here you can find manuals, forums etc. Effects panels Gives you acces to more effect parameters.
Record panels Gives you acces to a recorder. For more information on the Virtual DJ software, we suggest checking the Support Section on http://www.virtualdj.com/ . Here you can find manuals, forums etc. Maintenance The DAP Audio Kontrol D4i requires almost no maintenance. However, you should keep the unit clean. Disconnect the mains power supply, and then wipe the cover with a damp cloth. Do not immerse in liquid. Do not use alcohol or solvents. Keep connections clean.
Virtual DJ pro does not react on the controller. No correct driver in folder devices. No correct mapping in folder mappers. No correct skin in folder skins. Sound from controller despite all faders are in minimum position. Analog input 3 and 4 are not functioning with Virtual DJ LE software. Analog input switches 3 and 4 are not functioning with Virtual DJ Pro software. Incorrect soundcard settings. The analog inputs 3 and 4 are only functional with the Virtual DJ Pro software.
Product Specification Channels: 4 Decks: 4 Controllers: 102 16Bit 44,1Khz Inputs: 1 x Microphone, 6,3mm Jack 2x Line, RCA 2x Phono, RCA Soundcard: 4 In / 4Out Sampling Frequency: 44,1 KHz Audio Resolution : 16 bit Output level: 1,2V+-0.2V THD+N:< 0,05% S/N:> 80dB Crosstalk: > 80dB Outputs: 1 x Master unbalanced, RCA 1 x Master balanced, XLR 1 x Booth, RCA 1 x Headphone, 6,3mm Jack Power-supply: External adapter 7,5V DC Power consumption: 2000mA Dimensions: 474 x 334 x 66.
Midi Implementation function basic channel Transmitted 1,2, 3, 4, 5, 6 X Recognized X X X X X X X X X X X *1 Pitch bend 20(16) -75(16) X O X X X O Control change 05(16) - 3B(16) X *2 True# X X X X X X Song pos Song Sel Tune Clock Commands Local ON/OFF All Notes OFF Active Sense Reset X X X X X X X X X X X X X X X X X X Mode Default Changed Default Messages Altered Note number Velocity After touch True voice Note ON Note OFF Key's Channel Prog Change SysEx Common System real time Aux M
*1: note numbers Deck 1: MIDI Channel 1 Deck 2: MIDI Channel 2 Deck 3: MIDI Channel 3 Deck 4: MIDI Channel 4 note number function 20 FX select up 21 FX select down 22 sample select up 23 sample select down 24 FX on/off 25 autoloop 26 sample rec 27 sample play 28 1 29 2 2A 3 2B 4 2D in 2E out 2F scratch 30 keylock 31 sync 32 cue 33 play 35 X1/2 shift 36 X2 shift 37 deck switch Mixer: MIDI Channel 5 note number 60 function track encoder (push) 66 ch.
*2: control change numbers Deck 1: MIDI Channel 1 Deck 2: MIDI Channel 2 Deck 3: MIDI Channel 3 Deck 4: MIDI Channel 4 control change number function 10 Jogwheel 11 FX parameter 1 12 FX parameter 2 13 key 14 sample volume Mixer: MIDI Channel 5 control change number function 5 track encoder 21 ch. 1 gain 22 ch. 1 hi 23 ch. 1 mid 24 ch. 1 low 25 ch. 1 filter 26 ch. 1 fader 27 ch. 2 gain 28 ch. 2 hi 29 ch. 2 mid 2A ch. 2 low 2B ch. 2 filter 2C ch.
Touch sensitivity controls: MIDI Channel 6 control change number function 10 touch sens. A 20 touch sens.