
Programming instructions


Chapter 26 Measuring Frequency and Period
LabVIEW Data Acquisition Basics Manual 26-8
©
National Instruments Corporation
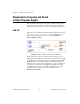
frequencies, use the Measure Frequency < 1 kHz (8253) VI located in
labview\examples\daq\8253.llb
. This VI uses three counters. The
other limitation is that there is a small software dependency, which causes
counter 0
to output a pulse slightly longer than the count it is given. This
is the nature of the 8253 chip, and it can increase the readings of high
frequencies. To avoid this software delay, use the Measure Frequency - Dig
Start > 1 kHz (8253) located in
labview\examples\daq\8253.llb
. For
a complete description of each example, refer to the information found in
Windows»Show VI Info…
.
Measuring the Period and
Frequency of Low Frequency Signals
How you measure the period and frequency of low frequency signals
depends on which counter chip is on your DAQ device. If you are uncertain
which chip your DAQ device has, refer to your hardware documentation.
DAQ-STC
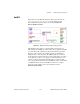
Figure 26-9 shows the Measure Period-Easy (DAQ-STC) VI located in
labview\examples\daq\DAQ-STC.llb
. This example uses the Easy
VI, Measure Pulse Width or Period located in
Functions»Data
Acquisition»Counter
.
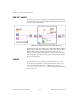
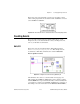
Figure 26-9.
Diagram of Measure Period-Easy (DAQ-STC) VI
You connect your signal of unknown period to the GATE of
counter
.
The counter measures the period between successive rising edges of your
TTL signal by counting the number of internal
timebase
cycles that occur
during the period. The
period
is the count divided by the timebase. The
frequency
is determined by taking the inverse of the
period
. You must
choose
timebase
such that the counter does not reach its highest value,