
Programming instructions


Chapter 2 Installing and Configuring Your Data Acquisition Hardware
LabVIEW Data Acquisition Basics Manual 2-8
©
National Instruments Corporation
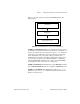
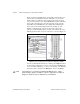
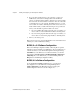
Figure 2-5 shows the NI-DAQ Device Configuration window. When you
are in the Device Configuration window of the utility, you can edit the
default settings for parameters, such as analog input polarity and range
on a per-device basis. If you are using AMUX-64T or signal conditioning
devices with your DAQ device, select the appropriate device using the
Accessories
menu. LabVIEW uses these settings when initializing the
device instead of the default settings listed in the descriptions of the
hardware configuration VIs. (You can use these VIs to change any
setting recorded by NI-DAQ.) When you click on the name of the device,
NI-DAQ displays the I/O connector for the device, as shown in Figure 2-5.
Figure 2-5.
Device Configuration and I/O Connector Windows in NI-DAQ
You also can find helpful information by clicking on the
Help
button. If at
any time during configuration you need to view a list of the LabVIEW DAQ
error codes and their meanings, you can do so by clicking on the NI-DAQ
menu bar, located to the right of the
Help
button, and choosing
Errors
.
Note
Some DAQ devices, such as the Lab-NB and NB-MIO-16 devices, require
hardware jumper changes in addition to software configuration. Consult your
DAQ device hardware reference manual for more information.