
Programming instructions


Chapter 2 Installing and Configuring Your Data Acquisition Hardware
©
National Instruments Corporation 2-9 LabVIEW Data Acquisition Basics Manual
Installing and Configuring Your SCXI Chassis
The following section describes the procedures for installing and
configuring your SCXI chassis.
Hardware Configuration
Your SCXI hardware kit includes the
Getting Started with SCXI
manual,
which contains detailed instructions for assembling your SCXI system,
module jumper settings, cable assemblies, and terminal blocks. The
following are the basic steps you must complete to assemble your
SCXI system.
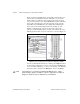
1. Check the jumpers on your modules. Generally, you will leave the
jumpers in their default positions. However, the
Getting Started with
SCXI
manual contains a section for each module type that lists cases
where you might want to change the jumper settings.
2. Turn off the chassis power. Plug in your modules through the front of
the chassis. You can put the modules in any slot. For simplicity, start
with slot 1 on the left side of the chassis and move right with each
additional module. Be sure to tightly screw the modules into the
chassis frame.
3. If you are using an SCXI-1180 feedthrough panel, you must install the
SCXI-1180 in the slot immediately to the right of the module that you
will cable to the DAQ device. Otherwise, the cable connectors might
not fit together conveniently.
4. If you have more than one chassis, select a unique jumpered address
for each additional chassis by using the jumpers directly behind the
front panel of the chassis.
5. Plug the appropriate terminal blocks into the front of each module and
screw them tightly into the chassis frame.