
Programming instructions


Chapter 7 Buffering Your Way through Waveform Acquisition
LabVIEW Data Acquisition Basics Manual 7-2
©
National Instruments Corporation
you can use a data buffer in computer memory as your shopping bag with
which you acquire data.
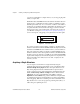
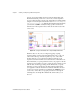
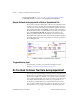
With buffered I/O, LabVIEW transfers data taken at timed intervals from
a DAQ device to a data buffer in memory. Figure 7-1 illustrates how the
data fills up the buffer only once, however the overall size of the buffer is
specified in your VI. In this illustration, think of
N
as the number of scans
or updates the buffer can hold, and
T
as the trigger occurrence whether
the trigger is because of an external signal or the start of the execution of
your VI. Refer to Chapter 8,
Controlling Your Acquisition with Triggers
,
for more descriptions on triggering your acquisition from another signal.
Figure 7-1.
How Buffers Work
In your VI, you must specify the number of samples to be taken and the
number of channels from which LabVIEW will take the samples. From this
information, LabVIEW allocates a buffer in memory to hold a number of
data points equal to the number of samples per channel multiplied by the
number of channels. As the data acquisition continues, the buffer fills with
the data; however, the data may not actually be accessible until LabVIEW
acquires all the samples (N). Once the data acquisition is complete, the data
that is in the buffer can be analyzed, stored to disk, or displayed to the
screen by your VI.
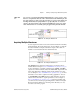
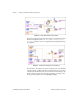
Acquiring a Single Waveform
You can acquire a waveform from a single channel by using the
AI Acquire Waveform VI, shown in Figure 7-2. You can find this VI in
Functions»DAQ»Analog Input
. Because AI Acquire Waveform is an
Easy Analog Input VI, it has the minimal number of inputs needed to
acquire a waveform from a single channel. These minimal inputs are the
device
,
channel string
,
number of samples
from the channel, and the
sample rate
. You can programmatically set the
gain
by setting the
high limit
and the
low limit
. Using only the minimal set of inputs makes
programming the VI easier, but the VI lacks more advanced capabilities,
such as triggering. Built-in error handling is another useful feature of the
Easy VIs. If an error occurs, the program stops running and notifies you
with a dialog box explaining the error.
writing and reading
T
N