
Instruction Manual

Miniature Drill Attachment
#70 through 1/16” ( .75 - 1.5 mm)
(DAREX Part # 4400)
Installation and Operating Instructions
Installation
The easiest way to use this attachment is to first learn the oper-
ating procedure of the standard sharpener and chuck. Once you
have mastered the sharpening of drills at least 1/8” and up, you
will find it much easier to use the miniature drill attachment.
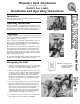
Mount the alignment fixture and magnifier as shown using the
screws provided. (See Fig. 1)
Operating Instructions
Figure 1
Alignment
Instead of setting the position of the pawls with a drill size lever,
they are positioned by squeezing them together with your thumb
and forefinger as shown. (See Fig. 2)
After the chuck is inserted into the alignment fixture as far as it
will go, squeeze the pawls together so they are touching the
drill. Now rotate the chuck until the flutes of the drill are caught
by the pawls, as shown (See Fig. 3)
Figure 2
Figure 3
Figure 4
Once the flutes are caught, continue to hold the drill by squeez-
ing the pawls and continue rotating the chuck until the chuck
arrow aligns with the chuck band arrow corresponding to the
point angle you will be sharpening. Now secure the chuck by
depressing the chuck grip lever and turn the chuck closing knob
until the drill is tight in the chuck.
On especially small drills it may be helpful to swing the magnifi-
er down to see if the drill is properly located in the pawls.
Sharpening the Drill
1. Only remove as much material as needed - it is very easy to
remove too much. With miniature drills you should just bare-
ly be able to see and/or hear the grinding operation.
2. When you have finished grinding and before you remove the
drill from the chuck, examine the drill under the magnifier. If
one lip appears longer than the other, put the chuck back
into the sharpening mechanism and remove a little more
material from the high lip. This can usually be done without
adjusting the feed knob since very little material usually
needs to be removed.
3. Before removing the drill from the chuck, examine the drill
through the magnifier for proper relief. If the relief is too
great, just re-insert it into the sharpening mechanism and
grind some more off the end of the drill. By doing this, you
work your way back along the twist of the drill which
reduces the relief angle. If you do not have enough relief,
you probably have removed too much material and must
start the alignment and sharpening procedure over.
4. Use a fine wheel of at least 180 grit or finer. (Part No. 4853
Cratex Ultra Fine wheel is available from DAREX).
(NOTE: the cutting edges do
not contact the pawls
as with the standard
alignment fixture.)