DAREX V390 Drill Sharpener ® 1/8” (3mm) to ¾” (19mm) size range OPERATING INSTRUCTIONS PP11852KF 03/20/06 Operating Instructions CAUTION! To reduce the risk of injury, the user must read and understand this instruction manual before using product. Save these instructions for future reference.
Table of Contents The Darex Story......................................................................................... Page 3 Safety Instructions..................................................................................... Page 4 Getting to Know Your V391......................................................................... Page 5 Drill Information......................................................................................... Page 6 Quick Step Instructions........................
The Darex Story Darex Corporation began in 1973 in Beecher, Illinois. The D, A and R of Darex are the initials of three generations of the Bernard family; David, Arthur and Richard Bernard. David and his father Richard founded Darex. Grandfather Arthur Bernard, who earlier founded the Bernard Welding Company contributed his energy and guidance to Darex until his death. Art’s inventions revolutionized the welding industry. In 1978, Darex relocated to Ashland, Oregon.
Safety Instructions WARNING: 21. TO MINIMIZE THE RISK OF INJURY, ALWAYS USE PROPER EYE AND RESPIRATORY PROTECTION: Everyday REMEMBER FOR YOUR OWN SAFETY, READ INSTRUCTION MANUAL eyeglasses only have impact resistance lenses and they are BEFORE OPERATING TOOL AND SAVE THESE INSTRUCTIONS. NOT safety glasses. (See Decal at Left.) Use appropriate Wear Eye Protection. Never touch internal parts of the sharpener respiratory face or dust mask. when the sharpener is on.
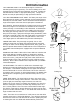
Getting to know your V390 Before you sharpen your first drill bit, please take a few minutes to familiarize yourself with your new DAREX V390 Drill Sharpener and its basic parts and features (shown below). The time it takes to read this page and the remainder of the manual will be made up when you sharpen your first drill bits. Vacuum Port Sharpening Port Wheel Cover Point Split Port Depth Adj. Knob Point Angle Bracket Point Angle Lock Knob Point Split Port Chuck Point Split Angle Adj.
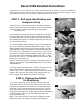
Drill Information 118º STANDARD POINT: This drill bit point angle is considered a standard general-purpose geometry. It is used for drilling soft or mild materials such as cold rolled steel, aluminum, and wood. Typically the standard drill bit is made of High Speed Steel (HSS). The tip of the drill bit can easily be split making it a high performance drill bit.
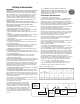
QUICK STEP INSTRUCTIONS A-1 (Detailed instructions start on page 9) A SELECT POINT ANGLE 1. Determine angle of your drill bit (A-1) 2. Set point angle from 118 to 140 degrees (A-2). 3. Set relief paddle to +1 for 118 or -1 for 135-degree point angles. These are starting reference values, settings may need adjustment. (A-3) 4. Set material removal knob from 1 to 4. Approximate removal per digit .005 inch.
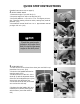
Quick Step 6. Make sure the drill tip is still up against stop, tighten the chuck. Remove from the alignment port. B-5 C SHARPEN DRILL BIT 1. Turn power switch to on. 2. Insert the chuck into the sharpening port with a slight lifting motion. 3. Rotate the chuck clockwise in half rotation increments, keeping consistent, slight downward and inward pressure on the chuck. Let the cam drive the natural in and out motion. 4.
Darex V390 Detailed Instructions If possible, the first couple of drill bits you sharpen should be about 3/8” in diameter, or a large enough drill bit to see the detail of the point. Study the machine information on page 5 and the drill information on page 6. Various drill bit facts and drill sharpener nomenclature will be referenced in these sections. STEP 1: Drill angle identification and sharpener set up A. Place the drill in a point angle gauge or mechanic’s protractor.
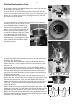
Detailed Instructions Cont. 10 Pic 6 B. Carefully push the relief paddle back all the way to the rear and hold it there. (See Picture #6) C. In the bottom of the alignment port is a locating pin, (See Picture #7) and located on the nose of the chuck is a milled slot. (See Picture #8) To insert the chuck into the alignment port, both the pin and slot must be aligned. Pic 7 For easier alignment, a reference line (See Picture #9) has been milled on the O.D.
Detailed Instructions STEP 3: Sharpening the drill point A. Push the Drill Sharpener switch to the ON ( | ) position. B. Insert the chuck into the sharpening port. While lightly pushing in and down, rotate the chuck clockwise in half rotation increments. The chuck will move in and out and the sharpening port will slightly swing during this process. Let the cams on the chuck dictate the natural in and out sharpening motion.
Machine Adjustments 12 diagrams (page 12 & 13) to help you understand split point drill bit geometry. A. Once the drill is sharpened, do not remove it from the chuck. Align the Point Split Tab Notch, on the chuck, with Point Split Tab on the point split angle adj. bracket. (See Picture # 16 Pic 18 & 17a & 17b) Make sure chuck is held in-line and square with the face of the point split port. B.
Thumbscrew Split Angle Adjustment: If the chisel angle of the drill has changed due to the relief ground on the drill, then the point split rotational angle may need to be changed. To adjust the split rotational angle, loosen the thumbPic 19 screw, (See Picture #19) located on the point split port. Move the bracket slightly to the left of the alignment detent (See Illustration 20) This will increase the split angle that is required if the relief has been increased.
Troubleshooting Q: I aligned the drill bit and sharpened it, but no material gets removed, why ? A: You may have allowed the paddle to knock the drill bit back into the chuck. Carefully realign the drill bit in the alignment port again. Making sure the drill bit is pushed all the way against the drill stop. A: You may not have tightened the chuck tight enough to hold the drill bit in place. When the drill bit hit the wheel it was pushed back into the chuck.
Q: The chisel edge on my drill bit is too long and flat! A: During the alignment process the pawls were not gripping "ON" the flutes of the drill bit. Re-align the drill bit making sure that the pawls are centered in the flutes. A: Too much heel relief. Realign drill bit toward the minus setting and re-sharpen. Q: After sharpening, the grind finish on my drill is rough! A: Grind finish is initially rough when sharpened on a new wheel. Drill performance will not be noticeably affected.
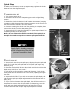
DAREX V390 MAINTENANCE Pic 25 Cleaning the DAREX V390 Unplug the Drill Bit Sharpener. Using a dry paintbrush or a cloth, clean the inside and outside of the Alignment, Sharpening and Splitting ports to remove any grindings that may have accumulated. (See Picture #25) The attachment of a vacuum with a standard vacuum hose works well to keep the grit area clean. (See “Vacuum Tube” below) Removing the wheel cover Unplug the Drill Bit Sharpener.
Vacuum tube PP11230TF) If a vacuum system is available it is strongly recommended to attach the air vacuum tube to the exhaust of the sharpening port. To attach the tube: Unplug the machine. Remove the wheel cover screws and remove the vacuum port plug. (See Picture #31) Insert the vacuum tube into the groove in the port. (See Picture #32) Re-install the screws that hold the wheel cover down. Attach a vacuum source to the 1-1/4" diameter tube.
1 2 3 3 4 5 6 7 8 9 9 10 11 12 13 13 14 15 16 16 17 17 18 19 20 21 22 23 24 25 26 26 DRWG # SA11308TA - PS Depth Screw w/spring Assy. SA11130TA - Grinding Wheel Retainer w/bolt Assy. PP11125GF - CBN Grinding Wheel (Standard) PP11115GF - DIA Grinding Wheel (Optional) SA11335SA - PS Adjustment Brkt Assy. PP11200CF - Wheel Guard Casting SA11610TA - V390 Chuck Complete PP11605TF - V390 Chuck Body SA11612TA - V390 Steel Chuck Knob w/internal Assy.
WORLD’S BEST SELLING INDUSTRIAL DRILL SHARPENERS Phone: 800-547-0222 541-488-2224 Darex P O Box 730 210 E Hersey St Ashland, OR 97520 USA Fax: 541-488-2229 Email: techsupport2@darex.com Web: www.darex.