User guide Please read these instructions carefully before use and keep this User Guide for future reference! LJ-100
User Guide LJ-100 Please read these instructions carefully before use and keep this User Guide for future reference.
Contents LJ-100 Contents I. Introduction......................................................................................... Telephone features............................................................................... Function button index............................................................................ II. Getting started................................................................................... How to connect the batteries.....................................................
I. Introduction LJ-100 I. Introduction Important! Please read these instructions carefully before use and keep this User Guide for future reference. Telephone components supplied: ! telephone set (base unit + handset), ! handset cord, ! line cord, ! stand, ! user guide, ! guarantee card.
I.
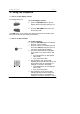
I. Introduction # LJ-100 Function button index 1. 2. 3. 4. 5. 6. 7. 8. 9. 10. 11. 12. 13. 14. 15. 16. 17. 18. 19. 20. 21. 22. 23. 24. 25. 26. 27. 28. 29. 30. 31. 32. 33. 34. 35. NEW indicator M1...
I. Introduction LJ-100 Note! The line sockets TEL OUT, TEL IN, the RINGER Hi/Low switch, the DIAL MODE T/P switch, the DC9V socket, the handset socket are located on the side of the base unit. In addition, on the bottom of the base unit, is the socket for blocking telephone numbers.
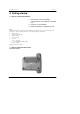
II. Getting started LJ-100 II. Getting started # How to connect the batteries ♦ ♦ ♦ Remove the cover of the battery compartment on the underside of the base unit. Fit three 1,5V AA batteries, Replace the battery compartment cover. Note! Instead of batteries, the adaptor to the DC9V socket, which is placed on the side of the base unit can be connected.
II. Getting started # LJ-100 How to connect the handset and telephone line ! ! Plug one end of the coiled handset cord into the handset and the other end into the socket on the side of the telephone. Insert the base unit’s telephone line plugs into the PTT wall socket and telephone socket TEL IN as shown on the illustration. Note! The telephone is equipped with two line sockets. These sockets are connected in parallel. It does not matter, where the telephone line and second telephone are connected.
III. Using the telephone LJ-100 III. Using the telephone # How to set the display contrast The setting factory is 3. To set the display contrast: ♦ press the SET/HOLD button, until the display will show the right setting for you. BRT/SLP DEL/TIME ♦ Press the DEL/TIME button to return to the standby mode. If the DEL button is not pressed, the telephone will return to standby mode after several seconds. The setting will be stored.
III. Using the telephone 2 ABC GHI 5 JKL PQRS 8 TUV / 0 OPER 1 4 7 3 6 9 DEF MNO WXYZ /= LJ-100 month: ! press the 2 button, the next digit will start to flash, ! press the 7 button. ♦ After setting the day, the first digit indicating the hours will start to flash. Use the keypad to enter the right digits. For example, if you want to set 16.00: ! press the 1 button, the second digit will start to flash, ! press the 6 button.
III. Using the telephone SET/HOLD 2 ABC GHI 5 JKL PQRS 8 TUV / 0 OPER 1 4 7 UP/+ 3 DEF 6 9 MNO WXYZ /= DOWN/- DEL/TIME LJ-100 To select one ringer melody: ♦ press the SET/HOLD button. The display will show - 0 1 2 3 4 5 6 7 -. ♦ Press the 7 button. The display will show an actual setting rING 09. The ringer melody will be played. ♦ Press the UP/+ or DOWN/- button to select the right signal (melody). ♦ Press the SET/HOLD button to confirm the setting.
III. Using the telephone # LJ-100 How to make a call SP-PHONE 2 1 4 7 ABC GHI 5 JKL PQRS 8 TUV / 0 OPER 3 6 9 To make a call: ♦ lift the handset from the base unit or ♦ press the SP-PHONE button. The display will show the timer. ♦ DEF MNO WXYZ /= ♦ SP-PHONE When the PTT on-line signal is heard, the required number should be dialed. The number will be displayed. After several seconds, the call time counter will be switched on.
III. Using the telephone # LJ-100 OUT memory Your telephone can store 30 the most recently dialed numbers in the OUT memory. They can be reviewed by pressing the OUT/X button in standby mode. Each number may consist of up to 16 digits. To review OUT numbers: ♦ press the OUT/X button. The display shows the last number dialed. ♦ Press the OUT/X button again to display the time of this call and the number of the memory location. OUT/x ♦ Press the OUT/X button again.
III. Using the telephone LJ-100 ♦ DEL/TIME Press the DEL/TIME button twice. The number will be removed. To delete the all numbers: ♦ Press the OUT/X button. ♦ Press and hold the DEL/TIME button until - - - End - - - is displayed. After several seconds, the telephone will return to standby mode. All numbers will be removed. # Last number redial Your telephone automatically stores the last number dialed of up to 32 digits long. This function can be used, when the number is busy.
III. Using the telephone LJ-100 SP-PHONE VIP/P 2 ABC GHI 5 JKL PQRS 8 TUV / 0 OPER 1 4 7 3 6 9 DEF To enter a pause: ♦ lift the handset or press the SP-PHONE button. ♦ Enter the access code for an outside line, for example 0. ♦ Press the VIP/P button to enter a pause. The symbol P will be showed on the display. MNO WXYZ /= SP-PHONE ♦ Enter the remaining digits of the telephone number. ♦ After your call, replace the handset on the base unit or press the SP-PHONE button.
III. Using the telephone LJ-100 will automatically be able to hear music. This function may be used, for example, in offices while a client is on hold. SET/HOLD To switch the hold music on: ♦ inform the person on the other end of the line about a music pause. ♦ Press the SET/HOLD button. The display will show Hold. The telephone will start to play music. The NEW indicator will light up.
III. Using the telephone 2 ABC GHI 5 JKL PQRS 8 TUV / 0 OPER 1 4 7 3 6 9 LJ-100 ♦ DEF MNO Enter the number, to be stored in the memory. The number will be displayed. WXYZ /= Note! The pause can be stored in the memory by pressing VIP/P button. M1 M2 ♦ Press the STORE button a second time. ♦ Now press one of the number buttons (M1-M7). This gives you the code under which your number will be stored. The telephone will return to standby mode.
III. Using the telephone ! LJ-100 Two-touch memory STORE 2 ABC GHI 5 JKL PQRS 8 TUV / 0 OPER 1 4 7 3 6 9 To store a number in the memory: ♦ press the STORE button. The display will show INPUt CodE_. ♦ DEF MNO Enter the number, to be stored in the memory. The number will be displayed. WXYZ /= Note! The pause can be stored in the memory by pressing VIP/P button. 2 ABC GHI 5 JKL PQRS 8 TUV / 0 OPER 1 4 7 STORE ♦ Press the STORE button a second time.
III. Using the telephone LJ-100 Note! 1. Storing a number in the memory automatically deletes any previous number kept under the individual code number you choose. 2. The stored numbers can be reviewed in the standby mode. To display the number from the code number key: ! press the RECALL button, ! press the code number key. The number will be displayed. ! How to delete a number from one-touch and two-touch memory DEL/TIME # During the review: ♦ Press the DEL/TIME button twice.
III. Using the telephone LJ-100 How to transfer a call. FLASH 2 ABC GHI 5 JKL PQRS 8 TUV / 0 OPER 1 4 7 3 6 9 To transfer a call from one internal number to another: ♦ press the FLASH button. DEF MNO WXYZ ♦ Enter the number, to which you want to transfer the call. ♦ Replace the handset on the base unit. /= # How to lock the telephone numbers.
III. Using the telephone 2 ABC GHI 5 JKL PQRS 8 TUV / 0 OPER 1 4 7 3 6 9 DEF MNO WXYZ /= SET/HOLD DEL/TIME LJ-100 2. Press the 5 button. The display will show AL 123. 3. Press the 1 button to set the first alarm. The display will show symbol AL 1OFF. Alarm is off. 4. Press the */. button to switch alarm on. The display will show AL 1 12-00. The first digit of the clock will flash. 5. Using the keypad, enter the hour and minute.
III. Using the telephone Note! ! ! LJ-100 The alarm will only function when the batteries are located in the battery compartment or the base unit is connected to a power supply. To switch the alarm off, set the AL 1OFF symbol by pressing the */. button. # „Don’t disturb” function. Your telephone allows the ringer to be switched off. The telephone will not then ring, with the exception of the VIP numbers (see chapter :„VIP function” ).
III. Using the telephone LJ-100 # Calculator Your telephone may be used as calculator. To switch the calculator on/off press the CAL button. After pressing this button, the display will show the digit 0. Below is a description of all button functions: ♦ the OUT/x button– multiplication, ♦ the BACK/÷ ÷ button- division, ♦ the UP/+ button- addition, ♦ the DOWN/- button- subtraction, ♦ the DEL/TIME button– clearing of data, ♦ the BRT/SLP button- addition and subtraction, ♦ the */.
IV. Clip (Caller ID)- Calling line identification presentation LJ-100 IV. Clip (Caller ID)- calling line identification presentation Note! CLIP function is only available if you have subscribed to the relevant TP S.A. services or those of another Provider. If more information is required, please contact the BOK (Customer Service Office) office in your area.. Your telephone displays and stores the number of the caller.
IV. Clip (Caller ID)- Calling line identification presentation LJ-100 To review all numbers: ! press the UP/+ button, the display will show the number stored in the first memory location. After next pressing the UP/+ button, the display will show date and time. ! Press the DOWN/- button, the display will show the number stored in the last memory location. After next pressing the DOWN/+ button, the display will show date and time.
IV. Clip (Caller ID)- Calling line identification presentation LJ-100 Press the VIP/P button. The display will show the VIP symbol. ! The above steps can be repeated for the next number. If no further buttons are pressed, the telephone will return to standby mode after several seconds. The settings will be stored. To remove the VIP symbol : ! press the UP/+ or DOWN/- button to select the VIP number. ! Press the VIP/P button. The VIP symbol will disappear from the display.
IV. Clip (Caller ID)- Calling line identification presentation SP-PHONE # ♦ LJ-100 on, the prefix will be added and the number will be dialed automatically. Replace the handset or press the SP-PHONE button to end the call. How to set the prefix SET/HOLD 2 ABC GHI 5 JKL PQRS 8 TUV / 0 OPER 1 4 7 3 6 9 DEF MNO WXYZ /= To enter the prefix: ♦ press the SET/HOLD button. The display will show - 0 1 2 3 4 5 6 7 -. ♦ Press the 3 button. The display will show CodE - 12 -.
IV. Clip (Caller ID)- Calling line identification presentation SET/HOLD 2 ABC GHI 5 JKL PQRS 8 TUV / 0 OPER 1 4 7 3 6 9 DEF MNO WXYZ /= DEL/TIME LJ-100 To enter the local area code: ♦ press the SET/HOLD button. The display will show - 0 1 2 3 4 5 6 7 -. ♦ Press the 4 button. The display will show ArEA - - - - -. ♦ Using the keypad, enter the local area code. ♦ Press the SET/HOLD button to confirm the setting. ♦ Press the DEL/TIME button. The telephone will return to standby mode.
V. Connecting the headphone LJ-100 V. Connecting a headphone The telephone is equipped with a socket, which allows a headphone to be connected.
VI. Help LJ-100 VI. Help Please read this Troubleshooting Guide in case of difficulty. ♦ No signal in the the handset: ! check that the telephone is connected to the telephone line. ♦ ! ! ♦ ! ! No dial tone: check that the telephone is connected to the telephone line, check that the DIAL MODE T/P switch is in the correct position.
VI. Help # LJ-100 Important advice ♦ ♦ ♦ ♦ ♦ ♦ Never use your telephone during a thunderstorm. Unplug it from the telephone line and the mains socket when there are storms in your area The telephone should not be installed near a sink, bath or shower. Electrical appliances can cause serious injury if the user is wet or standing in water. The telephone should be cleaned only when disconnected from the telephone PTT line. Please clean the telephone with a soft cloth to prevent scratching.
Declaration of Conformity (CE) LJ-100 DECLARATION OF CONFORMITY MANUFACTURER'S NAME: Przedsiębiorstwo “DARTEL” ADDRESS: 29-100 Włoszczowa, Podlipie 26 TYPE OF PRODUCT: Corded phone PRODUCT NAME: LJ-100 We inform, our products conform to the requirements of the following Directives and Norms: 1) Radio & Telecom Terminal Equipment Directive 99/5/EEC, 2) Low Voltage Directive 73/23EEC, norm PN-EN 60950 -1, 3) Electromagnetic Compatibility Directive (EMC) 89/336/EEC, norm PN-EN 55022, norm PN-EN 55024