
Specifications
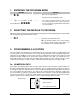
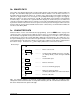

LCD KEYPAD 9
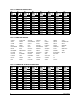
6b. ADJUSTING THE VIEW & BRIGHTNESS OF THE LCD
ACTION RESULT
Prompts to “Please Enter Your Code".
[master code]
Prompts to raise or lower the View angle.
or
Using the scroll keys to the right of the LCD, you
can raise or lower the viewing angle of the text.
Advances to the Brightness option.
Prompts to brighten or dim the LCD lighting.
or
Use the scroll keys again to adjust to desired
brightness.
Exits this mode.
6c. CUSTOM MESSAGES
IMPORTANT NOTES
1) When using standard NX-148 keypad(s) and NX-148E keypad(s) in the same system, it is
necessary to use a NON-“E” keypad to program the custom messages. The NON-“E” keypads
can be identified by the fact that they do not display a menu when
is pressed.
2) The messages (custom, zone, and shutdown) are transferred to other LCD keypads after this mode
is exited. All keypads must be addressed and enrolled for this to happen.
3) Use the
function to set the keypad numbers prior to programming custom messages.
4) If a keypad is added after messages are programmed, you should either program ALL
messages in
it, or enter custom message programming on an existing keypad and make changes. This is to
prevent accidentally overwriting existing messages. Refer to
option to prevent overwriting
the custom message only.
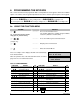
ACTION RESULT
Prompts to “Please Enter Your Code".
[program code]
The LCD will now prompt you to enter message
number followed by #.
Zones 1 through 192 custom messages are
message numbers 1-192 respectively.
Message 193 - Custom message top line.
Message 194 - Custom message bottom line.
Message 195 - Shutdown message top line.
Message 196 - Shutdown message bottom line.