7106 7206 7010 Ethernet Interface Installation Guide –1–
© August 2010 DASCOM Europe GmbH
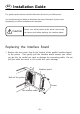
EN Installation Guide This guide explains how to install the Ethernet LAN card in your label printer. You should conult your dealer or distributor for more information if you are not completely sure of how to perform this operation. Caution Always turn off the power to the printer and remove the power cord before replacing the interface board. Replacing the Interface Board 1. Remove the two screws that fix the bracket of the parallel interface board to the printer.
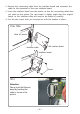
2. Remove the connecting cable from the interface board and reconnect the cable to the connector of the new interface board. 3. Insert the interface board into the printer so that the connecting cable does not catch on the printer. The new board is slightly larger than the original board, so the interface cable will need to be tucked in carefully. 4. Use the two screws that you removed to re-fix the bracket in place.
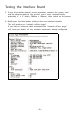
Testing the Interface Board 5. To test the interface board’s correct operation, connect the power cord and the ethernet cable to the printer, insert some standard media, preferably 4” x 4” labels, (100mm x 100mm), then switch on the power. 6. Briefly press the blue button visible on the new interface’s bracket. This will produce an “network self-test page”. If you have an ethernet cable connected the “network self-test page” will show you details of any network parameters already configured.
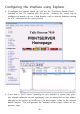
Configuring the Interface using Explorer 8. To configure the network board, you can use the “PrintServer Network Tools” included on the CD supplied with the printer. However, the easiest way to configure the board is to use a Web Browser, such as Internet Explorer, running on a PC connected to the same network. 9.
10. On the self-test, under the TCP/IP section, there will be a line saying “IP address” together with four groups of digits separated by dots. It should also say “asigned by DHCP” next to it. 11. Start “Internet Explorer” or a similar web browser on a PC connected to the same network. When entering this network address, you should remove the ‘leading zeros’ on the address. So for example you have to type “192.168.0.65” in to the address bar. 12.
DASCOM REPRESENTATIVES GERMANY DASCOM Europe GmbH Heuweg 3 D-89079 Ulm Deutschland Tel.: +49 (0) 731 2075 0 Fax: +49 (0) 731 2075 100 www.dascom.com UNITED KINGDOM DASCOM GB Ltd Hart House, Priestley Road Basingstoke, Hampshire RG24 9PU, England Phone: +44 (0) 1256 481481 Fax: +44 (0) 1256 481400 www.dascom.com R D R Le 1~ P F w SINGAPORE DASCOM AP Pte Ltd 21 Bukit Batok Crescent #29-81, WCEGA Tower Singapore 658065 Phone: +65 6760 8833 Fax: +65 6760 1066 www.dascom.