
Quick Reference Guide
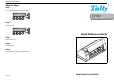

Quick Reference Guide
Load Paper
Step 1
Raise front cover, then open tractor flaps.
Step 2
Adjust tractors for paper width. Green lever unlocks/
locks (up is locked).
Step 3
Stack paper directly below tractor path.
Step 4
Press Load Key.
Step 5
Press Online Key.
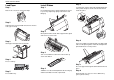
Install Ribbon
Step 1
Press Online Key (places printer offline) then remove
top cover by depressing spring loaded levers and
lifting up.
Step 2
Move print head to left side. Raise upper friction guide
and remove used cassette.
Step 3
Turn colored ribbon feed knob in order to take up
slack of the ribbon.
Step 4
Tilt ribbon cassette forward parallel to the housing top
and thread in ribbon in front of print head.
Step 5
Locate the two notches in the left and right guide rails
of the printer and press down on both sides until it
clicks into place.
Step 6
Turn colored ribbon feed knob again. The ribbon will
slide over the plastic guides on the left and right of the
print head into the correct position.
Step 7
Press the upper friction guide down until it clicks into
place.
Step 8
Remount and close top cover. Press Online Key
(places printer online)
90˚